JeepParts
My Garage
My Account
Cart
OEM 2006 Dodge Charger Door Latch Assembly
Door Latch- Select Vehicle by Model
- Select Vehicle by VIN
Select Vehicle by Model
orMake
Model
Year
Select Vehicle by VIN
For the most accurate results, select vehicle by your VIN (Vehicle Identification Number).
7 Door Latch Assemblys found


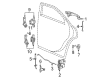
2006 Dodge Charger Lock Actuator, Rear Driver Side Part Number: 4575893AB
$140.38 MSRP: $210.00You Save: $69.62 (34%)Ships in 1-2 Business DaysProduct Specifications- Other Name: Latch - Rear Door; Rear Left Door Latch Assembly; Lock Actuator Motor; Lock Actuator.; Lock; Latch
- Position: Rear Driver Side
- Replaces: 4575893AA, 4589043AC, 4589043AD
- Item Weight: 1.50 Pounds
- Item Dimensions: 6.1 x 3.6 x 3.6 inches
- Condition: New
- Fitment Type: Direct Replacement
- SKU: 4575893AB
- Warranty: This genuine part is guaranteed by Mopar's factory warranty.


2006 Dodge Charger Lock Actuator, Rear Part Number: 5056268AG
$72.92 MSRP: $110.00You Save: $37.08 (34%)Ships in 1-2 Business DaysProduct Specifications- Other Name: Latch - Decklid; Deck Lid Latch, Rear; Door Lock Actuator; Trunk Latch; Door Lock; Lock; Latch
- Position: Rear
- Replaces: 5056268AC, 5056268AF, 5056268AD, 5056268AA, 5056268AB, 5056268AE
- Item Weight: 1.30 Pounds
- Item Dimensions: 6.4 x 6.3 x 3.5 inches
- Condition: New
- Fitment Type: Direct Replacement
- SKU: 5056268AG
- Warranty: This genuine part is guaranteed by Mopar's factory warranty.

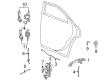
2006 Dodge Charger Lock Actuator, Rear Part Number: 4575892AA
$126.90 MSRP: $189.00You Save: $62.10 (33%)Ships in 1-2 Business DaysProduct Specifications- Other Name: Latch - Rear Door; Door Lock Actuator Motor; Door Lock Actuator; Door Lock; Latch Rear Door
- Position: Rear
- Replaced by: 4575892AB
- Replaces: 4589042AD, 4589042AC
- Item Weight: 1.70 Pounds
- Item Dimensions: 6.1 x 3.0 x 2.8 inches
- Condition: New
- Fitment Type: Direct Replacement
- SKU: 4575892AA
- Warranty: This genuine part is guaranteed by Mopar's factory warranty.

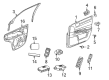
2006 Dodge Charger Lock Actuator, Front Part Number: 4575894AA
$95.23 MSRP: $141.00You Save: $45.77 (33%)Ships in 1-3 Business DaysProduct Specifications- Other Name: Latch - Front Door; Door Lock Actuator Motor; Door Lock Actuator; Door Lock; Latch Front Door
- Position: Front
- Replaced by: 4575894AB
- Item Weight: 1.60 Pounds
- Item Dimensions: 6.2 x 4.1 x 2.8 inches
- Condition: New
- Fitment Type: Direct Replacement
- SKU: 4575894AA
- Warranty: This genuine part is guaranteed by Mopar's factory warranty.
2006 Dodge Charger Lock Actuator, Front Driver Side Part Number: 4575895AB
$141.50 MSRP: $212.00You Save: $70.50 (34%)Ships in 1-2 Business DaysProduct Specifications- Other Name: Latch - Front Door; Door Latch Assembly, Front Left; Lock Actuator Motor; Lock Actuator.; Latch
- Position: Front Driver Side
- Replaces: 4575895AA, 4589071AC, 4589071AB
- Item Weight: 1.50 Pounds
- Item Dimensions: 6.3 x 3.9 x 3.7 inches
- Condition: New
- Fitment Type: Direct Replacement
- SKU: 4575895AB
- Warranty: This genuine part is guaranteed by Mopar's factory warranty.
2006 Dodge Charger Lock, Rear Passenger Side Part Number: 4575892AB
Product Specifications- Other Name: Latch - Rear Door; Rear Right Door Latch Assembly; Lock Actuator Motor; Lock Actuator.; Latch
- Position: Rear Passenger Side
- Item Weight: 1.70 Pounds
- Item Dimensions: 6.6 x 3.9 x 3.4 inches
- Condition: New
- Fitment Type: Direct Replacement
- SKU: 4575892AB
- Warranty: This genuine part is guaranteed by Mopar's factory warranty.

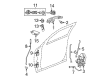
2006 Dodge Charger Latch, Front Passenger Side Part Number: 4575894AB
Product Specifications- Other Name: Latch - Front Door; Door Latch Assembly, Front Right; Door Latch Assembly; Door Lock Actuator; Door Lock
- Position: Front Passenger Side
- Replaces: 4589072AC, 4575894AA, 4589072AB
- Item Weight: 1.70 Pounds
- Item Dimensions: 6.3 x 3.9 x 3.6 inches
- Condition: New
- Fitment Type: Direct Replacement
- SKU: 4575894AB
- Warranty: This genuine part is guaranteed by Mopar's factory warranty.
2006 Dodge Charger Door Latch Assembly Parts and Q&A
- Q: How to Service and Repair a Front Door Latch Assembly on 2006 Dodge Charger?A: Start by taking the inside panel, speaker and watershield off the front door to access the latch. After that, take out the screw connecting the bottom of the pull cup bracket and window regulator rear rail next and undo the one holding down the top of the pull cup bracket. Take out the upper pull cup bracket screw from its keyed hole and then take away the bracket. Release the plastic clip joining the interior door latch lock link to the latch lever and detach the link, leaving the interior door latch lock and knob loose. Do the same process for the latch release links on both the interior and exterior door handles and also for the driver side front door, separate the link from the lock cylinder lock actuator. Pull out the three screws joining the latch to the outside part, then pull the latch forward to free up and remove the door connector. Pull the latch out of the door shell. To install, link the door wire harness connector to the door's latch, fit the latch to the front part and screw in the three parts at 12 N.m (108 in.lbs.). To seal the front driver door, push the lock cylinder actuator link and clip the plastic clip into place and then treat the door handle as you did before. Place the interior door latch lock link and knob unit into the front door and join the interior door latch lock link to the latch lever. Fit in the upper screw by hand, set and secure the lower screw at 11 N.m (100 in.lbs.) to hold the bottom of the pull cup bracket and window regulator in place and secure the top screw at 10 N.m (90 in.lbs.). Fit the watershield, speaker and trim panel back onto the vehicle. Ultimately, from outside the garage, use a wrench to adjust the screw in the access port on the outer latch, move the outside latch release handle two or three times and tighten the adjusting screw again.
Related 2006 Dodge Charger Parts
 2006 Dodge Charger Speedometer
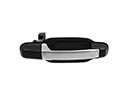 2006 Dodge Charger Door Handle
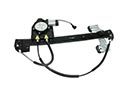 2006 Dodge Charger Window Regulator
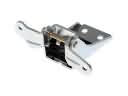 2006 Dodge Charger Door Hinge
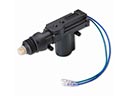 2006 Dodge Charger Door Lock Actuator
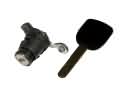 2006 Dodge Charger Door Lock Cylinder
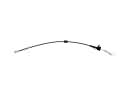 2006 Dodge Charger Door Latch Cable
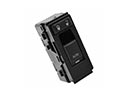 2006 Dodge Charger Door Lock Switch
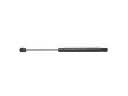 2006 Dodge Charger Lift Support
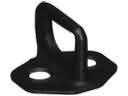 2006 Dodge Charger Rear Door Striker
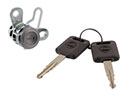 2006 Dodge Charger Tailgate Lock
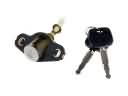 2006 Dodge Charger Trunk Lock Cylinder