JeepParts
My Garage
My Account
Cart
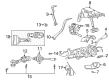
OEM 2006 Dodge Dakota Steering Column Cover
Steering Column Cover Bezel- Select Vehicle by Model
- Select Vehicle by VIN
Select Vehicle by Model
orMake
Model
Year
Select Vehicle by VIN
For the most accurate results, select vehicle by your VIN (Vehicle Identification Number).
6 Steering Column Covers found


2006 Dodge Dakota Lock Cover, Blue / Gray / Taupe, Lower Part Number: 5GE09BD1AD
$173.35 MSRP: $255.00You Save: $81.65 (33%)Product Specifications- Other Name: Shroud - Steering Column; Steering Column Cover, Lower, Upper; Lower Shroud; Upper Shroud; Lock Housing Cover; Shroud; Shroud Steering Column
- Position: Lower
- Replaces: 5GE09WL8AB, 5GE09DX9AC, 5GE09XDVAD, 5GE09DX9AB, WG451L8AC, 5GE09DX9AD, WG451DVAC, WG451QLAC, 5GE09XTMAB, WG45WL8AD, WG45YQLAD, 5GE09XDVAB, WG45XDVAD
- Item Weight: 1.00 Pounds
- Item Dimensions: 4.8 x 8.3 x 9.3 inches
- Condition: New
- Fitment Type: Direct Replacement
- SKU: 5GE09BD1AD
- Warranty: This genuine part is guaranteed by Mopar's factory warranty.


 Product Specifications
- Other Name: Shroud Package - Steering Column; Steering Column Cover, Lower, Upper; Lower Shroud; Shroud; Shroud Steering Column
- Position: Upper
- Replaces: 5GW81DX9AB, 5GW81DX9AC, WG47WL8AD, WG47XDVAD, WG471DVAC, WG47YQLAD, 5GW81DX9AD, WG471L8AC, WG471QLAC
- Item Weight: 1.30 Pounds
- Item Dimensions: 8.6 x 6.9 x 3.7 inches
- Condition: New
- Fitment Type: Direct Replacement
- SKU: 5GW81DX9AE
- Warranty: This genuine part is guaranteed by Mopar's factory warranty.


 Product Specifications
- Other Name: Shroud Package - Steering Column; Steering Column Cover, Lower, Upper; Lower Shroud; Upper Shroud; Shroud; Shroud Steering Column
- Position: Lower
- Replaces: 5GE10DX9AB, 5GE10DX9AD, 5GE10ZJ8AE, WG46WL8AD, WG461L8AC, 5GE10XDHAE, WG46XDVAD, WG461DVAC, 5GE10DX9AC, WG46YQLAD, WG461QLAC
- Item Weight: 0.80 Pounds
- Condition: New
- Fitment Type: Direct Replacement
- SKU: 5GE10DX9AE
- Warranty: This genuine part is guaranteed by Mopar's factory warranty.
- Product Specifications
- Other Name: Shroud Package - Steering Column; Steering Column Cover, Lower, Upper; Upper Shroud; Shroud; Shroud Steering Column
- Position: Upper
- Replaces: 5GW80DX9AC, 5GW80DX9AD, WG441QLAB, WG481QLAC, WG48XDVAD, WG481DVAC, 5GW80DX9AB, WG441DVAB, WG441L8AB, WG481L8AC, WG48YQLAD, WG48WL8AD
- Item Weight: 0.80 Pounds
- Item Dimensions: 12.2 x 12.6 x 4.2 inches
- Condition: New
- Fitment Type: Direct Replacement
- SKU: 5GW80DX9AE
- Warranty: This genuine part is guaranteed by Mopar's factory warranty.

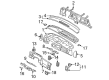
2006 Dodge Dakota Column Cover Part Number: 5JH97ZJ8AA
Product Specifications- Other Name: Cover - Steering Column; Instrument Panel Knee Bolster; Cover Steering Column
- Condition: New
- Fitment Type: Direct Replacement
- SKU: 5JH97ZJ8AA
- Warranty: This genuine part is guaranteed by Mopar's factory warranty.
2006 Dodge Dakota Column Cover, Slate Gray Part Number: 5JH97XDHAA
Product Specifications- Other Name: Cover - Steering Column; Instrument Panel Knee Bolster; Cover Steering Column
- Item Weight: 1.60 Pounds
- Item Dimensions: 23.2 x 10.3 x 3.6 inches
- Condition: New
- Fitment Type: Direct Replacement
- SKU: 5JH97XDHAA
- Warranty: This genuine part is guaranteed by Mopar's factory warranty.
2006 Dodge Dakota Steering Column Cover Parts and Q&A
- Q: How to Maintain and Fix a Steering Column Cover on 2006 Dodge Dakota?A: You should begin services and repairs of the steering column cover by reading all the necessary warnings and cautions. Trim off the retaining clips and the watch cap with a trim stick C-4755 and use them to take out the end cap. Pull out the park brake release handle, open the clip and free the release rod. Lift off the screws from the tray by holding down the release. Again, with the trim stick, C-4755 or the equivalent, take out the upper retaining clips and lift up the opening cover. Push the side clips to detach the diagnostic connector from the opening cover reinforcement. Open the screws and separate the handle from the reinforcement at the hood's opening. Loosen the two screws and pull apart the upper retaining clips with the trim stick C-4755 (or similar) to take off the opening cover reinforcement. The first step in installation is to install the opening cover reinforcement and seat all the upper clips. Attach all the screws, replace the hood release handle and screw each one in place. After that, move the diagnostic connector back into the reinforcement and secure all its edges. Lay the column cover onto the reinforcement and send the brake release rod through the hole. Make sure all the upper retaining clips are seated and fix the screws into the bottom and sides. Insert the release rod into the release handle and then clip it securely in place. Finally, put the end cap in place and seat all the retaining clips.
Related 2006 Dodge Dakota Parts
 2006 Dodge Dakota Power Steering Pump
 2006 Dodge Dakota Power Steering Hose
 2006 Dodge Dakota Rack And Pinion
 2006 Dodge Dakota Steering Column
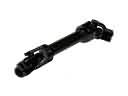 2006 Dodge Dakota Steering Shaft
 2006 Dodge Dakota Steering Wheel
 2006 Dodge Dakota Steering Gear Box
 2006 Dodge Dakota Drag Link
 2006 Dodge Dakota Power Steering Cooler
 2006 Dodge Dakota Rack & Pinion Bushing
 2006 Dodge Dakota Tie Rod Bushing