JeepParts
My Garage
My Account
Cart
OEM 2006 Dodge Sprinter 3500 Piston
Engine Pistons- Select Vehicle by Model
- Select Vehicle by VIN
Select Vehicle by Model
orMake
Model
Year
Select Vehicle by VIN
For the most accurate results, select vehicle by your VIN (Vehicle Identification Number).
1 Piston found

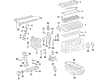
2006 Dodge Sprinter 3500 Piston Part Number: 5161392AB
Product Specifications- Replaces: 5117317AA, 5161392AA
- Item Weight: 2.30 Pounds
- Item Dimensions: 5.1 x 4.1 x 4.1 inches
- Condition: New
- Fitment Type: Direct Replacement
- SKU: 5161392AB
- Warranty: This genuine part is guaranteed by Mopar's factory warranty.
2006 Dodge Sprinter 3500 Piston Parts and Q&A
- Q: How to Remove and Replace a Piston and Its Connecting Rod on 2006 Dodge Sprinter 3500?A: Before removing the piston and connecting rod, first remove the negative battery cable and disassemble the engine, cylinder head, and oil pan. Push the chain tensioner against the tension and then pull the chain from the oil pump to remove it. Line up the connecting rod and bearing cap at the end where they join, ensuring you don't substitute top with bottom connecting rod bearing shells. Connect the bearing shell to the bearing cap marking all the relevant holes. Should you decide to reuse the pistons, wipe away any carbon buildup blocking the travel arrow's indications and make new marks if necessary. Lift the connecting rod with the piston from its place in the top of the engine and be sure not to get the bearing shells mixed up. Make sure you don't hurt the piston as you remove the piston pin circle clip and push the piston pin out of its bushing. Look at the connecting rod to see if it is worn or has suffered any damage. While assembling, place the piston into the cylinder bore and coat the piston pin and the connecting rod bushing with clean engine oil. Join the piston and connecting rod, orienting the arrow along the route the piston moves, so the mark on the connecting rod points to the side of the piston for intake. Both the piston pin and clip should be securely placed by hand. Clean the bore in the cylinder, the connecting rod bearing journals, connecting rod bearing shells, and the pistons with engine oil, leaving 120° space between piston rings. Wrap a ring compressor around the piston and both rings, secure it to tighten them without moving the position of the rings. After crankshaft rotation, make sure the connecting rod is lifted above the connecting rod journal. Place the piston so that the arrow is toward the path and the rod points to the side with the air inlet. Check and clean the connecting rod bolts and be sure that the bearing shells at both the top and bottom are set correctly, with the anti-twist locks in the slots of the bearing caps. Add the connecting rod bearing shell to the bearing cap so the indices match, then attach the bearing cap and use the bolts to tighten them a little, tighten harder, then tighten even more. Check the clearance by rotating the crankshaft to the end position, then set up the engine oil pump, oil pan, and drain plug. For the standard installation, use a cylinder head gasket of average thickness, measure how far the pistons stick out and mount the cylinder head and the engine. Put engine oil into the crankcase at the right level and put the right coolant into the cooling system. Now, reconnect the negative battery cable, start the engine and focus on watching for leaks as you exercise warning around all the moving parts.
Related 2006 Dodge Sprinter 3500 Parts
 2006 Dodge Sprinter 3500 Coolant Filter
 2006 Dodge Sprinter 3500 Crankshaft Pulley
 2006 Dodge Sprinter 3500 Crankshaft Seal
 2006 Dodge Sprinter 3500 Crankshaft Thrust Washer Set
 2006 Dodge Sprinter 3500 Crankshaft Timing Gear
 2006 Dodge Sprinter 3500 Cylinder Head Gasket
 2006 Dodge Sprinter 3500 Dipstick
 2006 Dodge Sprinter 3500 Engine Mount Bracket
 2006 Dodge Sprinter 3500 Exhaust Valve
 2006 Dodge Sprinter 3500 Piston Ring Set
 2006 Dodge Sprinter 3500 Timing Chain Guide
 2006 Dodge Sprinter 3500 Timing Chain Tensioner