JeepParts
My Garage
My Account
Cart
OEM 2008 Dodge Durango Antenna
Radio Antenna- Select Vehicle by Model
- Select Vehicle by VIN
Select Vehicle by Model
orMake
Model
Year
Select Vehicle by VIN
For the most accurate results, select vehicle by your VIN (Vehicle Identification Number).
5 Antennas found


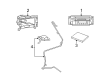
2008 Dodge Durango Satellite Ant Part Number: 5064724AA
$91.60 MSRP: $149.00You Save: $57.40 (39%)Ships in 1-3 Business DaysProduct Specifications- Other Name: Antenna - Satellite; Satellite Radio Antenna; Radio Antenna Assembly; GPS Antenna Assembly; Radio Antenna Mast; Antenna; Antenna Satellite
- Replaces: 5091504AB, 5150048AA, 5150048AB
- Item Weight: 0.50 Pounds
- Item Dimensions: 10.2 x 6.8 x 6.4 inches
- Condition: New
- Fitment Type: Direct Replacement
- SKU: 5064724AA
- Warranty: This genuine part is guaranteed by Mopar's factory warranty.


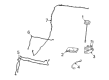
2008 Dodge Durango Antenna Base Part Number: 5064607AA
$62.84 MSRP: $71.20You Save: $8.36 (12%)Ships in 1-2 Business DaysProduct Specifications- Other Name: Antenna - Base Cable And Bracket; Radio Antenna Base; Base; Cable; Antenna Base Cable And Bracket
- Item Weight: 0.70 Pounds
- Item Dimensions: 37.5 x 0.3 x 0.3 inches
- Condition: New
- Fitment Type: Direct Replacement
- SKU: 5064607AA
- Warranty: This genuine part is guaranteed by Mopar's factory warranty.


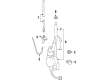
2008 Dodge Durango Antenna Mast Part Number: 56043311AC
$41.30 MSRP: $61.60You Save: $20.30 (33%)Product Specifications- Other Name: Mast - Antenna; Radio Antenna Mast; Antenna Assembly; Mast; Mast Antenna
- Replaces: 4685574AF, 56043311AA, 56043311AB, 4794176AE, 4685574AE, 4685574AH
- Item Weight: 1.40 Pounds
- Item Dimensions: 0.4 x 0.5 x 33.2 inches
- Condition: New
- Fitment Type: Direct Replacement
- SKU: 56043311AC
- Warranty: This genuine part is guaranteed by Mopar's factory warranty.

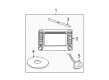
2008 Dodge Durango Gps Antenna Part Number: 5064464AA
$45.83 MSRP: $52.60You Save: $6.77 (13%)Ships in 1-2 Business DaysProduct Specifications- Other Name: Antenna - Global Positioning; GPS Antenna Assembly; Antenna; Antenna Global Positioning
- Item Weight: 4.50 Pounds
- Condition: New
- Fitment Type: Direct Replacement
- SKU: 5064464AA
- Warranty: This genuine part is guaranteed by Mopar's factory warranty.

2008 Dodge Durango Gps Antenna Part Number: 56043264AC
Product Specifications- Other Name: Antenna - Global Positioning; GPS Antenna Assembly; Antenna; Antenna Global Positioning
- Item Weight: 0.50 Pounds
- Condition: New
- Fitment Type: Direct Replacement
- SKU: 56043264AC
- Warranty: This genuine part is guaranteed by Mopar's factory warranty.
2008 Dodge Durango Antenna Parts and Q&A
- Q: How to Maintain the Antenna in a Remote Start Module on 2008 Dodge Durango?A: Remote Start Antenna Module Assembly assembly which connects to the WCM/SKREEM with a coaxial cable, two mounting clips and a control module/antenna, should be serviced by removing the negative battery cable as the first step. Following this, get rid of the steering column trim panel first, then the steering column shrouds, the end cap on the passenger's instrument panel and the bezel on the instrument cluster. After that task, bring out the instrument panel cluster and its three plugs, then unclip the upper instrument panel bezel and remove the left A-pillar trim. Remove the screws at the module, unhook the coax retainers from the panel and take off the WCM/SKREEM screws at the steering wheel. Take out the WCM/SKREEM from the slot in your steering wheel and pinch the coax cable connector to cut off both ends of the cable. Take the module off the rest of the instrument panel as you use the edge of the opening in the front to pull the coax cable through.
Related 2008 Dodge Durango Parts
 2008 Dodge Durango Headlight Switch
 2008 Dodge Durango Horn
 2008 Dodge Durango Ignition Switch
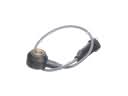 2008 Dodge Durango Knock Sensor
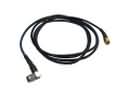 2008 Dodge Durango Antenna Cable
 2008 Dodge Durango Antenna Mast
 2008 Dodge Durango Dimmer Switch
 2008 Dodge Durango Ignition Lock Assembly
 2008 Dodge Durango Ignition Lock Cylinder
 2008 Dodge Durango Intake Manifold Temperature Sensor
 2008 Dodge Durango Transmitter
 2008 Dodge Durango Wiper Switch