JeepParts
My Garage
My Account
Cart
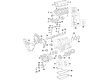
OEM 2008 Dodge Nitro Rod Bearing
Engine Connecting Rod Bearing- Select Vehicle by Model
- Select Vehicle by VIN
Select Vehicle by Model
orMake
Model
Year
Select Vehicle by VIN
For the most accurate results, select vehicle by your VIN (Vehicle Identification Number).
2 Rod Bearings found


2008 Dodge Nitro Connecting Rod Bearing Part Number: 68002286AC
$18.22 MSRP: $27.05You Save: $8.83 (33%)Ships in 1-3 Business DaysProduct Specifications- Other Name: Bearing Kit - Connecting Rod; Engine Connecting Rod Bearing Set; Connecting Rod Bearing Set; Rod Bearing; Bearings; Bearing Kit Connecting Rod Standard
- Replaces: 68002286AA, 68002286AB
- Item Weight: 0.50 Pounds
- Item Dimensions: 3.8 x 2.6 x 2.0 inches
- Condition: New
- Fitment Type: Direct Replacement
- SKU: 68002286AC
- Warranty: This genuine part is guaranteed by Mopar's factory warranty.


2008 Dodge Nitro Bearings Part Number: 68052222AB
$18.13 MSRP: $26.80You Save: $8.67 (33%)Ships in 1-2 Business DaysProduct Specifications- Other Name: Bearing - Connecting Rod; Engine Connecting Rod Bearing Set; Connecting Rod Bearing Set; Rod Bearing; Bearing Kit Connecting Rod Standard See Note
- Replaces: 5019447AA, 68052222AA
- Item Weight: 0.50 Pounds
- Item Dimensions: 3.9 x 2.6 x 2.0 inches
- Condition: New
- Fitment Type: Direct Replacement
- Require Quantity: 6
- SKU: 68052222AB
- Warranty: This genuine part is guaranteed by Mopar's factory warranty.
2008 Dodge Nitro Rod Bearing Parts and Q&A
- Q: How to Inspect and Replace Rod Bearings for Optimal Performance on 2008 Dodge Nitro?A: Be sure to inspect the connecting rod bearings for signs of scoring, normal or abnormal wear, grooves, fatigue and pitting. Replace any bearing with abnormal wear. Look for scoring, nicks and burrs on the connecting rod journals, because a misaligned or bent rod can lead to premature wear on pistons, piston rings, cylinder walls, connecting rod bearings and the journals of the crankshaft rods. Should damage or wear reveal a misalignment of the connecting rod, check the rod and repair or replace those that are not in place. Clear oil from the connecting rod journal and then grease the upper bearing insert, putting it into the rod with good alignment. Place the piston and rod assemblies using the piston ring compressor and Connecting Rod Guides 8507, ensuring the oil slingers in the rods face the engine's front and the F's at the piston point forward. Place the lower bearing insert into the bearing cap and center it and see to it that it is dry. Apply a narrow strip of Plastigage over the entire width of the lower insert at the bearing cap's center; if it is brittle, get a new supply. Place the bearing cap and connecting rod onto the journal, turning each bolt to 27 Nm (20 ft. lbs.) plus a 90° turn, while avoiding turning the crankshaft to prevent smearing the Plastigage. With the bearing cap gone, check the thickness of the compressed Plastigage to see if the bearing clearance matches the standards. If the clearance measurement is correct, install the rod; when it is outside of spec, pick the right bearing set and remember that removing Torque to Yield Bolts means they need to be replaced. Take another Plastigage measurement to check that the bearing is suitable before putting the machine together. After selecting the right insert, fit it and the cap, tightening the connecting rod bolts to 27 Nm (20 ft. lbs.) plus a 90° turn. Check the side clearance between the connecting rod and the crankshaft journal flange with a snug fitting feeler gauge, according to the standards and replace the connecting rod if it doesn't fit the requirements.
Related 2008 Dodge Nitro Parts
 2008 Dodge Nitro Oil Filter
 2008 Dodge Nitro Oil Pan
 2008 Dodge Nitro Timing Belt
 2008 Dodge Nitro Crankshaft
 2008 Dodge Nitro Crankshaft Timing Gear
 2008 Dodge Nitro Cylinder Head
 2008 Dodge Nitro Cylinder Head Gasket
 2008 Dodge Nitro Engine Mount Bracket
 2008 Dodge Nitro Oil Filler Cap
 2008 Dodge Nitro Oil Pump
 2008 Dodge Nitro Oil Pump Gasket
 2008 Dodge Nitro Piston