JeepParts
My Garage
My Account
Cart
OEM 2009 Chrysler Aspen Brake Booster
Brake Power Booster- Select Vehicle by Model
- Select Vehicle by VIN
Select Vehicle by Model
orMake
Model
Year
Select Vehicle by VIN
For the most accurate results, select vehicle by your VIN (Vehicle Identification Number).
2 Brake Boosters found

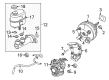
2009 Chrysler Aspen Power Booster Part Number: 68046478AA
Product Specifications- Other Name: Booster - Power Brake; Power Brake Booster; Booster Power Brake; Brake Booster
- Item Weight: 12.00 Pounds
- Item Dimensions: 13.0 x 13.1 x 10.3 inches
- Condition: New
- Fitment Type: Direct Replacement
- SKU: 68046478AA
- Warranty: This genuine part is guaranteed by Mopar's factory warranty.

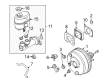
2009 Chrysler Aspen Brake Booster Part Number: 68003623AC
Product Specifications- Other Name: Booster - Power Brake; Power Brake Booster; Power Booster; Booster Power Brake
- Replaces: 68003623AA, 68003623AB
- Item Weight: 3.10 Pounds
- Item Dimensions: 19.8 x 11.8 x 12.1 inches
- Condition: New
- Fitment Type: Direct Replacement
- SKU: 68003623AC
- Warranty: This genuine part is guaranteed by Mopar's factory warranty.
2009 Chrysler Aspen Brake Booster Parts and Q&A
- Q: How to Service and Repair a Brake Booster with ESP on 2009 Chrysler Aspen?A: Install spacer block 3 and all the gaskets 2 in advance, if you have taken them out. Place the booster studs 2 through the holes in the cowl panel and place the booster on the panel. Place new booster bolts and tighten them to 28 Nm (250 in. lbs.). Attach the brake pedal to booster push rod 1 and clip it into place. Any time the original stop lamp switch has been disturbed or removed, you must install a replacement; do not adjust the old one. Make sure that output rod 3 of the brake booster is in the proper place and properly retained by an output rod retaining ring, as you can see from the master cylinder mounting hole. To let the master cylinder plunger sleeve receive the output rod, place the output rod in the middle and perpendicular to the master cylinder hole. Once you've removed the old booster, use a flashlight to make sure the shoulder and neck of the master cylinder are vacuum sealed; the integrity of the vacuum relies on a square seal hermetically sealing them. Ensure the plunger on the master cylinder is over the end of the booster rod before installation; it should slide smoothly onto it and attach to the studs via the flange before anything else. Fit the master cylinder 1 into the mounting studs that come with the booster and screw on the nuts 2 to a tightness of 10 Nm (or 90 in. lbs.). After that, put the IPM 4 and its fasteners back in and fit the left front wheel well. After that, attach the vacuum hose to check valve 2 and resume connecting the electrical connectors 4, 5 and 7. Then, attach the wiper arm and cowl assembly 1 to the vehicle.
Related 2009 Chrysler Aspen Parts
 2009 Chrysler Aspen ABS Control Module
 2009 Chrysler Aspen Brake Caliper
 2009 Chrysler Aspen Brake Caliper Bracket
 2009 Chrysler Aspen Brake Dust Shield
 2009 Chrysler Aspen Brake Master Cylinder
 2009 Chrysler Aspen Brake Pad
 2009 Chrysler Aspen Hydraulic Hose
 2009 Chrysler Aspen Parking Brake Cable
 2009 Chrysler Aspen Parking Brake Shoe
 2009 Chrysler Aspen Speed Sensor
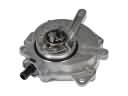 2009 Chrysler Aspen Vacuum Pump
 2009 Chrysler Aspen Wheel Stud