JeepParts
My Garage
My Account
Cart
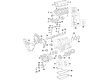
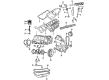
OEM 2010 Dodge Grand Caravan Timing Cover
Engine Timing Cover- Select Vehicle by Model
- Select Vehicle by VIN
Select Vehicle by Model
orMake
Model
Year
Select Vehicle by VIN
For the most accurate results, select vehicle by your VIN (Vehicle Identification Number).
4 Timing Covers found


2010 Dodge Grand Caravan Timing Cover, Lower Outer Part Number: 4892138AB
$217.86 MSRP: $327.00You Save: $109.14 (34%)Ships in 1-2 Business DaysProduct Specifications- Other Name: Cover - Timing Case; Engine Timing Cover, Outer Lower; Front Cover; Outer Timing Cover; Cover Timing Case
- Position: Lower Outer
- Item Weight: 4.10 Pounds
- Item Dimensions: 22.4 x 18.7 x 4.2 inches
- Condition: New
- Fitment Type: Direct Replacement
- SKU: 4892138AB
- Warranty: This genuine part is guaranteed by Mopar's factory warranty.

2010 Dodge Grand Caravan Timing Cover, Upper Outer Part Number: 4892136AC
$974.73 MSRP: $1075.00You Save: $100.27 (10%)Ships in 1-2 Business DaysProduct Specifications- Other Name: Cover - Timing Case; Engine Timing Cover, Inner, Outer Upper; Front Cover; Inner Timing Cover; Cover Timing Case
- Position: Upper Outer
- Replaces: 4892136AA, 4892136AB
- Item Weight: 13.30 Pounds
- Item Dimensions: 26.5 x 14.6 x 8.2 inches
- Condition: New
- Fitment Type: Direct Replacement
- SKU: 4892136AC
- Warranty: This genuine part is guaranteed by Mopar's factory warranty.

2010 Dodge Grand Caravan Timing Cover Part Number: 68262818AA
Product Specifications- Other Name: Cover Package - Timing; Engine Timing Cover; Front Cover
- Replaces: 68029219AB, 68029219AC, 68029219AA
- Item Weight: 23.30 Pounds
- Item Dimensions: 25.3 x 22.9 x 7.0 inches
- Condition: New
- Fitment Type: Direct Replacement
- SKU: 68262818AA
- Warranty: This genuine part is guaranteed by Mopar's factory warranty.
 Product Specifications
- Other Name: Cover - Timing Case; Engine Timing Cover, Outer Upper; Front Cover; Outer Timing Cover; Cover Timing Case
- Position: Upper Outer
- Item Weight: 1.50 Pounds
- Item Dimensions: 8.3 x 8.3 x 4.0 inches
- Condition: New
- Fitment Type: Direct Replacement
- SKU: 4892270AA
- Warranty: This genuine part is guaranteed by Mopar's factory warranty.
2010 Dodge Grand Caravan Timing Cover Parts and Q&A
- Q: How to Install a Timing Cover and Its Components on 2010 Dodge Grand Caravan?A: It is important to ensure the chain case cover matches cleanly with the cylinder block and to remove the crankshaft oil seal to allow normal oil pump function before installing the engine timing cover. Set a new gasket on the timing cover so that its lower edge is lined up to be 0.5 mm past the cover's lower edge. Position the oil pump drive and inner rotor discs so their mating flats are in alignment, both face-up to prevent any serious damage. Tighten the timing cover and timing chain cover bolts; when doing so, use 27 Nm for M8 bolts and 54 Nm for M10 bolts. Put in place the crankshaft front oil seal, water pump and pulley. After the idler pulley, tighten the bolt on the accessory drive belt tensioner to 28 Nm. Put the power steering pump on the engine and attach it using three bolts through the pulley before squeezing them tight to 23 Nm. Align the generator with the engine, bolt it down with two bolts and snugly fit around 54 Nm of force. Put the bracket on the generator and the stud and tighten the bolt and nut to 28 Nm. Attach the front support bracket using two bolts and a nut and tighten everything so the nut shows 22 Nm and the bolts 25 Nm. Place the support bracket for the power steering line and tighten the bolt to 10 Nm. Place the right side engine mount, install the camshaft position sensor and attach both the heater return hose and lower radiator hose. Attach the crankshaft vibration damper, set the A/C compressor in position and fasten all the nuts and bolts according to the sequence given. Set the drive belt in place, install the oil pump pick-up tube with a new O-ring and secure both with a tight 28 Nm bolt. Add in the oil pan, the right front inner splash shield and the tires and wheels to the right front. Pour engine oil into the crankcase up to the mark and also fill the cooling system. After that, attach the negative battery cable and tighten its nut to 5 Nm.
Related 2010 Dodge Grand Caravan Parts
 2010 Dodge Grand Caravan Engine Mount
 2010 Dodge Grand Caravan Harmonic Balancer
 2010 Dodge Grand Caravan Oil Pan Gasket
 2010 Dodge Grand Caravan Dipstick
 2010 Dodge Grand Caravan Crankshaft
 2010 Dodge Grand Caravan Crankshaft Thrust Washer Set
 2010 Dodge Grand Caravan Engine Mount Bracket
 2010 Dodge Grand Caravan Exhaust Valve
 2010 Dodge Grand Caravan Oil Pump
 2010 Dodge Grand Caravan Piston
 2010 Dodge Grand Caravan Pushrod
 2010 Dodge Grand Caravan Rod Bearing