JeepParts
My Garage
My Account
Cart
OEM Chrysler 300 Car Speakers
Audio Speakers- Select Vehicle by Model
- Select Vehicle by VIN
Select Vehicle by Model
orMake
Model
Year
Select Vehicle by VIN
For the most accurate results, select vehicle by your VIN (Vehicle Identification Number).
Filter by Part Type
Filter by Part Type
16 Car Speakers found


Chrysler 300 Front Driver Speaker, Center Part Number: 5059067AC
$92.79 MSRP: $149.00You Save: $56.21 (38%)Ships in 1-3 Business Days


Chrysler 300 Package Tray Speaker, Rear Part Number: 5064983AB
$109.84 MSRP: $174.00You Save: $64.16 (37%)Ships in 1-3 Business Days


Chrysler 300 Rear Speaker, Outer Part Number: 5064358AB
$32.60 MSRP: $49.80You Save: $17.20 (35%)Ships in 1-3 Business Days


Chrysler 300 Instrument Panel Speaker, Upper Part Number: 5059062AB
$32.60 MSRP: $49.80You Save: $17.20 (35%)Ships in 1-3 Business Days


Chrysler 300 Rear Speaker, Center Part Number: 5059063AC
$108.32 MSRP: $117.00You Save: $8.68 (8%)Ships in 1-2 Business Days
Chrysler 300 Front Driver Speaker Part Number: 68590588AA
$80.61 MSRP: $127.00You Save: $46.39 (37%)Ships in 1-3 Business Days
Chrysler 300 Woofer Part Number: 68440978AA
$228.87 MSRP: $353.00You Save: $124.13 (36%)
Chrysler 300 Rear Speaker Part Number: 68584767AA
$68.43 MSRP: $103.00You Save: $34.57 (34%)Ships in 1-3 Business DaysChrysler 300 Speaker Part Number: 1WQ34DX9AD
$257.19 MSRP: $389.00You Save: $131.81 (34%)Ships in 1-3 Business Days
Chrysler 300 Instrument Panel Speaker, Rear Part Number: 68423513AA
$42.57 MSRP: $62.65You Save: $20.08 (33%)Ships in 1-3 Business Days
Chrysler 300 Instrument Panel Speaker, Front Inner Part Number: 68423672AA
$32.60 MSRP: $49.80You Save: $17.20 (35%)


Chrysler 300 Rear Speaker, Front Center Part Number: 5091019AB
$53.77 MSRP: $79.85You Save: $26.08 (33%)


Chrysler 300 Instrument Panel Speaker, Front Part Number: 68039662AB

Chrysler 300 Front Driver Speaker Part Number: 5059061AC


Chrysler 300 Speaker, Rear Part Number: 5059064AB

Chrysler 300 Woofer Part Number: 5290522AB
Chrysler 300 Car Speakers
Choose OEM Car Speakers that meet Chrysler factory standards. Chrysler designs and tests every component for precision and durability. Each Car Speakers follows strict manufacturing steps to lock in quality and fit. If your Chrysler 300 matters to you, OEM parts make the smart choice. You'll get the exact look, feel, and performance you expect. Shop genuine 300 parts at the highly competitive prices online. Enjoy a manufacturer's warranty, a hassle-free return policy, and rapid delivery. No more guesswork with off brands. Get genuine parts with exact fit and true factory performance. Shop with confidence today at JeepPartsDeal.com.
Chrysler 300 Car Speakers Parts and Q&A
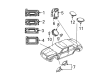
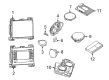
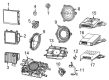
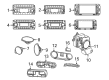
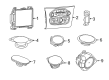
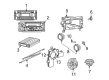
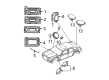
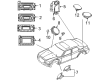
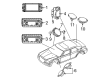
- Q: How to Remove Car Speakers from the Front Door and Other Areas on Chrysler 300?A:You should start by isolating the battery negative cable, then take off the front door trim panel, disconnect the mounting screws and then take out the harness connector to remove the speaker. Unplug the battery cables and cover the speaker, take away the mounting screws, separated the electrical harness connector and remove the instrument panel side speaker. The process is the same for the instrument panel center speaker. On a sedan, first disconnect the negative battery, then remove the upper and lower C-pillar trim, the rear shelf trim, detach the fasteners and separate the speaker's electrical connector to get it out. For a wagon, begin by detaching the battery negative cable, following by removing the quarter trim speaker cover, the mounting screws and disconnecting the same colored connector from the speaker. To take the subwoofer out, remove the negative terminal from the battery, eliminate the C-pillar trims, take off the rear shelf trim, unfasten the subwoofer and separate the electrical harness connector. To install a subwoofer in a sedan, first open the decklid, cut off the battery negative cable from the car, remove the connection from the amp, unscrew the mount and then take out the subwoofer. In a wagon, unplug the black cable from the battery, open the rear bottom seat cushion, disconnect its plugs and pull the subwoofer through the opening.
- Q: How to Install Car Speakers and Subwoofers on Chrysler 300?A:First, link the electrical harness connector with the speaker, fit it into position, install and secure the mounts, then add the trim panel to the front door and finally attach the battery negative cable. On the instrument panel side, plug the speaker harness connector in, set the speaker into place, fasten and tighten the mounting nuts, fit the speaker cover on the panel and attach the negative Battery Cable. Performing these tasks for the center speaker is the same: plug the electrical harness, position the speaker, attach and tighten the fixing screws, place the cover on the panel and link the negative battery cable. For the rear speaker on a sedan, first add the electrical harness connector, follow with setting and tightening the speaker, use the mounting fasteners, then put in the rear shelf trim, lower C-pillar trim, upper C-pillar trim and finally attach the negative cable to the battery. For a wagon, link the harness to its connector, fix the speaker into place, tighten the four fasteners and link the battery negative cable. Install the electrical harness connector, position the subwoofer, fix the back shelf mounting screws, install the shelf trim, connect the trim above the rear door windows and connect a negative cable to the battery. To set up a sedan subwoofer, adhere a factory-approved harness (1) to the subwoofer, plug in the electrical connector (3), fasten the top mounting kit (2), link the battery negative cable and tighten the decklid. Inside the wagon, place the subwoofer (1) onto the vehicle using mounting fastener (5), join the electrical connector (3), raise the rear seat and connect the battery negative cable.


Related Chrysler 300 Parts
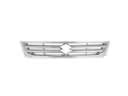 Chrysler 300 Grille
 Chrysler 300 Subwoofer
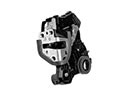 Chrysler 300 Door Lock
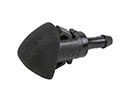 Chrysler 300 Windshield Washer Nozzle
 Chrysler 300 Ashtray
 Chrysler 300 Brake Booster Vacuum Hose
 Chrysler 300 Door Lock Switch
 Chrysler 300 Front Cross-Member
 Chrysler 300 Lift Support
 Chrysler 300 Liftgate Lock Actuator
 Chrysler 300 Wiper Motor
 Chrysler 300 Wiper Pivot