JeepParts
My Garage
My Account
Cart
OEM Chrysler 300 Coil Springs
Strut Spring- Select Vehicle by Model
- Select Vehicle by VIN
Select Vehicle by Model
orMake
Model
Year
Select Vehicle by VIN
For the most accurate results, select vehicle by your VIN (Vehicle Identification Number).
138 Coil Springs found


Chrysler 300 Coil Spring, Front Part Number: 5168880AC
$92.49 MSRP: $141.00You Save: $48.51 (35%)Ships in 1-2 Business Days


Chrysler 300 Coil Spring, Rear Part Number: 5168888AC
$102.36 MSRP: $156.00You Save: $53.64 (35%)


Chrysler 300 Coil Spring, Front Part Number: 5168882AB
$64.45 MSRP: $141.00You Save: $76.55 (55%)Ships in 1-2 Business Days
Chrysler 300 Coil Spring, Rear Part Number: 5168953AB
$81.51 MSRP: $126.00You Save: $44.49 (36%)
Chrysler 300 Coil Spring, Rear Part Number: 68083431AB
$108.27 MSRP: $164.00You Save: $55.73 (34%)Ships in 1-2 Business DaysChrysler 300 Coil Spring, Front Part Number: 5168881AC
$92.49 MSRP: $141.00You Save: $48.51 (35%)Ships in 1-2 Business DaysChrysler 300 Coil Spring, Front Part Number: 68031642AC
$81.95 MSRP: $125.00You Save: $43.05 (35%)Ships in 1-2 Business DaysChrysler 300 Coil Spring, Rear Part Number: 5168957AB
$106.59 MSRP: $162.00You Save: $55.41 (35%)Ships in 1-2 Business DaysChrysler 300 Coil Spring, Rear Part Number: 5168891AB
$103.14 MSRP: $157.00You Save: $53.86 (35%)Ships in 1-2 Business Days
Chrysler 300 Coil Spring, Front Part Number: 5181608AC
$101.86 MSRP: $156.00You Save: $54.14 (35%)Ships in 1-2 Business Days
Chrysler 300 Spring, Front Part Number: 4895627AB
$109.66 MSRP: $166.00You Save: $56.34 (34%)Ships in 1-2 Business DaysChrysler 300 Coil Spring, Front Part Number: 5168883AC
$99.63 MSRP: $152.00You Save: $52.37 (35%)Ships in 1-2 Business DaysChrysler 300 Coil Spring, Front Part Number: 5168879AC
$92.49 MSRP: $141.00You Save: $48.51 (35%)Ships in 1-2 Business DaysChrysler 300 Coil Spring, Front Part Number: 5168886AB
$99.63 MSRP: $152.00You Save: $52.37 (35%)Ships in 1-2 Business DaysChrysler 300 Coil Spring, Rear Part Number: 5168899AC
$219.66 MSRP: $332.00You Save: $112.34 (34%)Ships in 1-2 Business Days
Chrysler 300 Coil Spring, Rear Part Number: 5168896AC
$107.04 MSRP: $163.00You Save: $55.96 (35%)Chrysler 300 Coil Spring, Rear Part Number: 5168954AB
$76.71 MSRP: $116.00You Save: $39.29 (34%)Ships in 1-2 Business DaysChrysler 300 Coil Spring, Rear Part Number: 5168951AB
$106.20 MSRP: $161.00You Save: $54.80 (35%)Ships in 1-2 Business DaysChrysler 300 Coil Spring, Rear Part Number: 5168895AC
$94.89 MSRP: $145.00You Save: $50.11 (35%)Ships in 1-2 Business DaysChrysler 300 Coil Spring, Front Part Number: 5168872AB
$90.04 MSRP: $138.00You Save: $47.96 (35%)
| Page 1 of 7 |Next >
1-20 of 138 Results
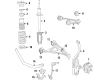
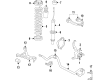
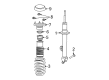
Chrysler 300 Coil Springs
Choose OEM Coil Springs that meet Chrysler factory standards. Chrysler designs and tests every component for precision and durability. Each Coil Springs follows strict manufacturing steps to lock in quality and fit. If your Chrysler 300 matters to you, OEM parts make the smart choice. You'll get the exact look, feel, and performance you expect. Shop genuine 300 parts at the highly competitive prices online. Enjoy a manufacturer's warranty, a hassle-free return policy, and rapid delivery. No more guesswork with off brands. Get genuine parts with exact fit and true factory performance. Shop with confidence today at JeepPartsDeal.com.
Chrysler 300 automobiles have Coil Springs as a component of their suspension systems which is used in the suspension of the automobile over rugged terrains and absorb shock forces. In each wheel there is a coil spring and these are used in improving comfort and stability of the vehicle especially during high speed. The front Coil Springs are usually stiffer as compared to the rear to bear the added load of the powertrain and some other parts. In Chrysler 300 models over the years, many kinds of Coil Springs have been used such as compression springs which will not compress forces. Albeit these springs have long service duration, they tend to degrade and lose their clearance while having a saggy appearance. The inspection will enable the Chrysler 300 to retain it's capability and perceptive in terms of suspension so that it will run smoothly.
Chrysler 300 Coil Springs Parts and Q&A
- Q: How to Safely Remove Rear Coil Springs on Chrysler 300?A:Begin by placing the vehicle on jack stands, then undo the wheel nuts and take the rear tire and wheel out of the mounts to remove the rear coil spring. If you are attending to the left side shock absotrber, take out the fuel filler pipe. Fasten two additional jack stands under the engine cradle's farthest forward part to keep the car steady as you handle the rear suspension. If you have dual exhaust or are working on the right side if it has single exhaust, place an up-jacked stand under the exhaust at the Muffler, detach the exhaust isolators from the hangers at the muffler and the resonator, then let the exhaust down onto the jack or stand. After that, set an under-hoist utility jack or transmission jack beneath the rear axle differential's center, raise it to come into contact with the differential and keep it in place, but don't yet secure the stabilizer bar. With a wrench, break and remove the four pieces above the Shock Absorber first and then lower mounting bolt and nut. When you are removing the AWD crossmember bolts, be sure not to lose the rubber spacers between the mounts and the body. To avoid needing a rear wheel alignment, make sure the mounting bolts of the opposite crossmember are not loosened or removed. Become a repair side crossmember mounting bolts, then use the jack to slowly lower the car until the crossmember is just low enough for the top of the shock absorber to slide past the body flange. Tilt the spline outside the chassis, then pull the bottom end from the link holding the spring. Unhook the brake hose from its bracket on the body to keep it from getting stretched while you move the line off the wheel. Let the jack descend gradually and lower the crossmember enough to let you remove the old coil spring and its isolators.
- Q: How to install Rear Coil Springs on Chrysler 300?A:Before installing the rear coil springs, put the upper and lower isolators on them and verify they are properly installed at each end. Following this, place the spring with isolators into the spring link's pocket, molding the lower isolator to match the pocket and make sure the coil's top aligns with the body mount. For the Shock Absorber, put the spring link's pocket around the lower area and turn the top part until it matches the bolt holes on top. Hold the lower shock mounting bolt and nut in place, but don't tighten them for now. Make certain that the spacers on top of the crossmember mount bushings are in the right positions on AWD vehicles. Engage the jack to hydraulic lift, leading the coil spring and top part of the shock to its original position, then install the upper mounting screws and turn on the screwdriver to 52 Nm (38 ft. lbs.). Since the rear crossmember uses longer bolts, never use the front ones on the rear. Secure the crossmember to the frame with the mounting bolts, but don't tighten them too much. Go from the tension link to the body weld flange just upfront and check the distance is 12 mm for adequate suspension movement. If the distance is less than 12 mm on that side, move the crossmember rearward until it is proper, then tighten all crossmember bolts to 180 Nm (133 ft. lbs.). Get the jack away from the differential of the rear axle, raise the rear exhaust back into its proper spot and then join the exhaust isolators under the Muffler and resonators. Set the fuel filler tube and tire and wheel assemblies in their place, then tighten the bolts that hold the wheels on the police models to 150 Nm (110 ft. lbs.) or 190 Nm (140 ft. lbs.). Flatten the vehicle under an alignment rack or drive-on lift and lift up the vehicle as needed to get to the lower mounting bolt. To finish, adjust the lower bolt on the front to 72 Nm (53 ft. lbs.).


Related Chrysler 300 Parts
 Chrysler 300 Control Arm
 Chrysler 300 Ball Joint
 Chrysler 300 Control Arm Bushing
 Chrysler 300 Alignment Bolt
 Chrysler 300 Axle Beam Mount
 Chrysler 300 Bump Stop
 Chrysler 300 Control Arm Bolt
 Chrysler 300 Lateral Link
 Chrysler 300 Leaf Spring Bushing
 Chrysler 300 Shock And Strut Mount
 Chrysler 300 Sway Bar Bracket
 Chrysler 300 Sway Bar Bushing