JeepParts
My Garage
My Account
Cart
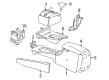
OEM Chrysler 300M Automatic Transmission Shifter
AT Shifter- Select Vehicle by Model
- Select Vehicle by VIN
Select Vehicle by Model
orMake
Model
Year
Select Vehicle by VIN
For the most accurate results, select vehicle by your VIN (Vehicle Identification Number).
7 Automatic Transmission Shifters found

Chrysler 300M Shifter Part Number: CBNSC458
$32.65 MSRP: $46.95You Save: $14.30 (31%)Chrysler 300M Gear Shift Assembly Part Number: CBSSC457
$24.07 MSRP: $34.60You Save: $10.53 (31%)

Chrysler 300M Gear Shift Assembly Part Number: 4593203AF
$254.93 MSRP: $378.00You Save: $123.07 (33%)Ships in 1-3 Business Days

Chrysler 300M Shift Actuator Part Number: 4593201AG
Chrysler 300M Shift Actuator Part Number: 4578148AB
Chrysler 300M Shift Actuator Part Number: 4578171AC
Chrysler 300M Shift Actuator Part Number: 4593203AG
Chrysler 300M Automatic Transmission Shifter
Choose OEM Automatic Transmission Shifter that meet Chrysler factory standards. Chrysler designs and tests every component for precision and durability. Each Automatic Transmission Shifter follows strict manufacturing steps to lock in quality and fit. If your Chrysler 300M matters to you, OEM parts make the smart choice. You'll get the exact look, feel, and performance you expect. Shop genuine 300M parts at the highly competitive prices online. Enjoy a manufacturer's warranty, a hassle-free return policy, and rapid delivery. No more guesswork with off brands. Get genuine parts with exact fit and true factory performance. Shop with confidence today at JeepPartsDeal.com.
Chrysler 300M Automatic Transmission Shifter Parts and Q&A
- Q: How to Service and Repair an Automatic Transmission Shifter Mechanism on Chrysler 300M?A:Service and repair of the 42LE automatic transmission shifter should begin by taking out the shifter handle and the console bezel. Remove the Autostick switch connector if your car is equipped with Autostick. Open the adjuster screw on the shifter adjuster, then pull the shifter cable away from the shifter assembly bracket and from the shift pin. At this point, it's important not to break the tab as you disconnect the interlock cable from the shifter's base. Take the five nuts off the shifter base and bracket onto the transmission floor and then remove the assembly from the car. After fitting the shifter assembly, attach it and tighten the five nuts to 31 Nm (23 ft. lbs.). Always put the shift lever and transaxle into "Park" while the rear sprag engages; move the vehicle back and forth to make sure the sprag is fully engaged. In the ignition lock position, match the eyelet from the shift cable to the shift pin. Next, attach the entire cable to the bracket near the shifter. Place the interlock cable core wire into the adjustment lever groove, so the interlock cable slug is fitted securely in position. Insert the interlock cable conduit end fitting into the bracket. If you have Autostick, connect the similar connector found under the steering column. The last step is to adjust the gear shift and interlock cables since how well you adjust them matters a lot.