JeepParts
My Garage
My Account
Cart
OEM Chrysler Aspen Automatic Transmission Filter
AT Filter- Select Vehicle by Model
- Select Vehicle by VIN
Select Vehicle by Model
orMake
Model
Year
Select Vehicle by VIN
For the most accurate results, select vehicle by your VIN (Vehicle Identification Number).
3 Automatic Transmission Filters found


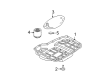
Chrysler Aspen Oil Filter Part Number: 5015267AD
$51.86 MSRP: $76.85You Save: $24.99 (33%)Ships in 1-2 Business Days


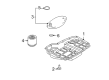
Chrysler Aspen Oil Filter Part Number: 5179267AD
$37.41 MSRP: $54.00You Save: $16.59 (31%)

Chrysler Aspen Filter Part Number: 68049926AA
Chrysler Aspen Automatic Transmission Filter
Choose OEM Automatic Transmission Filter that meet Chrysler factory standards. Chrysler designs and tests every component for precision and durability. Each Automatic Transmission Filter follows strict manufacturing steps to lock in quality and fit. If your Chrysler Aspen matters to you, OEM parts make the smart choice. You'll get the exact look, feel, and performance you expect. Shop genuine Aspen parts at the highly competitive prices online. Enjoy a manufacturer's warranty, a hassle-free return policy, and rapid delivery. No more guesswork with off brands. Get genuine parts with exact fit and true factory performance. Shop with confidence today at JeepPartsDeal.com.
Chrysler Aspen Automatic Transmission Filter is a key component that determines the dependability of Chrysler's upscale full-size sport utility vehicle. This Automatic Transmission Filter is intended to sustain the condition of the transmission system by filtering out the elements of dirt and other contaminant particles in the transmission fluid that could impede the flow and eventually cause cloggage of its moving parts. This is even more relevant to different Chrysler Aspen models because it increases not only the car's efficiency but also protects it against transmission harm. Chrysler Aspen Automatic Transmission Filter is versatile and can fit the internal transmission filters located behind a removable fluid pan, inline transmission filters as well as the external spin-on or cartridge type, thus making vehicle maintenance easier with optimum filtration. The sturdy body of this Chrysler Aspen Automatic Transmission Filter plays compensations with the life span of the car's transmission as well as aligns with the high performance of the strong engines of the vehicle such as the 4.7L V8 and the 5.7L Hemi V8. Being able to trap nanodetails while not interfering with the flow of fluids, using the Chrysler Aspen in the automotive market is this Automatic Transmission Filter, which guarantees the continuation of a comfortable ride. All in all, Chrysler Aspen Automatic Transmission Filter is an essential component that has the responsibility of boosting the operational reliability of the vehicle making it a suitable option for all consumers.
Chrysler Aspen Automatic Transmission Filter Parts and Q&A
- Q: How to Service and Replace an Automatic Transmission Filter and Fluid on Chrysler Aspen?A:Drive the car up on safety stands, disconnect the fluid line and place a shallow and wide pan beneath the transmission pan. Take out the bolts holding the side and front of the pan to the transmission, loosen those in the back and gently pull the front apart so the fluid starts to drain. Once you've emptied the pan and it's standing level, unscrew the rest of the bolts and lift the pan away from the transmission, dumping the rest of the fluid into the drain pan. Disconnect the main Oil Filter (1) from the valve body and pump by removing its single screw, take off the filter and pour the fluid into the pan. Check the oil pump's oil filter seal; if it is damaged or not fully fitted, remove it, but if it is in good shape, you can reuse it. If you decide to replace the cooler return filter (2), use tool 8321 to unscrew it from the transmission and get rid of the used transmission fluid and filters the right way. Look at both the pan and magnet below and see if there is any sign of excess metal. A little metal on the clutch surfaces is acceptable apart from during times of slipping or delay in shifting. Wipe the pan and magnet with a suitable solvent and take off the sealant from the case and pan with a gasket scraper. During installation, place the primary oil filter seal against the oil pump's body instead of on its neck. Should a seal be needed, fit a new original equipment (Oe) primary oil filter seal inside the oil pump inlet bore using Installer 6960 or a similar tool. Place the replacement filter onto the valve body and insert it into the oil pump, next screw it into position and fasten it by turning it 4.5 Nm (40 in. lbs). If you need to, put a fresh cooler return filter onto the transmission and tighten it to 9.5 Nm (84 in. lbs.). On the transmission, put a layer of Rtv sealant along the case seal, fit the pan onto the transmission, attach the bolts and tighten each to 12 Nm (105 in. lbs.) rotational force. First, lower the vehicle and add the Mopar(R) Atf +4 to the transmission.
- Q: How to Change an Automatic Transmission Filter and Fluid on Chrysler Aspen?A:Support and lift the vehicle on safety stands and under the transmission pan, position a big, low drain pan. Remove the bolts securing the pan to the front and sides, loosen the ones at the rear and slowly take off the front of the pan so fluid can drain into the pan. Remove the bolts from the pan while holding it steady and tip the pan away and down to take out any remaining oil. Remove the screw at the primary Oil Filter (1) from the valve body, separate the filter from the body and the oil pump and drain the fluid into the drain pan. Look at the oil filter seal in the oil pump; if it is damaged or not in place, throw it away and if it's fine, you can use it again. When replacing the cooler return filter (2), take it out using Oil Filter Wrench 8321. Don't throw away transmission fluid or filters in your waste bin. Check both the pan and the magnet underneath for large pieces of metal; just a thin layer of clutch material is fine as long as no slipping or lag occurs. Using a solvent, wipe down the pan and magnet, then use a gasket scraper to take off any remaining sealing material from the case and pan of the transmission. Ensure the oil filter seal is installed straight against the body of the oil pump, not on the filter neck during installation. Should the seal be damaged or worn, place a new primary oil filter seal at the oil pump inlet bore with the useful tool. Put the replacement filter against the valve body and into the oil pump, then attach a screw to hold the primary oil filter (1) to the valve body and tighten it to 4.5 Nm (40 in. lbs.). Replace the cooler return filter (2) if required onto the transmission and tighten it with 9.5 Nm (84 in.lbs. ) torque. Lay a small line of Mopar(R) Rtv sealant on the surface around the transmission, fix the pan in position and attach the bolts to secure it, applying 12 Nm (105 in. lbs.) of force. After the vehicle comes down, fill the transmission with Mopar(R) Atf +4.


Related Chrysler Aspen Parts
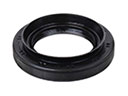 Chrysler Aspen Automatic Transmission Output Shaft Seal
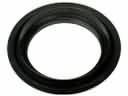 Chrysler Aspen Automatic Transmission Seal
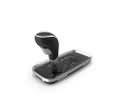 Chrysler Aspen Automatic Transmission Shifter
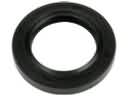 Chrysler Aspen Manual Transmission Extension Housing Seal
 Chrysler Aspen Shift Cable
 Chrysler Aspen Transfer Case
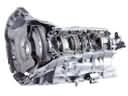 Chrysler Aspen Transmission Assembly
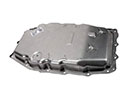 Chrysler Aspen Transmission Pan