JeepParts
My Garage
My Account
Cart
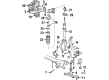
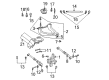
OEM Chrysler Cirrus Steering Knuckle
Front Steering Knuckle- Select Vehicle by Model
- Select Vehicle by VIN
Select Vehicle by Model
orMake
Model
Year
Select Vehicle by VIN
For the most accurate results, select vehicle by your VIN (Vehicle Identification Number).
5 Steering Knuckles found


Chrysler Cirrus Strut Mounting Fork, Front Driver Side Part Number: 4656235
$126.38 MSRP: $160.22You Save: $33.84 (22%)Ships in 1-2 Business Days
Chrysler Cirrus Knuckle Part Number: 4695982
$364.58 MSRP: $462.18You Save: $97.60 (22%)Ships in 1-2 Business Days

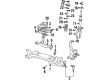
Chrysler Cirrus Knuckle, Front Part Number: 4695985AB

Chrysler Cirrus Knuckle, Rear Passenger Side Part Number: 4764586AB
Chrysler Cirrus Knuckle, Rear Driver Side Part Number: 4764587AB
Chrysler Cirrus Steering Knuckle
Choose OEM Steering Knuckle that meet Chrysler factory standards. Chrysler designs and tests every component for precision and durability. Each Steering Knuckle follows strict manufacturing steps to lock in quality and fit. If your Chrysler Cirrus matters to you, OEM parts make the smart choice. You'll get the exact look, feel, and performance you expect. Shop genuine Cirrus parts at the highly competitive prices online. Enjoy a manufacturer's warranty, a hassle-free return policy, and rapid delivery. No more guesswork with off brands. Get genuine parts with exact fit and true factory performance. Shop with confidence today at JeepPartsDeal.com.
The Steering Steering Steering Knuckle in Chrysler Cirrus cars is a component which connects the suspension and the steering systems with a view of moving the front wheels. It has provision to accommodate the control arms, tie rod ends and the wheel hub or spindle and offers up and down movements in relation to road and side to side movement during steering. Chrysler Cirrus steering knuckles can be classified, depending on where the power is being delivered most of the time, mainly rear-wheel (RWD) and front, all, or four-wheel (FWD/AWD/4WD). RWD knuckles can have an enclosed spindle which is cast with the hub or a bolted type while FWD/AWD/4WD designs have a drive axle that is connected to the knuckle. Over the year styles of the steering knuckle have experienced changes from kingpin style to modern ball joint style improving in their performance and stability. These are some of the critical structural parts that need to be inspected time to time, but more often after any suspension modification has been conducted.
Chrysler Cirrus Steering Knuckle Parts and Q&A
- Q: How to Service and Repair a Steering Knuckle on Chrysler Cirrus?A:Service and repairs of the steering knuckle require raising the vehicle on jack stands or a frame contact type hoist, removing the front tire and wheel assembly from the hub and ensuring that the hub nut is not loosened until the vehicle is up in the air. After securing the brakes, turn the hub nut loosely and take out the front Brake Caliper by disconnecting the bolts that are holding the guide pin, then holding it above the steering knuckle with a wire. Then, get rid of the braking disc from the front hub/bearing assembly. If the wheels are 15 inches, first remove the lower ball joint heat shield before you pull the ball joint stud away from the steering knuckle. Hold the stud with a 11/32 socket and use MB-991113 on the Tie Rod End to ease it off the stud and remove the outer tie rod end. In case your vehicle has antilock brakes, pull the speed sensor cable routing bracket from the steering knuckle. Take out the cotter pin and castle nut from the lower ball joint stud and ensure you do not insert any kind of tool between the knuckle and lower ball joint as you separate them. With the steering knuckle off to the side, whack the boss with a hammer to release the lower ball joint stud, being careful not to harm the lower control arm or ball joint grease seal. With the knuckle lifted off the lower ball stud, remove it and use a support to keep the inner C/V joint from separating and lower the driveshaft onto it. Take the steering knuckle apart from the outer C/V joint and be sure to support the driveshaft during this step. Remove the cotter pin and nut from the ball joint stud above and use Puller C-3894-A to free the upper ball joint stud from the steering knuckle. A front wheel bearing in good condition can be placed on the new steering knuckle. If using a hub/bearing assembly, install it in the steering knuckle ahead of putting the assembly on the vehicle; slide the driveshaft into place in the assembly and finally, attach the steering knuckle to the lower ball joint stud. Put the castle nut on the lower ball joint stud and insert the upper ball joint into the steering knuckle, tightening the upper ball joint castle nut with 45 ft. lbs. and the lower ball joint nut with 55 ft. lbs. with a torque wrench. After that, install two cotter pins in the two ball joint studs. Secure the speed sensor cable bracket and bolt if your vehicle has antilock brakes. Apply 61 Nm (45 ft. lbs.) of torque to the attaching nut as you install the tie rod end into the steering knuckle and always connect the ball joint seal boot heat shield to help stop any heat damage. Place the lower ball joint heat shield, braking disc and disc brake caliper assembly where they should be and secure the caliper with bolted pins tightened to 22 Nm (16 ft. lbs.). Clean the outer C/V joint stub axle, put on the hub nut and when the vehicle brakes are applied, tighten the hub nut to 142 Nm (105 ft. lbs.). After that, install the original front wheel and drop the vehicle. Then, tighten the front lug nuts to 135 Nm (100 ft. lbs.) as indicated, towel underneath the vehicle to avoid dirt and set the front toe correctly.

Related Chrysler Cirrus Parts
 Chrysler Cirrus Axle Beam Mount
 Chrysler Cirrus Axle Pivot Bushing
 Chrysler Cirrus Coil Spring Insulator
 Chrysler Cirrus Control Arm
 Chrysler Cirrus Lateral Link
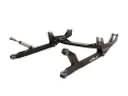 Chrysler Cirrus Radius Arm
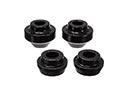 Chrysler Cirrus Radius Arm Bushing
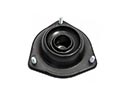 Chrysler Cirrus Strut Mounts
 Chrysler Cirrus Sway Bar Bracket
 Chrysler Cirrus Sway Bar Link Bushing
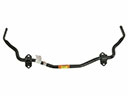 Chrysler Cirrus Sway Bars
 Chrysler Cirrus Wheel Bearing