JeepParts
My Garage
My Account
Cart
OEM Chrysler Concorde Timing Cover
Engine Timing Cover- Select Vehicle by Model
- Select Vehicle by VIN
Select Vehicle by Model
orMake
Model
Year
Select Vehicle by VIN
For the most accurate results, select vehicle by your VIN (Vehicle Identification Number).
11 Timing Covers found

Chrysler Concorde Timing Cover Part Number: 4897571AD
$1015.76Ships in 1-2 Business Days


Chrysler Concorde Timing Cover Part Number: 4663614AC

Chrysler Concorde Oil Pump Part Number: 4591102AB

Chrysler Concorde Front Cover, Inner Part Number: 4897748AB


Chrysler Concorde Timing Cover, Inner Driver Side Part Number: 4663817
Chrysler Concorde Front Cover, Rear Part Number: 4573503
Chrysler Concorde Front Cover Part Number: 4556537

Chrysler Concorde Timing Cover, Upper Driver Side Part Number: 4556535


Chrysler Concorde Timing Cover Part Number: 4897568AD
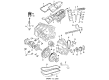
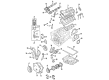
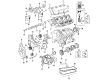
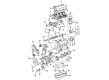
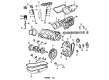
Chrysler Concorde Timing Cover
Choose OEM Timing Cover that meet Chrysler factory standards. Chrysler designs and tests every component for precision and durability. Each Timing Cover follows strict manufacturing steps to lock in quality and fit. If your Chrysler Concorde matters to you, OEM parts make the smart choice. You'll get the exact look, feel, and performance you expect. Shop genuine Concorde parts at the highly competitive prices online. Enjoy a manufacturer's warranty, a hassle-free return policy, and rapid delivery. No more guesswork with off brands. Get genuine parts with exact fit and true factory performance. Shop with confidence today at JeepPartsDeal.com.
The Timing Cover is a critical part that has a critical utility in determination of the Chrysler's full-sized sedan dependability as well as efficiency. Intended to safeguard the engine's timing mechanism that could comprise of a belt, a chain or a cam belt; the Timing Cover is often made out of aluminum plastic or steel. This reliable design of hoods shields the delicate interior specifications of the engine thus guaranteeing the efficiency and safety of the Chrysler Concorde. These include timing belt Tensioner Kit, Concorde Timing Chain Cover, Concorde Crankshaft Timing Flange or Pulley produced and fitted on several Concorde models produced between 1993 and 2004, hence the importance of Timing Cover. This Timing Cover often comes with gaskets, which just increases protection, and in extension, the durability the Chrysler Concorde. Still, some of these covers are highly durable and when used appropriately their replacement is often done in time before they give in and cause early mishaps that can put the safety of the vehicle at risk. The Chrysler Concorde's style is highly distinctive; it is cab-forward, which simplifies vehicle maintenance, so the Timing Cover has a much more significant function. Thus, the Timing Cover offers both protection and universality in the models, thus, making sure that drivers get a trouble-free and safe driving experience. In conclusion, the Timing Cover is one which shows that Chrysler intend to produce high quality and high performance Concorde models on the market.
Chrysler Concorde Timing Cover Parts and Q&A
- Q: How to Maintain a Timing Cover on Chrysler Concorde?A:You should begin by removing the negative cable from the remote jumper terminal, then take away the upper radiator support crossmember, the radiator fan, all accessory Drive Belts, the crankshaft vibration damper, the Power Steering Pump from its bracket and the accessory drive belt tensioner pulley and bracket. After that, pull off the timing chain cover by unscrewing the attaching bolts. When setting up, look over the surfaces that come in contact and make sure they are clean and either keep or replace the gasket and seal. Should the front Crankshaft Seal be bench installed, carefully install Special Tool 6780-2, Sleeve over the nose of the crankshaft to guide and shield the seal lip. Apply a 1/8 inch line of Mopar Engine RTV GEN II around the parting lines between the Oil Pan and cylinder block before installing the timing cover gasket. Place the timing cover and gasket on and tighten the M10 bolts to 54 Nm (40 ft. lbs.) and the M6 bolts to 12 Nm (105 in. lbs.). Should it be required, put on the crankshaft oil seal by using Special Tool 6780-2 sleeve and then Special Tool 6780-2 installer and end with the crankshaft vibration damper. Replace the power steering pump on the bracket, install the A/C belt tensioner assembly to the timing cover and then attach the generator/power steering drive belt tensioner pulley and bracket. After that, put back the radiator fan, accessory drive belts and upper radiator crossmember and then reconnect the negative battery cable.
- Q: How to Service and Repair a Timing Cover on Chrysler Concorde?A:First, take off the negative cable from the remote jumper terminal and then get the upper radiator support crossmember out. Then, remove the fan, the belt around the accessory drives and the crankshaft damper. First, remove the Power Steering Pump from its bracket and second, take off both the tensioner pulley and the bracket holding it. Following that, loosen and remove the bolts holding the timing chain cover, then remove the cover. When installing, look over and clean each surface that needs to be sealed. Replace the gasket and seal as needed. Should you need to change a bench installed front Crankshaft Seal, use Special Tool 6780-2 to place and shield the seal lip. Apply a 1/8 inch strip of Mopar Engine RTV GEN II oil around the edge of the Oil Pan and along the lines where the oil pan and cylinder block are separated before fitting the timing cover gasket. Attach the timing cover and gasket, fastening both their bolts according to the specification: M10 bolts should be tightened to 54 Nm (40 ft. lbs.) and M6 bolts to 12 Nm (106 in. lbs.). If you haven't done it yet, use the package sleeve and installer for the crankshaft oil seal (Special Tool 6780-2). Place the crankshaft damper in the engine, securing it with a 170 Nm (125 ft. lbs.) tightened center bolt and then bolt the power steering pump to the bracket. Afterwards, attach the timing cover tensioner bracket and the A/C belt tensioner assembly and follow that by attaching the generator/power steering Drive Belt tensioner pulley and bracket. Reinstall the fan module, fan drive belt, under-hood belts, upper radiator crossmember and the vehicle's negative cable.


Related Chrysler Concorde Parts
 Chrysler Concorde Camshaft Seal
 Chrysler Concorde Camshaft Thrust Plate
 Chrysler Concorde Crankshaft Thrust Washer
 Chrysler Concorde Cylinder Head Gasket
 Chrysler Concorde Lash Adjuster
 Chrysler Concorde Oil Filter Housing
 Chrysler Concorde Oil Pan Baffle
 Chrysler Concorde Oil Pump Gasket
 Chrysler Concorde Rod Bearing
 Chrysler Concorde Timing Chain
 Chrysler Concorde Transmission Mount
 Chrysler Concorde Variable Timing Sprocket