JeepParts
My Garage
My Account
Cart
OEM Chrysler Concorde Oil Pan
Oil Drain Pan- Select Vehicle by Model
- Select Vehicle by VIN
Select Vehicle by Model
orMake
Model
Year
Select Vehicle by VIN
For the most accurate results, select vehicle by your VIN (Vehicle Identification Number).
6 Oil Pans found

Chrysler Concorde Oil Pan Part Number: 4663740AB
$242.89 MSRP: $317.56You Save: $74.67 (24%)
Chrysler Concorde Oil Pan Part Number: 4792956AA
$364.89 MSRP: $441.00You Save: $76.11 (18%)Ships in 1-2 Business DaysChrysler Concorde Oil Pan Part Number: 4663841AD
$174.22 MSRP: $220.86You Save: $46.64 (22%)Ships in 1-2 Business Days


Chrysler Concorde Differential Cover, Front Part Number: 4659520
Chrysler Concorde Oil Pan Part Number: 4573510
Chrysler Concorde Oil Pan Part Number: 4792576AA
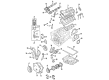
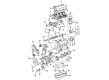
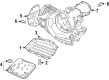
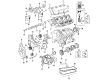
Chrysler Concorde Oil Pan
Choose OEM Oil Pan that meet Chrysler factory standards. Chrysler designs and tests every component for precision and durability. Each Oil Pan follows strict manufacturing steps to lock in quality and fit. If your Chrysler Concorde matters to you, OEM parts make the smart choice. You'll get the exact look, feel, and performance you expect. Shop genuine Concorde parts at the highly competitive prices online. Enjoy a manufacturer's warranty, a hassle-free return policy, and rapid delivery. No more guesswork with off brands. Get genuine parts with exact fit and true factory performance. Shop with confidence today at JeepPartsDeal.com.
The Chrysler Concorde Oil Pan is one of those critical parts that clearly define the dependability and power of Chrysler's full-sized sedan, the Concorde. Located under the engine crankshaft, the oil pan holds engine oil that is vital in wet sumping lubrication system to ensure that the engine is adequately cooled depending on the-duty cycle it is exposed to. As parts of being specifically designed to fit Chrysler Concorde, most of the Concorde oil pans are long-lasting, particularly the new models that are mostly made from cast aluminum thus making efficient and durable. This change from stamped steel to materials of high tech has demonstrated Chrysler's seriousness in change and enhancement. The design of the oil pan is always well-thought-out to facilitate proper circulation of oil and to avoid leaks of the oil as well as to feed the correct amount of oil to the engine required for its functionality and safety. However, it is essential to note that Chrysler Concorde Oil Pan suits different models that were manufactured between 1993 and 2004 that makes it suitable for servicing and repairing. It's unique from the automotive market because of its reliability to survive dynamic driving conditions as well as offer the right lubrication. If appearance, performance, and safety were three factors, then the Chrysler Concorde Oil Pan is not just a cross component that gains recognition; it is a representation of Chrysler's devotion to producing vehicles with such characteristics.
Chrysler Concorde Oil Pan Parts and Q&A
- Q: How to Service and Repair an Oil Pan on Chrysler Concorde?A:Take out the dipstick and its tube, then lift the vehicle with a hoist to service and repair the oil pan. Change out the engine oil and remove the Oil Filter. Unhook the suspension stabilizer bar and put it back in place to allow better room for the oil pan. Take out the structural collar from the oil pan to the transmission housing as well as the lower bolt connecting the A/C compressor to the oil pan. If the vehicle has an engine oil cooler line, disconnect it from the pan and make sure to remove the two bolts on the Timing Cover from the oil pan so you do not damage them. After that, unscrew the attaching bolts from the oil pan, then pull out the oil pan and gasket. Give the oil pan and sealing areas a good clean and inspect the gaskets on the oil pan and timing chain cover to determine when replacement might be needed. Apply a 1/8 inch bead of Mopar GEN II Engine RTV to the front T-joints of both the oil pan gasket and timing cover gasket and then set the oil pan gasket into the block. To keep oil leaks from happening, begin by fastening the oil pan bolts and nuts with your hands, then cover the timing chain holders with the pan bolts to 12 Nm (105 in. lbs.). Repeat for the oil pan bolts and tighten to 28 Nm (250 in. lbs.), plus the nuts to 12 Nm (105 in. lbs.). Replace the lower bolt between the A/C compressor and the oil pan and tighten it to 28 Nm (21 ft. lbs.). Should you have an oil cooler, connect the line from the cooler to the oil pan. Work on the collar in order: tighten the bolts from the vertical collar connecting to the oil pan to 1.1 Nm (10 in. lbs.); tighten the horizontal collar to the transmission to 55 Nm (40 ft. lbs.); and tighten all the bolts on the collar from the center vertical collar to 55 Nm (40 ft. lbs.). Now, replace the oil filter and drain plug, secure the suspension stabilizer bar, lower the vehicle, put in the oil dipstick and tube and add the correct oil to the engine crankcase.
- Q: How to Maintain and Fix an Oil Pan on Chrysler Concorde?A:Before repairing the oil pan, withdraw the dipstick and turn off the car, then use a hoist to lift it slightly. Empty the engine oil and then get rid of the Oil Filter. Unscrew the suspension stabilizer bar, then move it for more room to fit the oil pan below. Detach the structural collar between the oil pan and the transmission and remove the lower bolt from the A/C compressor to the oil pan. If your car is equipped with an engine oil cooler, take it out from the oil pan. Eliminate the two bolts securing the Timing Cover to the oil pan to keep any accidents from occurring. Afterward, unscrew the bolts that secure the oil pan and get rid of the pan and gasket. Clean the oil pan and seal any exposed areas and check if replacing the gaskets on the oil pan and timing chain is necessary. Use a thin line (1/8 inch) of Mopar Engine RTV GEN II around both T joints that fit over the oil pan gasket. Install the gasket to the block, then install the oil pan and mount it using the fasteners following this order: loosely secure the oil pan bolts and nuts at first, then tighten the timing chain cover to pan bolts to 12 Nm (105 in. lbs.), then tighten the oil pan bolts to 28 Nm (250 in. lbs.) and finally, tighten the oil pan nuts to 12 Nm (105 in. lbs.). Attach the oil pan's lower bolt to the A/C compressor, then tighten it to 28 Nm (21 ft. lbs.). If your engine has an engine oil cooler, connect it to the oil pan. Apply 1.1 Nm (10 in. lbs.) to all the vertical collar to oil pan bolts first, next tighten the horizontal collar to the transmission bolts to 55 Nm (40 ft. lbs.) and finally tighten all the bolts to the same torque in sequence from the center outward to 55 Nm (40 ft. lbs.). When everything is installed, put in the oil, secure the oil dipstick and check that the oil crankcase reaches the correct level.


Related Chrysler Concorde Parts
 Chrysler Concorde Timing Belt
 Chrysler Concorde Coolant Filter
 Chrysler Concorde Harmonic Balancer
 Chrysler Concorde Oil Filler Cap
 Chrysler Concorde Oil Filter
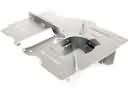 Chrysler Concorde Oil Pan Baffle
 Chrysler Concorde Oil Pump Gasket
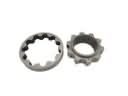 Chrysler Concorde Oil Pump Rotor Set
 Chrysler Concorde Piston Ring Set
 Chrysler Concorde Rocker Arm Pivot
 Chrysler Concorde Timing Cover Gasket
 Chrysler Concorde Valve Stem Seal