JeepParts
My Garage
My Account
Cart
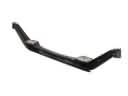
OEM Chrysler LHS Front Cross-Member
Front Engine Cross Member- Select Vehicle by Model
- Select Vehicle by VIN
Select Vehicle by Model
orMake
Model
Year
Select Vehicle by VIN
For the most accurate results, select vehicle by your VIN (Vehicle Identification Number).
3 Front Cross-Members found

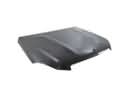
Chrysler LHS Crossmember, Front Driver Side Part Number: 4580353
Chrysler LHS Crossmember, Passenger Side Part Number: 4580352

Chrysler LHS Engine Cradle, Front Part Number: 5012966AE
Chrysler LHS Front Cross-Member
Choose OEM Front Cross-Member that meet Chrysler factory standards. Chrysler designs and tests every component for precision and durability. Each Front Cross-Member follows strict manufacturing steps to lock in quality and fit. If your Chrysler LHS matters to you, OEM parts make the smart choice. You'll get the exact look, feel, and performance you expect. Shop genuine LHS parts at the highly competitive prices online. Enjoy a manufacturer's warranty, a hassle-free return policy, and rapid delivery. No more guesswork with off brands. Get genuine parts with exact fit and true factory performance. Shop with confidence today at JeepPartsDeal.com.
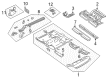
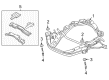
The Chrysler LHS Front Cross-Member operates as a critical component which improves both the ruggedness and driving capabilities of Chrysler LHS automobiles. The Front Cross-Member functions as a strong framework for the powertrain segments to maintain vehicle stability and accurate handling thus reducing misalignment of car body components. The K-frame component delivers strength due to its steel construction and its ability to handle numerous forces which makes it crucial for operational safety. The K-member Front Cross-Member exists among the Chrysler LHS lineup to serve vehicles with this particular transversely-mounted engine by providing structural support. A Front Cross-Member demands absolute integrity since it fundamentally boosts operational efficiency and safety performance. The Chrysler LHS spent nine years (1994-2001) in production where its Front Cross-Member joined the list of features that gave the popular model its market position. The Chrysler LHS Front Cross-Member showcases unique engineering and design because it provides steady performance as well as vehicle alignment during operations. The component integrates sustainable performance with mechanical system functionality to deliver essential driving functions which stand as an essential element within the automaker model history.
Chrysler LHS Front Cross-Member Parts and Q&A
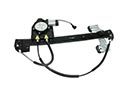
- Q: How to Service and Repair the Front Cross-Member on Chrysler LHS?A:Before trying to fix or repair the engine cradle crossmember, place and secure the car on a lift to stop the center of gravity from shifting and causing a hazard. Release the Hood Latch, open the hood and take off the nuts connecting the Engine Mounts to the cradle. Attach the correct engine support and then place the vehicle on safe stands. Subsequently, disconnect the bolts securing the transaxle crossmember to the cradle, let the vehicle down and lift the engine and transaxle off the frame. Raise the car once again with safety stands, break the connectors between the sway bar and the Control Arms and remove the bolts keeping the suspension lower ball joints and spindles together. After separating the lower control arm from the spindle, put the cradle on a wood beam and a jack in a 10 cm by 10 cm by 90 cm size. Take out the bolts holding the cradle to the body shell, then lower the cradle as far as it will go. If the cradle must be changed, bring over the suspension parts and jounce and bounce plates to the new cradle. Make sure the cradle is on top of the jack and wooden beam, then put it below the body shell and bolt it in place. Attach the control arms at the lower end to the spindles, place the bolts that secure the suspension ball joints to the spindles and connect the sway bar links. Drop the vehicle and engine-transaxle onto the cradle, before lifting it back up again. Secure the bolts on the transaxle crossmember to the cradle, lower the car, remove the engine support and install the supplied nuts on the engine mounts. In case needed, adjust the front suspension.