JeepParts
My Garage
My Account
Cart
OEM Chrysler LHS Control Arm
Suspension Arm- Select Vehicle by Model
- Select Vehicle by VIN
Select Vehicle by Model
orMake
Model
Year
Select Vehicle by VIN
For the most accurate results, select vehicle by your VIN (Vehicle Identification Number).
2 Control Arms found


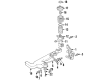
Chrysler LHS Control Arm, Front Passenger Side Part Number: 4616402
$121.95 MSRP: $154.60You Save: $32.65 (22%)Ships in 1-2 Business Days

Chrysler LHS Control Arm, Front Driver Side Part Number: 4616403
Chrysler LHS Control Arm
Choose OEM Control Arm that meet Chrysler factory standards. Chrysler designs and tests every component for precision and durability. Each Control Arm follows strict manufacturing steps to lock in quality and fit. If your Chrysler LHS matters to you, OEM parts make the smart choice. You'll get the exact look, feel, and performance you expect. Shop genuine LHS parts at the highly competitive prices online. Enjoy a manufacturer's warranty, a hassle-free return policy, and rapid delivery. No more guesswork with off brands. Get genuine parts with exact fit and true factory performance. Shop with confidence today at JeepPartsDeal.com.
Everyone must acknowledge that the Chrysler LHS Control Arm is a highly crucial part that improves the performance and reliability of Chrysler LHS automobiles. As an augural component of the suspension system, the Control Arm connects the frame of a car to its wheels enabling the suspension performance of up-down movements of the wheels in order to correspond with the irregularity of the terrain. Chrysler LHS made between 1994 to 2001 has employed conventional stamped steel Control Arm together with newest cast iron or aluminum types that are stronger and lighter. Normally in a Control Arm, the bushings are used for the mounting purpose and on the other hand ball joints are used for the assembly of the wheel as it plays an important role in handling and alignment. Interestingly, Chrysler LHS Control Arm is a flexible type that can handle aggressive operations by designing the part to be stronger than the original equipment type. Made from DOM tubular steel or aluminum and other long-lasting materials, its reliability increases when changes to the car's height or its wheels are made. This moveable join, named a Control Arm is contributing to the general performance and safety of this car model, Chrysler LHS. Thus, the Chrysler LHS Control Arm is acknowledged as highly reliable and performing in the automotive market, guaranteeing the LHS to be an attractive asset for full-size luxury sedans. Characteristics and the construction of the car exemplify the Chrysler concern to produce quality vehicles that would last for a long time, thus making LHS the symbol of American automobile industry.
Chrysler LHS Control Arm Parts and Q&A
- Q: How to Remove and Reinstall the Lower Control Arm on Chrysler LHS?A:Raise the car on jackstands or a frame lift, remove the wheel and tire and then you can take the lower control arm out. Remove the ball joint stud from the Steering Knuckle by first taking out the nut and bolt, but ensure you don't harm the seal or the inner ON joint. Use the pry bar to take apart the ball joint stud and steering knuckle. Now hold the open-end wrench on the end of the tension strut so it doesn't turn as you remove the nut and washer. Throw away the original retaining nut and use a fresh one when you reinstall it. Remove the lower control arm pivot bushing attached to the lower control arm pivot bolt, then take out the complete lower control arm along with the tension strut at one time. Following that, take out the tension strut to control arm retaining nut and washer, separating the tension strut from the lower control arm. When taking out the pivot bushing in disassembly, first put the lower control arm in an arbor press with the large end inside Receiver and then press it out with Remover, Special Tool 6644-2. Cast out the pressed-out bushing. After detaching the force strut bushing, use Remover, Special Tool 6644-4, to cut it into two separate pieces for the new bushing. Before installing the lower control arm, apply lubricant to the pivot bushing. Use Installer, Special Tool 6644-1, to insert the pivot bushing and press it until it sits squarely on the supporting spot. Fixed the tension strut to the lower control arm and put both parts together as an assembly. Make sure you grease the bushing and use the Installer to press it into place in the lower control arm, all the way to the end. Reinstall the tension strut and tighten it up along with the lower control arm and tension strut assembly. Fix the tension strut in place, install a washer and a new retaining nut and tighten it at 130 Nm (96 ft. lbs.) as you stop the strut from rotating. The assembly must be installed with the tension strut and isolator bushing fitted in first and after that, the lower control arm pivot bushing is slipped on. Put the lower control arm onto the cradle bracket with the pivot bolt, but resist tightening the nut for now. Installing a washer and a tension strut, then fasten the bracket nut to 130 Nm (95 ft. lbs.) by holding the strut. Insert the lower ball joint stud into the steering knuckle and use a rodeo clamp bolt and nut, tightening the nut to 56 Nm (40 ft. lbs.). Set the wheel and tire back in place and tighten the bolts on the wheel mounting stud to a specific torque of 129 Nm (96 ft. lbs.), using the specified order. Then, lower the car to support it, tighten the control arm bushing at the cradle bracket and fasten it to the bolt with 142 Nm (106 ft. lbs.) of effort.

Related Chrysler LHS Parts
 Chrysler LHS Axle Beam Mount
 Chrysler LHS Axle Support Bushings
 Chrysler LHS Bump Stop
 Chrysler LHS Coil Springs
 Chrysler LHS Crossmember Bushing
 Chrysler LHS Lateral Link
 Chrysler LHS Shock Absorber
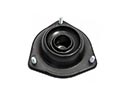 Chrysler LHS Strut Mounts
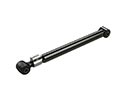 Chrysler LHS Suspension Strut Rod
 Chrysler LHS Sway Bar Link
 Chrysler LHS Sway Bar Link Bushing
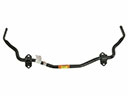 Chrysler LHS Sway Bars
Browse Chrysler LHS Control Arm by Years
2001
2000
1999
1997
1996
1995
1994