JeepParts
My Garage
My Account
Cart
OEM Chrysler PT Cruiser A/C Accumulator
Accumulator- Select Vehicle by Model
- Select Vehicle by VIN
Select Vehicle by Model
orMake
Model
Year
Select Vehicle by VIN
For the most accurate results, select vehicle by your VIN (Vehicle Identification Number).
9 A/C Accumulators found


Chrysler PT Cruiser Dehydrator Part Number: 68029229AA
$159.93 MSRP: $285.00You Save: $125.07 (44%)Ships in 1-2 Business Days

Chrysler PT Cruiser Dehydrator Part Number: 68029242AA
$151.73 MSRP: $200.00You Save: $48.27 (25%)Ships in 1-2 Business DaysChrysler PT Cruiser A/C Line Part Number: 5058271AK
$89.73 MSRP: $132.00You Save: $42.27 (33%)Ships in 1-3 Business Days

Chrysler PT Cruiser Dehydrator Part Number: 5179157AB

Chrysler PT Cruiser Dehydrator Part Number: 5179158AA
Chrysler PT Cruiser Dehydrator Part Number: 5179157AA

Chrysler PT Cruiser Drier Part Number: 5142568AA
Chrysler PT Cruiser Dehydrator Part Number: 5096289AA
Chrysler PT Cruiser Dehydrator Part Number: 5017441AA
Chrysler PT Cruiser A/C Accumulator
Choose OEM A/C Accumulator that meet Chrysler factory standards. Chrysler designs and tests every component for precision and durability. Each A/C Accumulator follows strict manufacturing steps to lock in quality and fit. If your Chrysler PT Cruiser matters to you, OEM parts make the smart choice. You'll get the exact look, feel, and performance you expect. Shop genuine PT Cruiser parts at the highly competitive prices online. Enjoy a manufacturer's warranty, a hassle-free return policy, and rapid delivery. No more guesswork with off brands. Get genuine parts with exact fit and true factory performance. Shop with confidence today at JeepPartsDeal.com.
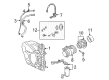
The A/C Accumulator in Chrysler PT Cruiser is considered to be important as it prevents moisture from accumulating within the air conditioning system while also trapping debris. This element is found in two key components: the receiver drier, connected usually in the high-pressure liquid line and the accumulator installed ideally before the compressor and after the evaporator. Both component employ of the desiccant bag to shield the A/C system against the moisture-formed rust and debris form sludge that is lethal to the system. It stated that Chrysler PT Cruiser vehicles may need the A/C Accumulator to be changed during massive A/C services because debris can not be dispersed from the system. The sorptive capacity of desiccant is defined, and the desiccant can only absorb limited amount of water and start to get saturated when it is opened to the air. It is thus important to replace the A/C Accumulator on time to avoid such leakage and to ensure the longevity of the A/C system as well as warrant the validity in case of a warrantable replacement of compressors.
Chrysler PT Cruiser A/C Accumulator Parts and Q&A
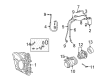
- Q: How to Remove and Install an A/C Accumulator in a Refrigerant System on Chrysler PT Cruiser?A:First, unhook the negative battery terminal and let it stand a bit before gathering the refrigerant from the refrigeration system. If you can't get the servo control out with the vehicle at ground level, lower the vehicle to reach the servo and the accumulator inside. Unplug the A/C low pressure switch from the wire harness, unfasten the nuts on the suction and liquid lines to the accumulator tube tapping block and remove the lines by discarding their O-ring seals. For the open fitting on the suction and liquid line and the accumulator tapping block ports, use either plugs or tape. Take out the bolt holding the accumulator bracket to the frame rail, plus the two bolts joining the accumulator tubes to the Evaporator tube tapping block and then separate the tubes. Throw out the old gasket. As before, use tape or plugs to seal the holes in the accumulator tube and evaporator. Take out the assembly of tubes by the evaporator and accumulator from under the hood and stand it on a table. Screw out the bolts from the fittings on the accumulator tubes, free the tubes, cast off the O-ring seals and fit the accumulator tubes with new sealing plugs or cover them with tape. Pull the A/C low pressure switch from the accumulator and throw away the O-ring seal. When replacing the accumulator, put 30 milliliters (1 fluid ounce) of refrigerant oil into the A/C system only with the recommended oil for the compressor. Put in the A/C low pressure switch on the accumulator using a new O-ring seal and tighten it manually. After opening the accumulator tube fittings and ports, remove the tape or plugs, lubricate new rubber O-ring seals using clean refrigerant oil and attach them to the accumulator tube fittings, using only the correct R-134a system O-rings. Hook the accumulator tubes to the accumulator, then fasten the two required bolts to 11 N.m (97 in.lbs.). Put the accumulator and tubes in your vehicle's engine area, take off any passage plugs from the open ports, lubricate a fresh gasket with refrigerant oil and connect the gasket to the evaporator tube tapping block. Connect the accumulator tubes to the evaporator tube tapping block, install the two bolts holding them together and tighten them to a torque of 11 N.m (97 in.lbs.). Put the end that secures the accumulator bracket through the hole, line up the notches and torque to 10 N.m (89 in.lbs.). Pull out the tape from opened suction and liquid line fittings and the accumulator tube tapping block, oil the new O-rings, install them on the suitable line fittings and be sure to use only the appropriate O-rings with the system's R-134a gas. Join the A/C suction and liquid lines to the taps on the accumulator tube block, fit the nuts and tighten them to 5 N.m (44 in.lbs). Connect the wire harness connector to the A/C low pressure switch, if there is a vehicle speed control servo, reinstall it, reattach the negative Battery Cable, get rid of the refrigerant and charge the refrigerant system.
- Q: How to Service and Repair an A/C Accumulator on Chrysler PT Cruiser?A:Begin the service and repair of an accumulator HVAC by recovering the refrigerant from the refrigerant system. Take out the battery negative cable from the car. If necessary, move the vehicle speed control servo so you can reach the accumulator. Take out the low pressure clutch cycling switch from the accumulator. After that, take out the screws that join the suction and liquid line assembly's refrigerant line fittings to the accumulator connector block and remove those fittings. Eliminate the rubber O-ring from the refrigerant line connectors and seal the ports on the accumulator connector block and the fittings with plugs or with tape. Open the screw securing the accumulator mounting bracket to the right side rail and take out the accumulator from its position in the engine space. For the installation, put the accumulator in the engine compartment and use miniature screwdrivers to tighten the mounting bracket screw to 11.3 Nm (100 in. lbs.). Take away the tape and plugs from where the accumulator connects and at the same time, from all R-134a refrigerant line fittings and then lubricate new rubber O-ring seals with clean refrigerant oil and put them on the R-134a refrigerant line fittings. Attach the refrigerant line fittings to the accumulator connector block ports and tighten the screws using 2.3 Nm (20 in. lbs.) as your guide. Install the low pressure clutch cycling switch onto the accumulator and, if the vehicle needs it, reinstall the speed control servo too. Connect the terminal on the battery's negative cable and pull out the refrigerant system. If you change the accumulator, put 89 milliliters (3 fluid ounces) of the recommended refrigerant oil into the system before charging it. At this time, fill the refrigerant system to its optimum operating level.


Related Chrysler PT Cruiser Parts
 Chrysler PT Cruiser Heater Core
 Chrysler PT Cruiser A/C Compressor
 Chrysler PT Cruiser A/C Compressor Clutch
 Chrysler PT Cruiser A/C Compressor Cut-Out Switches
 Chrysler PT Cruiser A/C Condenser
 Chrysler PT Cruiser A/C Hose
 Chrysler PT Cruiser A/C Service Cap
 Chrysler PT Cruiser A/C System Valve Core
 Chrysler PT Cruiser Blend Door Actuator
 Chrysler PT Cruiser Blower Motor Resistor
 Chrysler PT Cruiser Evaporator
 Chrysler PT Cruiser HVAC Pressure Switch