JeepParts
My Garage
My Account
Cart
OEM Chrysler Sebring Parking Brake Shoe
Emergency Parking Brake Shoe- Select Vehicle by Model
- Select Vehicle by VIN
Select Vehicle by Model
orMake
Model
Year
Select Vehicle by VIN
For the most accurate results, select vehicle by your VIN (Vehicle Identification Number).
4 Parking Brake Shoes found


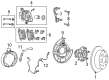
Chrysler Sebring Parking Brake Shoes, Rear Part Number: 5191215AB
$121.95 MSRP: $187.00You Save: $65.05 (35%)Ships in 1-2 Business Days


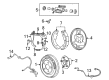
Chrysler Sebring Brake Shoes, Rear Part Number: 5191306AA
$52.09 MSRP: $77.20You Save: $25.11 (33%)Ships in 1-2 Business Days
Chrysler Sebring Brake Pads, Front Part Number: 68574695AA
$88.09 MSRP: $132.00You Save: $43.91 (34%)Ships in 1-2 Business Days

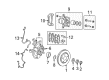
Chrysler Sebring Brake Shoes, Rear Part Number: 5012334AA
Chrysler Sebring Parking Brake Shoe
Choose OEM Parking Brake Shoe that meet Chrysler factory standards. Chrysler designs and tests every component for precision and durability. Each Parking Brake Shoe follows strict manufacturing steps to lock in quality and fit. If your Chrysler Sebring matters to you, OEM parts make the smart choice. You'll get the exact look, feel, and performance you expect. Shop genuine Sebring parts at the highly competitive prices online. Enjoy a manufacturer's warranty, a hassle-free return policy, and rapid delivery. No more guesswork with off brands. Get genuine parts with exact fit and true factory performance. Shop with confidence today at JeepPartsDeal.com.
Parking Brake Shoe as the component that is necessary for stopping the wheels rotation in Chrysler Sebring vehicles when the parking break is initiated. Through application of brake lining that faces the drum wall, the Parking Brake Shoe prevents the rotation of the wheel hence immobilizing the vehicle during a parking session. In various Chrysler sebring models over the years, there have been diverse PARKING BRAKE SHOES each of which has the core function of immobilizing the car in its position. These different styles may be constructed differently or made using different materials but overall, they perform the role of offering the required force to bring the car to a standstill during parking.
Chrysler Sebring Parking Brake Shoe Parts and Q&A
- Q: How to install parking brake shoes on Chrysler Sebring?A:Before installing the parking brake shoes, insert the lower return spring 3 and adjuster 5 between 2 and 6 and confirm the lever is facing inwards on the rear shoe and the threaded adjuster section is to the left on both sides. If necessary, put the strut 1 just above the hub and bearing so the curved end points toward the back. Following that, place the brake shoes 2 and 6, adjuster 5 and lower return spring 3 around the hub and bearing, so that the strut sits between the front shoe and the rear shoe's lever on the mounting plate. Connect the cable to the lever on the parking brake shoe and insert the three parking brake hold-down springs and pins 1 and 2 and rotate pins 90° to hold them in place. Start by fixing the front upper return spring 2 for the front brake shoe and anchor pin 3 and after that fix the rear upper return spring 2 to hold the rear brake shoe and anchor pin 3. With Special Tool C-3919, Brake Shoe Gauge, measure the drilled part of the parking Brake Drum and put the gauge at the set size for the brake shoes. Lay the gauge 2 across the widest tip of the parking brake shoes 1 and screw the adjuster wheel on each side until the linings of the shoes almost touch the jaws on the gauge. Put on the rear brake rotor 3 next and tighten it using a couple of wheel mounting nuts for the final setup. The adjuster wheel is located with the drum on at 7 o'clock for the left side's 1 hole and at 5 o'clock for the right side. Whenever you rotate the adjustment wheel 2 upward, it loosens the brakes, and rotating it downward makes the brakes tighter. Take out the rubber plug from hole 1 on the front of the rotor, make your final repairs or adjustments by reaching in through it, and then put it back in place. Last, take out the wheel mounting nuts, install the brake rotor 3, complete all the earlier steps and lower the vehicle to test the parking brake.
- Q: How to Maintain and Fix a Parking Brake Shoe on Chrysler Sebring?A:Before beginning on the parking brake shoe, attach the vehicle to the air jack. In case you are taking out parking brake shoes on both sides, do these steps for each side. Open the brake drum, take out and remove the rear brake rotor. Be sure to turn the brake shoe adjuster wheel until it is as short as it can go. Disengage both upper return springs from their anchor pins and the brake shoes at the back and front of the wheel first. After that, pry off all brake shoe hold-down springs and pins (1 and 2) using a screwdriver, rotating each pin 90° to disengage them. Release the cable from the parking brake lever at the rear, together with the brake shoes (2, 6), adjuster (5) and lower return spring (3) from the support plate. Should you need to, take out the left strut (1) and then slide the lower return spring (3) and its adjuster (5) out of the shoes.


Related Chrysler Sebring Parts
 Chrysler Sebring ABS Relay
 Chrysler Sebring Brake Caliper Bolt
 Chrysler Sebring Brake Caliper Bracket
 Chrysler Sebring Brake Caliper Piston
 Chrysler Sebring Brake Disc
 Chrysler Sebring Brake Dust Shield
 Chrysler Sebring Brake Line
 Chrysler Sebring Brake Pad
 Chrysler Sebring Brake Proportioning Valve
 Chrysler Sebring Hydraulic Hose
 Chrysler Sebring Speed Sensor
 Chrysler Sebring Wheel Stud