JeepParts
My Garage
My Account
Cart
OEM Chrysler Town & Country A/C Condenser
Air Conditioning Condenser- Select Vehicle by Model
- Select Vehicle by VIN
Select Vehicle by Model
orMake
Model
Year
Select Vehicle by VIN
For the most accurate results, select vehicle by your VIN (Vehicle Identification Number).
9 A/C Condensers found


Chrysler Town & Country Condenser Part Number: 4677782AC
$328.19 MSRP: $497.00You Save: $168.81 (34%)
Chrysler Town & Country Condenser Part Number: 4809227AG
$192.82 MSRP: $318.00You Save: $125.18 (40%)Ships in 1-2 Business DaysChrysler Town & Country Condenser Part Number: 68059739AB
$236.47 MSRP: $357.00You Save: $120.53 (34%)Ships in 1-2 Business Days
Chrysler Town & Country Condenser Part Number: 5012969AA
$45.59 MSRP: $210.00You Save: $164.41 (79%)Ships in 1-2 Business Days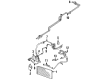
Chrysler Town & Country Condenser Part Number: 4809195AB
$50.23 MSRP: $63.68You Save: $13.45 (22%)Ships in 1-2 Business Days
Chrysler Town & Country Condenser Part Number: 4682590
Chrysler Town & Country Condenser Part Number: 5012649AA

Chrysler Town & Country Condenser Part Number: 4682591AC

Chrysler Town & Country Condenser Part Number: 5016793AC
Chrysler Town & Country A/C Condenser
Choose OEM A/C Condenser that meet Chrysler factory standards. Chrysler designs and tests every component for precision and durability. Each A/C Condenser follows strict manufacturing steps to lock in quality and fit. If your Chrysler Town & Country matters to you, OEM parts make the smart choice. You'll get the exact look, feel, and performance you expect. Shop genuine Town & Country parts at the highly competitive prices online. Enjoy a manufacturer's warranty, a hassle-free return policy, and rapid delivery. No more guesswork with off brands. Get genuine parts with exact fit and true factory performance. Shop with confidence today at JeepPartsDeal.com.
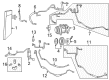
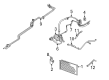
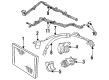
The A/C condenser in Chrysler Town & Country is used to heat exchange in the vehicles and is used in converting the gaseous refrigerant and pumping the liquid refrigerant into the accumulator. Located usually at the front of the car right beneath the radiator, the A/C Condenser is made up of a series of tubes through which this cooling process occurs. Year after year Chrysler Town & Country has relayed different styles of A/C Condensers but the specific variations in their style are not well spelt. Despite the varying roles for the different types of A/C Condenser we find that their main purpose is to always regulate the temperatures of the refrigerant to enhance the functioning of the air conditioning system of the vehicle.
Chrysler Town & Country A/C Condenser Parts and Q&A
- Q: How to Service an A/C Condenser to Prevent Malfunction and Ensure Proper Installation on Chrysler Town & Country?A:While servicing the A/C condenser, it is important to set the oil level to prevent problems and possible compressor issues. Place all factory seals or shrouds over the hoses to keep the A/C and engine cooling systems well-protected, preventing the engine from overheating. Before installing a new A/C condenser, add 30 milliliters (1 fluid ounce) of the suggested refrigerant oil. It is important to replace both rubber and metal seals on the refrigerant lines whenever you disconnect them. Make sure the air seals on the radiator and condenser are in the proper places. Secure the A/C condenser to the upper mounting bracket, then slide the radiator rearward to clear other things, then fit the lower brackets and attach them to the radiator. Following the instructions on the kit, fix the upper condenser brackets to the radiator using their retaining tabs before installing the upper radiator crossmember. Make sure the filler strainer on the cooler is removed and install the lines on the transmission fluid cooler. Connect the condenser tapping block to the radiator using a screw and tighten everything securely. Take off the tape and remove any plugs from the coils on the lines and condenser ports, oil the new rubber O-rings and then set them and the gaskets in place. Connect the A/C discharge line and liquid line to the condenser tapping block, installing nuts to 23 Nm (17 ft. lbs.) of torque. Attach the Grille, auto-drain the refrigerant system and then rejoin the negative battery cable. With a new A/C condenser, combine 30 milliliters (1 fluid ounce) of refrigerant oil and for several parts changes, consult the Refrigerant Oil Capacities chart to know the proper oil amount. After completing all the other steps, ensure the refrigerant system is filled.
- Q: How to Ensure Proper Air Flow Before Removing the A/C Condenser on Chrysler Town & Country?A:Be sure to see the location of each radiator and condensers air seal before removing the condenser. The first thing to do is recover the refrigerant from the system it is in. Unscrew the two large fasteners securing the fascia and two sides of the shield to the radiator panel and then the five small screws that hold the grille inserts to the shied. Taking off the radiator sight shield, lift the Hood Latch out of the way and remove the two screws holding the latch to the front of the radiator crossmember, noting where the latch was mounted. Loosen the hoses from the left side transmission oil cooler ports first and next remove and disconnect the A/C condenser inlet line fitting from its side of the module. Throw away the O-ring seal and gasket from the discharge line fitting and install plugs or tape over the open part of the discharge line and condenser inlet. Removing the nut that attaches the liquid line fitting to the condenser next, disconnect it from the outlet port and throw out the O-ring seal. Plug the opening of the liquid line fitting and the condenser outlet port, as before. With the screw out, lift the condenser, transmission oil cooler and both mounting brackets at once to pull the condenser out and separate it from the lower mount rubber dampers on the cooling module by activating the locating pin. Remove both side screws from each of the two mounting brackets on the A/C condenser. After that, remove the one screw securing the left mounting bracket to the side of the transmission oil cooler and lastly remove the left mounting bracket from both the condenser and the oil cooler sides. As you replace the A/C condenser, add a little more refrigerant oil-50 milliliters or 1.8 fluid ounce-after checking and returning all air seals to their proper positions. Place the A/C condenser inside the right mounting bracket and transmission oil cooler, then set the left mounting bracket over the side of the condenser and transmission oil cooler. Attach the left mounting bracket to the transmission oil cooler and secure it with a 5Nm (around 45 in. lbs) screw and then get the two screws in the mounting brackets on the condenser fitted, also tightened to 5Nm (same as last sentence). Set the combined condenser, oil cooler and brackets into the car, making sure the pins are where they should be on the center supports and that the condenser isolators are right. Secure the top screws of the mounting bracket to the cooling module after placing it on both sides of the condenser. Tighten all screws to 5 Nm (45 in. lbs.). Uncover the condenser outlet port and the liquid line fitting, put a clean rubber O-ring seal in the new sealing holder and oil and fit it onto the liquid line fitting. Replace the old dual plan seal with a new one and connect the liquid line fitting to the condenser port on the cooling module's right. Secure it with a nut tightened to 23 Nm (17 ft. lbs.). Take off the tape or plugs near the condenser inlet port and discharge line port, lubricate a new seal with clean oil and put it on the fitting of the discharge line. Fit a new dual plan seal and fix the discharge line fitting to the right-side condenser inlet port of the cooling module with the nut tightened to 23 Nm (17 ft. lbs.). Fix the hoses back to their cooling tool fittings on the left hand side, relocate the hood latch unit in front of the radiator closure panel and secure by adding the two required screws and tightening them to 14 Nm (123 in. lbs.). Secure the shield for the radiator sight onto the radiator closure panel crossmember, install and tighten five screws at the front fascia grille supports, then put in the two big ones to secure the front fascia and both sides of the radiator sight shield to the radiator crossmember crossmember panel, tighten them to the required torque. After that, evacuate the refrigerant system and charge it again.


Related Chrysler Town & Country Parts
 Chrysler Town & Country A/C Compressor
 Chrysler Town & Country A/C Compressor Clutch
 Chrysler Town & Country A/C Expansion Valve
 Chrysler Town & Country A/C Hose
 Chrysler Town & Country A/C Service Cap
 Chrysler Town & Country Ambient Temperature Sensor
 Chrysler Town & Country Blend Door Actuator
 Chrysler Town & Country Blower Control Switches
 Chrysler Town & Country Blower Motor Resistor
 Chrysler Town & Country Evaporator
 Chrysler Town & Country Heater Core
 Chrysler Town & Country HVAC Pressure Switch