JeepParts
My Garage
My Account
Cart
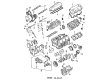
OEM Chrysler Voyager Piston
Engine Pistons- Select Vehicle by Model
- Select Vehicle by VIN
Select Vehicle by Model
orMake
Model
Year
Select Vehicle by VIN
For the most accurate results, select vehicle by your VIN (Vehicle Identification Number).
5 Pistons found


Chrysler Voyager Vibration Damper Part Number: 5142303AB
$56.55 MSRP: $81.25You Save: $24.70 (31%)Ships in 1-3 Business Days
Chrysler Voyager Pistons Part Number: MD197814
Chrysler Voyager Pistons Part Number: MD197808

Chrysler Voyager Piston Part Number: 68067617AA


Chrysler Voyager Piston Part Number: 4666130AB
Chrysler Voyager Piston
Choose OEM Piston that meet Chrysler factory standards. Chrysler designs and tests every component for precision and durability. Each Piston follows strict manufacturing steps to lock in quality and fit. If your Chrysler Voyager matters to you, OEM parts make the smart choice. You'll get the exact look, feel, and performance you expect. Shop genuine Voyager parts at the highly competitive prices online. Enjoy a manufacturer's warranty, a hassle-free return policy, and rapid delivery. No more guesswork with off brands. Get genuine parts with exact fit and true factory performance. Shop with confidence today at JeepPartsDeal.com.
The Chrysler Voyager Piston serves a very vital function in the efficiency as well as durability of Chrysler's popular line of minivans. Being one of the working components of the internal combustion engine, the Chrysler Voyager Piston plays an important role of converting the power developed from the combustion process into the energy needed for the movement of the vehicle and providing the prime performance. These pistons are manufactured from high strength aluminum alloys and are capable of withstanding high pressure and temperature; aspects such as cooling cavities and gas sealant piston rings are included in the design of these pistons. Petrol and diesel engines have been used on the Chrysler Voyager and through the years different piston designs were applied and these are the trunk pistons which improve lubrication and also cater for the side forces. Much of the mentioned flexibility proves the Weaver Chrysler Voyager's focus on performance and durability. The Chrysler Voyager Piston acts as a crucial component that operates on several models of Voyager to boost the efficiency and safety features of the van and making the minivan to be famous for the level of reliability it offers. The sixth-generation Chrysler Voyager continues: high-tech piston technology in vehicle production is illustrated by the vehicle's 3.6L Pentastar V6 engine. Currently, Chrysler Voyager became one of the automobiles that have more than 12 million copies sold and is evident not just for performance, but for changes in the seats of the car, which are rather unique in meeting customers' requirements. Lastly, Chrysler Voyager Piston one can also conclude that Chrysler company takes its job very seriously and continuously strives to introduce new developments and improvements, which make the Voyager popular with families and individuals.
Chrysler Voyager Piston Parts and Q&A
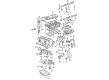
- Q: How to Maintain and Fix a Piston on Chrysler Voyager?A:To begin, replace the cylinder head to expose the cylinder bores and use a good reamer to even out the ridges, leaving the piston tops covered. Before removing the reamer, mark each piston with its cylinder number. At this stage, get rid of the Oil Pan and mark the ceiling of the rod and cover with the cylinder number for clarity. Direct the directional stamping on the pistons toward the engine front and take out the pistons and connecting rods from above by rotating the Crankshaft to make each connecting rod central in the related cylinder bore. Take out the Balance Shaft Assembly and the bolts that secure each rod cap, then push the piston and rod assembly off the crankshaft's journal without accidentally nickiling them. Following removal, put on the bearing cap on the mating rod, as pistons and rods are maintained all at once. When you install the compression rings, apply them so the gaps do not match those in the oil ring rail and have the ends of the oil ring expander join the rail gaps correctly. Soak the piston head and rings in clean engine oil, then put the ring compressor over the piston to keep their positions steady. The stamp should be facing the front, as before. Rotate the crankshaft so the connecting rod journal is in the center of the cylinder bore, fit in the piston and rod and slide the part over the crankshaft journal. With the piston on the hammer handle, tap down to line up the connecting rod in place. Never use the same cap bolts; instead, cover the threads of the new bolts in clean engine oil, assemble the cap alternately and thread each bolt by hand, without a torque wrench. After that, fasten everything else to 27 Nm plus 1/4 turn and ensure there is proper clearance between the connecting rod and the feeler gauge.
- Q: How to Properly Remove and Install Pistons and Connecting Rods in an Engine on Chrysler Voyager?A:When removing the pistons and connecting rods, you must first bid farewell to the cylinder head. First, run a reliable ridge reamer through the bores to get rid of the ridge at the top, ensuring the tops of the pistons are covered. Pistons should be stamped so the front faces the front of the engine. After that, take out the Oil Pan and the Balance Shaft Carrier Assembly. Put a permanent ink or paint mark on every connecting rod cap with the related cylinder number to show the correct pairing, instead of using a number punch or stamp: this will help prevent any damage. Be careful not to damage the fracture rod and cap as you remove the bolts and don't use them again afterward. After rotating the Crankshaft, line up a rod in a cylinder bore and carefully pull out the piston and rod without touching the crankshaft journals. Once the worn bearing is out, install the bearing cap on the rod of the same assembly and perform the same procedure for all the assembly piston/rod pairs. When installing, check that the compression ring gaps aren't aligned and that the oil ring expander ends go against the rail gaps that are placed correctly. Put both the piston head and piston rings into clean engine oil, then put the ring compressor over the piston so the ring locations stay the same. Once the bottom is on, place the directional stamp on the piston pointing toward the engine's front. Rotate the crankshaft until the rod's journal is in the bore in the middle, push the assembly in and place the rod over the crankshaft journal. Strike the piston down using the handle, directing the connecting rod at the same time while you do so. Before you install the cap bolts, coat them with clean oil and fit them in place just hand tight. Do not use the torque wrench in the second part of the last step; tighten the bolts until they reach 27 Nm and turn them an extra 1/4 turn. After that, test the connecting rod space with a feeler gauge and reattach the Balance Shaft Carrier Assembly, oil pan and cylinder head.


Related Chrysler Voyager Parts
 Chrysler Voyager Cam Gear
 Chrysler Voyager Exhaust Valve
 Chrysler Voyager Lash Adjuster
 Chrysler Voyager Motor And Transmission Mount
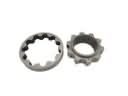 Chrysler Voyager Oil Pump Rotor Set
 Chrysler Voyager Pushrod
 Chrysler Voyager Rocker Arm Pivot
 Chrysler Voyager Rod Bearing
 Chrysler Voyager Timing Belt Idler Pulley
 Chrysler Voyager Timing Chain
 Chrysler Voyager Timing Chain Guide
 Chrysler Voyager Timing Cover