JeepParts
My Garage
My Account
Cart
OEM Dodge Avenger Timing Belt
Engine Timing Belt- Select Vehicle by Model
- Select Vehicle by VIN
Select Vehicle by Model
orMake
Model
Year
Select Vehicle by VIN
For the most accurate results, select vehicle by your VIN (Vehicle Identification Number).
3 Timing Belts found


Dodge Avenger Timing Belt Part Number: 4792353
$85.20 MSRP: $127.00You Save: $41.80 (33%)
Dodge Avenger Timing Belt Part Number: 4667611

Dodge Avenger Timing Belt Part Number: 5183004AA
Dodge Avenger Timing Belt
Choose OEM Timing Belt that meet Dodge factory standards. Dodge designs and tests every component for precision and durability. Each Timing Belt follows strict manufacturing steps to lock in quality and fit. If your Dodge Avenger matters to you, OEM parts make the smart choice. You'll get the exact look, feel, and performance you expect. Shop genuine Avenger parts at the highly competitive prices online. Enjoy a manufacturer's warranty, a hassle-free return policy, and rapid delivery. No more guesswork with off brands. Get genuine parts with exact fit and true factory performance. Shop with confidence today at JeepPartsDeal.com.
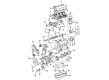
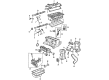
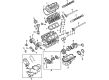
The timing belt in Dodge Avenger car is very essential since it act as a link between the crankshaft and camshaft in order to control the opening and closing of engine valves at appropriate time. This is necessary to the performance of the engine, since the pistons' motion must be synchronized with the valves. The Timing Belt is generally synthesized from rubber with fibers, its favorable attributes include reduced sound emission, costs and less friction in comparison to earlier gear types. Different Years of Dodge Avenger models have used Different Strategies of Timing Belts, The Latest Development Have Involved the Creation of Belts Whose Teeth Arched with the View of Enhancing Strength and Minimal Noise Production. This usually leads to severe engine damage if not fixed on time, especially in the interference engines, hence, proper inspection of the Timing Belt and its replacement when necessary is recommended. Furthermore, it is recommended that on Timing Belt replacement, other parts such as automatic tensioners in addition to idler pulleys go hand in hand with replacement for an enhanced engine performance.
Dodge Avenger Timing Belt Parts and Q&A
- Q: How to Properly Remove and Install a Timing Belt Without Causing Damage on Dodge Avenger?A:It's important to use the tools made for the job so as not to damage the pulley damper while removing the Crankshaft pulley. While spraying lubricant on the engine support bracket, take care and gently remove the reamer bolt, as it might be stuck because of heat. Don't take the hoses off the oil pump, but suspend the pump with wire until you've safely removed the timing belt. Place the timing marks together using a special tool, chalk an arrow to show which way the belt rotates behind it and loosen the middle bolt of the tensioner pulley. Be sure to clean the timing belt, sprocket and tensioner of any oil or water, as their life will be greatly reduced if they are contaminated; also check the front case oil seals, camshaft seal and Water Pump for any leaks if oil or water is found. Friction type auto tensioners should be installed by aligning pin hole A with pin hole B, inserting a setting pin and slowing pushing the push rod using a press or vise, leaving the pin inside the junction for now. When putting in the timing belt, make sure the timing marks match the No. 1 cylinder's top dead center on its compression. Use bulldog clips to keep the belt aligned with all sprockets and pulleys. Pull the camshaft sprocket in the counterclockwise direction so that the end of the belt that is tighter is pushed against the engine and then gently raise and temporarily tighten the center bolt on the tensioner pulley. Before you adjust the belt tension, spin the crankshaft a quarter turn counterclockwise, spin it again clockwise to bring the marks into alignment, loosen the center bolt on the tensioner pulley and tension the belt using a proper tool and torque wrench at a specification of 4.4 Nm (3.3 ft. lbs.). Remove the auto tensioner setting pin or wire, checking for easy release of the tensioner. Then, rotate the crankshaft clockwise two turns and hold for over five minutes; the tensioner rod projection must be between 3.8 and 4.5 mm (0.149 and 0.177 inches). Conduct the same steps again until the other command is relelented. Make certain all marks on the sprockets are positioned correctly, screw in each bolt of the engine support bracket carefully following the recommended sequence, put the engine mount bracket in place so the arrow matches and use only the proper special tools to fix the crankshaft pulley and avoid damaging it. Look for leaks on the auto tensioner and make sure the push rod is free of cracks.

Related Dodge Avenger Parts
 Dodge Avenger Dipstick
 Dodge Avenger Oil Pan
 Dodge Avenger Crankshaft Seal
 Dodge Avenger Engine Mount Bracket
 Dodge Avenger Harmonic Balancer
 Dodge Avenger Intake Valve
 Dodge Avenger Oil Drain Plug
 Dodge Avenger Oil Pump
 Dodge Avenger Oil Pump Gasket
 Dodge Avenger Timing Belt Tensioner
 Dodge Avenger Timing Cover
 Dodge Avenger Transmission Mount