JeepParts
My Garage
My Account
Cart
OEM Dodge Caliber Rear Crossmember
Rear Suspension Crossmember- Select Vehicle by Model
- Select Vehicle by VIN
Select Vehicle by Model
orMake
Model
Year
Select Vehicle by VIN
For the most accurate results, select vehicle by your VIN (Vehicle Identification Number).
3 Rear Crossmembers found

Dodge Caliber Rear Crossmember Part Number: 5115538AB
$269.65 MSRP: $397.00You Save: $127.35 (33%)
Dodge Caliber Suspension Crossmember, Rear Part Number: 68211933AB
$739.67 MSRP: $1085.00You Save: $345.33 (32%)Ships in 1-3 Business DaysDodge Caliber Suspension Crossmember, Rear Part Number: 68211932AB
$869.06 MSRP: $1270.00You Save: $400.94 (32%)
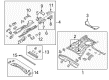
Dodge Caliber Rear Crossmember
Choose OEM Rear Crossmember that meet Dodge factory standards. Dodge designs and tests every component for precision and durability. Each Rear Crossmember follows strict manufacturing steps to lock in quality and fit. If your Dodge Caliber matters to you, OEM parts make the smart choice. You'll get the exact look, feel, and performance you expect. Shop genuine Caliber parts at the highly competitive prices online. Enjoy a manufacturer's warranty, a hassle-free return policy, and rapid delivery. No more guesswork with off brands. Get genuine parts with exact fit and true factory performance. Shop with confidence today at JeepPartsDeal.com.
The Rear Crossmember for Dodge Caliber vehicles stands as a crucial structural element which boosts Dodge Caliber performance reliability across all models made between 2007 and 2012. As an essential framing structure the Rear Crossmember distributes transmission and engine weight while maintaining the drivetrain alignment to guarantee proper operations and enhance safety and handling. The Dodge Caliber Rear Crossmember functions with all 2007 through 2012 SE and SXT models thus maintaining the structural quality of these vehicles. Vehicles depend on the Dodge Caliber Rear Crossmember to handle structural stresses as any damages or rust will create operational issues that affect the entire vehicle performance. The Rear Crossmember helps build Caliber safety credibility since the Insurance Institute for Highway Safety tested the vehicle and handed out high safety ratings. The Dodge Caliber Rear Crossmember supports fuel conservation which ultimately makes this vehicle a secure driving option along with being economical. The durability attributes and stability functions of the Dodge car Rear Crossmember make it an exceptional choice in the automotive market because they enhance vehicle performance safety and give drivers the peace of mind they need. A driver who wants to protect their the automaker model efficiency and safety should consider the car Rear Crossmember as an indispensable part of their vehicle.
Dodge Caliber Rear Crossmember Parts and Q&A
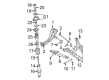
- Q: How to remove the Rear Crossmember on Dodge Caliber?A:You must first unbolt the rear brake shoes to take out the cross-member. After that, detach the park brake cable from the lever. With the hair pin clip removed, take out the brake cable from its place at the backing plate. After that, undo the bolt and release the Brake Line from the Trailing Arm. After that, remove another bolt, the clip and cut the brake line from the trailing arm. Place the wheel speed sensors out of the way so that you can take out the crossmembers. Should you need to, take out the rear drive module. Get rid of all the cotter pins, nuts and washers and separate the two half shafts. Then, take out both lower strut bolts and trailing link bushing bolts. With the car up on jacks, secure the rear cradle beneath (using a suitable lifting tool) and loosen and take out the rear cradle bolts. At this stage, take out the nuts on the lower stabilizer links, remove the bolts on the lower and upper links at the cradle and unbolt the toe link cams from the cradle. Finally, remove the suspension knuckle assemblies and the stabilizer bushing bolts to separate the stabilizer bar from the cradle.
- Q: How to install a Rear Crossmember on Dodge Caliber?A:You should start by putting in the stabilizer bar, bushings and bolts and then tighten them to 61 Nm (45 ft. lbs.). Slide the control arms assemblies onto the crossmember and attach the toe link cam bolts in the cradle, tightening them to 35 Nm (26 ft. lbs.). After that, place the upper link bolts on the cradle and tighten them to 90 Nm (70 ft. lbs.) and then install the 90 Nm (70 ft. lbs.) tightened lower link bolts at the cradle. Fit the stabilizer link nuts and tighten them to get 58 Nm (43 ft. lbs.) torque. Holder the rear cradle assembly up with an appropriate device and place it back into the vehicle. Apply 110 Nm (81 ft. lbs.) of torque to the front cradle bolts and then do the same to the rear ones. Install the bushing bolts in the trailing link, beginning with the inboard ones held at 110 Nm (81 ft. lbs.) and finishing with the outboard ones at the same rate. Put in the lower strut bolts and tighten them to 99 Nm (73 ft. lbs.). When provided, set up the rear half shafts, screwing them tightly with nuts and washers, reaching an air gage of 244 Nm (180 ft. lbs.) and attach new cotter pins. After removing, clean and replace the rear drive module and wheel speed sensor. Reattach the clips and use bolts to fasten the Brake Lines, doing it tight to about 15 Nm. Set the other brake lines in place and put the bolts in, tightening them with 23 Nm (17 ft. lbs.) of torque. Lift the brake cable into place on the backing plate, clip it into position with the hair pin and connect the cable to the park brake lever before putting in the park brake shoes. The last thing to do is to make sure the alignment of the wheels is correct.


Related Dodge Caliber Parts
 Dodge Caliber Glove Box
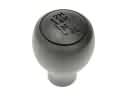 Dodge Caliber Shift Knob
 Dodge Caliber Windshield Washer Nozzle
 Dodge Caliber Axle Beam
 Dodge Caliber Cigarette Lighter
 Dodge Caliber Door Lock
 Dodge Caliber Exterior Door Handle
 Dodge Caliber Floor Pan
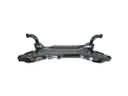 Dodge Caliber Front Cross-Member
 Dodge Caliber Lift Support
 Dodge Caliber Liftgate Hinge
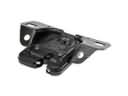 Dodge Caliber Trunk Lid Latch