JeepParts
My Garage
My Account
Cart
OEM Dodge Charger Oil Pan
Oil Drain Pan- Select Vehicle by Model
- Select Vehicle by VIN
Select Vehicle by Model
orMake
Model
Year
Select Vehicle by VIN
For the most accurate results, select vehicle by your VIN (Vehicle Identification Number).
16 Oil Pans found


Dodge Charger Oil Pan Part Number: 53010814AA
$345.87 MSRP: $528.00You Save: $182.13 (35%)Ships in 1-2 Business Days


Dodge Charger Oil Pan Part Number: 5037634AC
$411.06 MSRP: $623.00You Save: $211.94 (35%)Ships in 1-2 Business Days
Dodge Charger Oil Pan Part Number: 68166425AD
$443.11 MSRP: $674.00You Save: $230.89 (35%)


Dodge Charger Oil Pan Part Number: 5184513AC
$206.63 MSRP: $311.00You Save: $104.37 (34%)


Dodge Charger Oil Pan Part Number: 4792861AC
$167.33 MSRP: $249.00You Save: $81.67 (33%)Ships in 1-3 Business Days
Dodge Charger Oil Pan, Upper Part Number: 68051599AE
$199.89 MSRP: $301.00You Save: $101.11 (34%)Ships in 1-2 Business Days
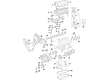
Dodge Charger Oil Pan Part Number: 4792865AD
$134.76 MSRP: $200.00You Save: $65.24 (33%)Ships in 1-2 Business Days
Dodge Charger Oil Pan, Lower Part Number: 5184546AD
$161.71 MSRP: $240.00You Save: $78.29 (33%)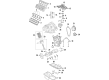
Dodge Charger Oil Pan Part Number: 4792973AD
$165.08 MSRP: $245.00You Save: $79.92 (33%)Ships in 1-2 Business DaysDodge Charger Oil Pan Part Number: 4792865AB
$275.32 MSRP: $408.00You Save: $132.68 (33%)Ships in 1-3 Business DaysDodge Charger Oil Pan Part Number: 4892171AA
Dodge Charger Oil Pan Part Number: 4792963AB
Dodge Charger Oil Pan Part Number: 4792963AA
Dodge Charger Oil Pan Part Number: 4792861AA

Dodge Charger Oil Pan Part Number: 68043599AA
Dodge Charger Oil Pan Part Number: 4792963AE
Dodge Charger Oil Pan
Choose OEM Oil Pan that meet Dodge factory standards. Dodge designs and tests every component for precision and durability. Each Oil Pan follows strict manufacturing steps to lock in quality and fit. If your Dodge Charger matters to you, OEM parts make the smart choice. You'll get the exact look, feel, and performance you expect. Shop genuine Charger parts at the highly competitive prices online. Enjoy a manufacturer's warranty, a hassle-free return policy, and rapid delivery. No more guesswork with off brands. Get genuine parts with exact fit and true factory performance. Shop with confidence today at JeepPartsDeal.com.
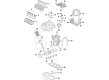
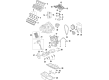
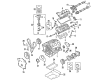
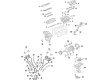
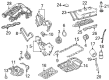
Oil Pan in Dodge Charger cars is designed to hold or store engine oil for the purpose of correct lubrication, washing and cooling of the members of engines. The Oil Pan sits right below the engine and its work is to ensure that oil does not spill from the lubrication system which is very vital for an engine to function properly. In the long run, the Oil Pans are prone to getting punctured or rusted and this can cause severe problems on the engine. Standard configuration of design includes what is known as the sump that which pools oil, however, the Charger may require other sophisticated systems such as the "dry sump" typical in race vehicles. It uses scavenge pumps as well as swirl tank that ensures that the oil and air are well separated for proper lubrication even in case of extreme driving manner. In sum, the Oil Pan is a crucial component that is vital for the long life span and optimal operation of the Engine of the Dodge Charger.
Dodge Charger Oil Pan Parts and Q&A
- Q: How to Remove and Service an Oil Pan on Dodge Charger?A:Before servicing the oil pan, remove the negative Battery Cable and then take away the oil indicator in the trunk. Lift the vehicle on a hoist, remove the bolts holding the lower splash shield and then take out the shield. Take out the Oil Filter and remove all the oil from the engine. After that, get rid of the bolt holding the steering coupler and take off the coupler from the rack. First, disconnect the electrical connector of the power steering pressure switch, then remove the bolts holding the steering rack to the mounting surface and next, disconnect the power steering line from the frame. Move the rack somewhere else, then get rid of the structural collar. To prevent any harm to the Timing Cover or oil pan, first take out the mounting bracket to oil pan lower bolt, the A/C compressor bracket to oil pan lower bolt and remove the four lower timing chain cover bolts. When you are done, remove the oil pan and gasket.
- Q: How to Properly Install and Service an Oil Pan on Dodge Charger?A:You should first wipe the oil pan and the places it will seal and check if the timing chain cover gaskets are still good. Use 1/8 inch Mopar(R) Engine RTV GEN II on the T-joints on both ends of the oil pan gasket (the junction between the oil pan gasket and the Timing Cover gasket at the front and at the crankshaft rear oil seal retainer gasket at the rear). Put the oil pan gasket onto the block of the engine. When attaching the oil pan and timing chain cover, first place the oil pan so that the oil level indicator tube is aligned, then put the fasteners on while ensuring the oil pan bolts and nuts are not fully tightened, compressing the gasket's seal and aligning the front of the oil pan to the front of the block. Following that, put in the lower timing chain cover bolts and tighten them to 12 Nm (105 in. lbs.), before installing the bolts on the oil pan to 28 Nm (250 in. lbs.) and the oil pan nuts to 12 Nm (105 in. lbs.). Install and tighten both bolts at the bottom, first between the A/C compressor and oil pan, to 28 Nm (21 ft. lbs.,) and then between the alternator bracket and oil pan, also tightened to 28 Nm (21 ft. lbs.). Install the new Oil Filter and the drain plug and next install the structural collar. Add the steering gear and fit the mounting bolts, tightening them to 70 Nm (95 ft. lbs.). Place the new lower pinch bolt into the steering coupling on the gear and tighten it to 30 Nm (22 ft. lbs.). Then connect the electrical connector to the steering gear. After that, hang the power steering line support and tighten it, then put on the lower splash shield and fasten its bolts. First, lower your vehicle, add the engine oil level indicator, pour in the proper oil to the correct level in the engine crankcase, link up the negative battery cable and start the engine to make sure there are no leaks.


Related Dodge Charger Parts
 Dodge Charger Camshaft
 Dodge Charger Oil Pump
 Dodge Charger Rocker Arm
 Dodge Charger Camshaft Thrust Plate
 Dodge Charger Crankshaft Seal
 Dodge Charger Crankshaft Thrust Washer
 Dodge Charger Cylinder Head Gasket
 Dodge Charger Lash Adjuster
 Dodge Charger Motor And Transmission Mount
 Dodge Charger Pushrod
 Dodge Charger Rod Bearing
 Dodge Charger Valve Cover Grommet
Browse Dodge Charger Oil Pan by Years
2023 2022 2021 2020 2019 2018 2017 2016 2015 2014 2013 2012 2011 2010 2009 2008 2007 2006