JeepParts
My Garage
My Account
Cart
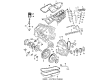
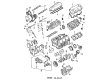
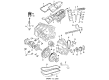
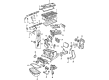
OEM Dodge Grand Caravan Piston
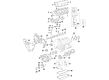
Engine Pistons- Select Vehicle by Model
- Select Vehicle by VIN
Select Vehicle by Model
orMake
Model
Year
Select Vehicle by VIN
For the most accurate results, select vehicle by your VIN (Vehicle Identification Number).
10 Pistons found


Dodge Grand Caravan Piston Part Number: 4666129AA
$227.63 MSRP: $347.00You Save: $119.37 (35%)Ships in 1-2 Business Days
Dodge Grand Caravan Pistons Part Number: MD119671
$28.61 MSRP: $36.27You Save: $7.66 (22%)Ships in 1-2 Business Days
Dodge Grand Caravan Pistons Part Number: MD197814
Dodge Grand Caravan Pistons Part Number: MD197808

Dodge Grand Caravan Pistons Part Number: MD152563

Dodge Grand Caravan Piston Assembly Part Number: 4797692

Dodge Grand Caravan Piston Part Number: 4796212

Dodge Grand Caravan Piston Assembly Part Number: 4798744

Dodge Grand Caravan Piston Part Number: R4593589AB


Dodge Grand Caravan Piston Part Number: 4666130AB
Dodge Grand Caravan Piston
Choose OEM Piston that meet Dodge factory standards. Dodge designs and tests every component for precision and durability. Each Piston follows strict manufacturing steps to lock in quality and fit. If your Dodge Grand Caravan matters to you, OEM parts make the smart choice. You'll get the exact look, feel, and performance you expect. Shop genuine Grand Caravan parts at the highly competitive prices online. Enjoy a manufacturer's warranty, a hassle-free return policy, and rapid delivery. No more guesswork with off brands. Get genuine parts with exact fit and true factory performance. Shop with confidence today at JeepPartsDeal.com.
Dodge Grand Caravan Piston Parts and Q&A
- Q: How Are Pistons Installed into the Bore with Connecting Rod Assemblies on Dodge Grand Caravan?A:Pistons and connecting rod assemblies should be placed into the bore with your compression rings staggered, so that they do not lie straight above the oil rings. Before installing the ring compressor, see that the oil ring expander is pushed all the way in and the gaps between the rails are the right widths. After lubricating both the piston and rings with clean oil, place a ring compressor over the area, making sure to apply no pressure on the rings until you adjust the compressor. Put the upper bearing onto the connecting rod and cover it with oil. Engines with cracked cap connecting rods should use tool #8189 to prevent the Crankshaft from any possible damage. Inspect and replace the seal on the connecting rod and install metal covers on all of the rod bolts before tightening. Both pistons should have an "F" symbol next to their piston pin and they must be arranged so the connecting rod oil hole is on the main thrust side and the "F" is closer to the front of the engine on all cylinder banks. Move the crankshaft until the connecting rod fits in the bore, then pop in the piston and connect the connecting rod over the crankshaft. With the hammer handle, press the piston into the cylinder bore and bring the connecting rod up to slide into place on the journal in the surtling. Attach the lower bearing shell and the connecting rod cap, then tighten the retaining nuts for the connecting rod cap over oil-covered and cleaned rod bolts to 54 Nm (40 ft. lbs.) and then add 1/4 turn. Connecting rod bolts should be tightened to 7 Nm (5 ft. lbs.) at first, then turned up to 29 Nm (21 ft. lbs.) before turning each bolt 90° even further. Follow these steps for each set of pistons and connecting rods, mount the cylinder heads and lastly add the Oil Pan. Add the right oil to the crankcase of the engine and link the negative cable to the battery.
- Q: How to Remove and Replace a Piston in an Engine on Dodge Grand Caravan?A:Disconnect the negative cable from the battery as the first step and afterward, take out both the cylinder heads and the Oil Pan. Should a reamer be required, first use it to smooth the ridge on the cylinder wall that fits the piston top, then remove the pistons while covering the tops. With the Crankshaft turned, center each connecting rod in its bore then take out the piston and connecting rod assembly from the top of the block. Check the connecting rods and their caps to tell which cylinder they were coming from and mark them if necessary. Take off the cap from the connecting rod and put on bolt protectors for each connecting rod bolt. Make sure the crankshaft journals remain free from marks, carefully take each piston and rod assembly from the cylinder bore and then apply the bearing cap to the mating rod once removed. Before you use a ring compressor, stagger the gaps between compression rings, insert the oil ring into its groove and lubricate the piston and rings with clean engine oil. Put the upper bearing on the connecting rod, add lubrication and afterwards fit the rod bolt protectors. You should see an "F" mark close to the piston pin on both pistons and you should line it up so that the connecting rod oil squirt hole is pointing towards the larger flat section of the engine block. Spin the crank until you see the connecting rod journal aligned with the center of the bore, subtly lower the rod and piston set into the cylinder and carefully drop the rods over the journals on the crankshaft. Line up the connecting rod and slowly tap the piston down into the cylinder bore with a hammer handle. Attach the lower bearing shell and the cap for the connecting rod and then put nuts on the oiled rings, tightening them to 54 Nm (40 ft. lbs.) and turning another quarter turn. Do the same with the rest of the installations and then put in the cylinder heads and oil pan. Once that is done, add the correct oil to the engine crankcase and put the negative cable back onto the battery terminal.


Related Dodge Grand Caravan Parts
 Dodge Grand Caravan Camshaft
 Dodge Grand Caravan Harmonic Balancer
 Dodge Grand Caravan Camshaft Seal
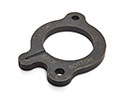 Dodge Grand Caravan Camshaft Thrust Plate
 Dodge Grand Caravan Crankshaft
 Dodge Grand Caravan Crankshaft Seal
 Dodge Grand Caravan Oil Pump Gasket
 Dodge Grand Caravan Pushrod
 Dodge Grand Caravan Rocker Arm Pivot
 Dodge Grand Caravan Valve Cover Gasket
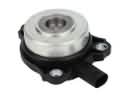 Dodge Grand Caravan Variable Timing Solenoid
 Dodge Grand Caravan Variable Timing Sprocket