JeepParts
My Garage
My Account
Cart
OEM Dodge Intrepid A/C Accumulator
Accumulator- Select Vehicle by Model
- Select Vehicle by VIN
Select Vehicle by Model
orMake
Model
Year
Select Vehicle by VIN
For the most accurate results, select vehicle by your VIN (Vehicle Identification Number).
3 A/C Accumulators found

Dodge Intrepid Dehydrator Part Number: 4797148AB
$34.51 MSRP: $62.85You Save: $28.34 (46%)Ships in 1-2 Business Days
Dodge Intrepid Dehydrator Part Number: 5101762AA

Dodge Intrepid Dehydrator Part Number: 5003980AA
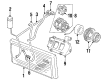
Dodge Intrepid A/C Accumulator
Choose OEM A/C Accumulator that meet Dodge factory standards. Dodge designs and tests every component for precision and durability. Each A/C Accumulator follows strict manufacturing steps to lock in quality and fit. If your Dodge Intrepid matters to you, OEM parts make the smart choice. You'll get the exact look, feel, and performance you expect. Shop genuine Intrepid parts at the highly competitive prices online. Enjoy a manufacturer's warranty, a hassle-free return policy, and rapid delivery. No more guesswork with off brands. Get genuine parts with exact fit and true factory performance. Shop with confidence today at JeepPartsDeal.com.
The Dodge Intrepid A/C Accumulator is an essential piece that maintains the air conditioning performance of all Dodge Intrepid vehicles because of its reliability. The A/C Accumulator operates as a critical safety device which enhances cooling system efficiency through efficient filtration of moisture oil and debris to protect system functionality. Positioned between the compressor and the evaporator the Dodge Intrepid A/C Accumulator contains a desiccant bag for storing water together with particle elimination that results in system efficiency. The significance of the Dodge Intrepid A/C Accumulator becomes apparent through its ability to work with multiple Intrepid versions which either use 3.3 L or 3.5 L V6 engines throughout different generations. Replacing an A/C Accumulator remains mandatory because the procedure cannot remove debris accumulation on its own. The Dodge Intrepid A/C Accumulator sets itself apart in automotive markets because of its efficient design system which helps maintain passenger comfort during driving. The Dodge car provides users with a comfortable driving experience and advanced safety through its space-enhancing design and safe A/C Accumulator technology which attracts multiple types of automotive consumers. The the automaker model A/C Accumulator functions as a vital system component which provides enhanced efficiency and safety improvements to all installations of this vehicle model.
Dodge Intrepid A/C Accumulator Parts and Q&A
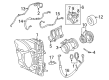
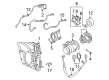
- Q: How Should You Properly Install an A/C Accumulator to Prevent Moisture Intrusion on Dodge Intrepid?A:Do not let the A/C accumulator remain open for a long time once installed, because it contains substances that absorb moisture. The process should start with the use of a refrigerant recovery machine to gather all refrigerant from the system. After that, remove one 8mm hex bolt securing the A/C accumulator bracket and one nut holding the A/C lines to the expansion valve. Very gently pull out the A/C accumulator bracket from the strut tower and then disconnect one A/C line from the A/C accumulator that goes to the condenser. Following that, get the A/C accumulator out of the vehicle and connect the small line from the A/C accumulator to the expansion valve on the new A/C accumulator. During this process, place new O-rings on both connections. With the system open, cover or seal each liquid line fitting so that moisture cannot enter. During installation, put all parts and lines in place first loosely, then secure each one individually to avoid damage and tighten the plumbing fasteners for the A/C accumulator to 10 ft-lbs.
- Q: How to Service and Repair an A/C Accumulator on Dodge Intrepid?A:Start the service and repair of the A/C accumulator by removing the refrigerant from the system. On vehicles equipped with either a 3.2/3.5 liter engine, take off the engine air inlet tube and the air distribution duct. After that, release the single 8mm hex bolt that holds the A/C accumulator bracket in place and remove the nut from the A/C lines at the expansion valve. First, delicately open the A/C accumulator bracket connection on the top of the strut tower, then cut a connection at the A/C accumulator and remove both pieces out of the car. Remove the small line connecting the A/C accumulator to the expansion valve before installation on the new one, always remembering to use new O-rings. Protect the liquid line fittings by plugging or capping them when the system is open. Avoid making refrigerant plumbing rough or sharp; the hose bends should be comfortable and far from the exhaust in order to prevent any damage. Pressure-test and inspect every refrigerant system connection for leaks and inspect flexible hose refrigerant lines yearly to ensure they are in good shape and correctly routed. Assemble all the pieces loosely at first, so you don't damage them and make sure to use new lubricated O-rings when you insert them. Install the little line going from the expansion valve, on the new A/C accumulator, to the refrigerant A/C accumulator and then place the new A/C accumulator inside the car. First, join the A/C line to the A/C accumulator and tighten the fastener to 13.6 N.m (10 ft. lbs.), then add the A/C accumulator bracket to the strut tower. Screw the nut that holds the A/C line to the expansion valve, using 8 N.m (6 ft. lbs.) of torque and then insert and tighten the bolt to the A/C accumulator bracket. After that, reconnect the engine air inlet tube and the air distribution duct, withdraw all the refrigerant and replenish the system.


Related Dodge Intrepid Parts
 Dodge Intrepid Blend Door Actuator
 Dodge Intrepid A/C Compressor
 Dodge Intrepid A/C Compressor Clutch
 Dodge Intrepid A/C Compressor Cut-Out Switches
 Dodge Intrepid A/C Condenser
 Dodge Intrepid A/C Expansion Valve
 Dodge Intrepid A/C Service Cap
 Dodge Intrepid A/C Switch
 Dodge Intrepid Blower Control Switches
 Dodge Intrepid Blower Motor
 Dodge Intrepid Evaporator
 Dodge Intrepid HVAC Pressure Switch