JeepParts
My Garage
My Account
Cart
OEM Dodge Intrepid Thermostat
Engine Coolant Thermostat- Select Vehicle by Model
- Select Vehicle by VIN
Select Vehicle by Model
orMake
Model
Year
Select Vehicle by VIN
For the most accurate results, select vehicle by your VIN (Vehicle Identification Number).
3 Thermostats found

Dodge Intrepid Thermostat Part Number: 68027789AA
$30.38 MSRP: $44.50You Save: $14.12 (32%)Ships in 1-2 Business Days

Dodge Intrepid Thermostat Part Number: 4792237AE
$19.14 MSRP: $27.55You Save: $8.41 (31%)

Dodge Intrepid Thermostat Part Number: 4573560AE
Dodge Intrepid Thermostat
Choose OEM Thermostat that meet Dodge factory standards. Dodge designs and tests every component for precision and durability. Each Thermostat follows strict manufacturing steps to lock in quality and fit. If your Dodge Intrepid matters to you, OEM parts make the smart choice. You'll get the exact look, feel, and performance you expect. Shop genuine Intrepid parts at the highly competitive prices online. Enjoy a manufacturer's warranty, a hassle-free return policy, and rapid delivery. No more guesswork with off brands. Get genuine parts with exact fit and true factory performance. Shop with confidence today at JeepPartsDeal.com.
The Dodge Intrepid Thermostat serves as a vital component which operates within Dodge Intrepid cooling systems for reliable performance. Engine temperature control depends on this thermostat which operates near the radiator to achieve both performance excellence and efficiency. When acting as a closed-loop control device the Dodge Intrepid Thermostat detects temperature adjustments to keep a specific setpoint while controlling heat transfer fluid flow and activating cooling or heating devices accordingly. Different Dodge Intrepid editions use mechanical thermostats that include bimetallic strips or wax pellet models to optimize engine efficiency and driving comfort. The thermostat of the Dodge Intrepid serves a critical performance maintenance role across its 1993 to 2004 production period because it supports both the 3.3 L EGA V6 and the 3.5 L EGE V6 engine variants. Safety aspects become paramount since the Dodge car Thermostat functions to avoid thermal damage that would endanger the engine and create enhanced vehicle safety conditions. The car Thermostat excels within the automotive market through its strong design along with dependable operation which allows model drivers to depend on their vehicles during every drive. The car Thermostat operates as a vital component which produces reliable performance and which allows consistent compatibility to create an improved driving experience in the automaker Intrepids.
Dodge Intrepid Thermostat Parts and Q&A
- Q: How to Maintain Your Thermostat on Dodge Intrepid?A:To access the thermostat for service, first take the negative remote jumper cable off its socket. Do not remove the pressure cap when the system is hot and pressurized; not doing so can prevent serious burns from the coolant. Remove oil from the cooling system, then pull out the dipstick and its tube, making sure you cap the tube with something suitable to avoid coolant coming in. Place the vehicle on a hoist, lean the engine to a safe position and take out the left Engine Mount. After that, take out the generator support strut and separate the generator's wiring connector. Release the bolt on the transaxle dipstick tube bracket and the bolt under the lower heater hose tube bracket, then pull the lower heater hose and radiator lower hose away from the Thermostat Housing. Take out the bolts holding the thermostat housing and get rid of the thermostat and its housing. When installing the thermostat, first clear the gasket sealing areas, put the thermostat in place at the top of the housing and then insert the gasket. Fit the thermostat and housing onto the cylinder block and turn the bolts so they reach 12 Nm (105 inch lbs.). Connect the heater return and radiator lower hose again to the thermostat housing and make sure to secure them with hose clamps. Put in the heater hose tube bracket bolt, the transaxle dipstick tube bracket bolt and the generator support strut. Attach the connector to the generator and put in the left engine mount. Ease the vehicle back down, apply grease to the end of the dipstick O-ring and use it to seal the dipstick. Fill the cooling system next and finally attach the remote jumper wire to the negative (black) cable.

Related Dodge Intrepid Parts
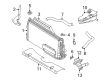
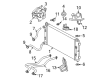
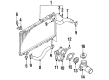
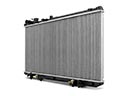 Dodge Intrepid Radiator
 Dodge Intrepid Thermostat Housing
 Dodge Intrepid Coolant Reservoir Cap
 Dodge Intrepid Coolant Reservoir Hose
 Dodge Intrepid Fan Motor
 Dodge Intrepid Fan Shroud
 Dodge Intrepid Radiator Cap
 Dodge Intrepid Radiator Drain Plug
 Dodge Intrepid Radiator Hose
 Dodge Intrepid Water Hose
 Dodge Intrepid Water Pump Gasket
 Dodge Intrepid Water Pump Pulley