JeepParts
My Garage
My Account
Cart
OEM Dodge Journey Brake Caliper
Caliper- Select Vehicle by Model
- Select Vehicle by VIN
Select Vehicle by Model
orMake
Model
Year
Select Vehicle by VIN
For the most accurate results, select vehicle by your VIN (Vehicle Identification Number).
8 Brake Calipers found


Dodge Journey Caliper, Front Driver Side Part Number: 68003707AC
$289.93 MSRP: $438.00You Save: $148.07 (34%)Ships in 1-2 Business Days


Dodge Journey Caliper, Front Passenger Side Part Number: 68003697AC
$312.79 MSRP: $438.00You Save: $125.21 (29%)Ships in 1-2 Business Days
Dodge Journey Caliper, Rear Passenger Side Part Number: 68159524AA
$152.21 MSRP: $331.00You Save: $178.79 (55%)Ships in 1-2 Business Days
Dodge Journey Caliper, Rear Passenger Side Part Number: 68029890AD
$99.87 MSRP: $217.00You Save: $117.13 (54%)Ships in 1-2 Business Days
Dodge Journey Caliper, Front Driver Side Part Number: 68144161AA
$175.48 MSRP: $262.00You Save: $86.52 (34%)Ships in 1-2 Business DaysDodge Journey Caliper, Front Passenger Side Part Number: 68144160AA
$175.48 MSRP: $262.00You Save: $86.52 (34%)Ships in 1-2 Business DaysDodge Journey Caliper, Rear Driver Side Part Number: 68159525AA
$221.51 MSRP: $331.00You Save: $109.49 (34%)Ships in 1-2 Business DaysDodge Journey Caliper, Rear Driver Side Part Number: 68029889AD
$147.53 MSRP: $220.00You Save: $72.47 (33%)Ships in 1-2 Business Days
Dodge Journey Brake Caliper
Choose OEM Brake Caliper that meet Dodge factory standards. Dodge designs and tests every component for precision and durability. Each Brake Caliper follows strict manufacturing steps to lock in quality and fit. If your Dodge Journey matters to you, OEM parts make the smart choice. You'll get the exact look, feel, and performance you expect. Shop genuine Journey parts at the highly competitive prices online. Enjoy a manufacturer's warranty, a hassle-free return policy, and rapid delivery. No more guesswork with off brands. Get genuine parts with exact fit and true factory performance. Shop with confidence today at JeepPartsDeal.com.
The Brake Caliper is critical to the Jeep braking system in Dodge Journey automobiles characterized by strength and efficiency. It is a crucial component of the Journey's brake system that makes use of brake pads, applying clamping force to the rotors to generate the friction needed for a stop. Sourcing the Brake Caliper in fixed and floating types with the fixed ones used to increase performance while the floating types provide easy operations. One of the most affordable three-row SUV cars on the world market is Dodge Journey that gains the usage of these innovative Brake Calipers that add to already existing protection and safety features such as anti-lock brake system and brake assist facility. Interoperability with different Journey models guarantees that drivers can retain the optimal feel of braking for the particular year and style. Among this myriad of players, Brake Caliper has been noticed and seized on the market due to its durability and solidity allowing for less frequent replacement of brake components. Also, the new structure of the Brake Caliper enhances fuel economy by reducing drag and over-heating which causes the pads to seize unevenly. In conclusion, the Brake Caliper shows that the brand excellently handles safety, performance, and durability; all qualities that have continued to make the Dodge Journey famous today.
Dodge Journey Brake Caliper Parts and Q&A
- Q: How to Remove and Replace a Front Brake Caliper on Dodge Journey?A:You should apply a C-clamp to the brake caliper piston, moving it in to cover the bore as a wood block is placed on the piston. Be careful not to injure the guide pin boots when you are fastening the caliper bracket to the adapter on a disk brake. Guide pin is stationary with a wrench which is needed while placing the caliper over the pads and putting the caliper bracket's guide pin bolt in or out. Put the caliper guide pin bolts so their holes are lined up on the adapter bracket and tighten both bolts to 35 Nm (26 ft. lbs.). Connect the flex brake hose with a banjo bolt to the brake caliper. Be sure to place new brake hose washers on either side of the hose fitting, then tighten the bolt to 26 Nm (19 ft. lbs.). Replace the tire and wheel assembly, make sure the wheel mounting nuts are tightened to 135 Nm (100 ft. lbs.), lift the vehicle and remove the tool holding the brake pedal. Following a bleed, test the brakes on the road to check they are working and to press the brake shoes into position.
- Q: How to Install a New Brake Caliper on Dodge Journey?A:The first thing to do when installing a new brake caliper is to take out the outboard pad from the adapter bracket. Not damaging the guide pin boots, put the disc brake caliper in place over the inboard brake pad and the brake rotor. Maintain the guide pin in place by hand while attaching both upper and lower caliper guide pin bolts, completing the task by lightening the bolts. Install a new brake hose washer on each side of the fitting and join the flex hose to the brake caliper and then tighten the banjo bolt to 26 Nm (19 ft. lbs.). Remove the brake pedal holder from inside the vehicle and press the brake pedal repeatedly until you see the fingers of the caliper touch the brake rotor's outboard surface, then release the pedal. Both guide pin bolt screws must be removed and then the disc brake caliper can be taken from the adapter bracket. Set the outboard pad back into place in the adapter bracket and loosen the caliper bleeder screw at least one full turn. Use Additional Tool 8807-1 and 8807-2 with a 3/8 in. drive ratchet handle and extension to put the caliper piston into the bore, not tightening the screw too tightly. First, rotate the piston anticlockwise to take up all the air and then tighten the bleeder screw. With care, fit the caliper into the adapter bracket and fasten the guide pin bolts so that they're tightened to 35 Nm (26 ft. lbs.). While a helper pushes down on the brake pedal, try to fill the master cylinder, watch the reservoir and open the bleeder screw to let fluid and air out until the brake pedal drops and then close it. Keep repeating this until only clean air is in the wheel and remember to bleed the remaining circuits where needed. Unlock the caliper lever and extend the parking brake cable, connecting it to the lever. After that, put what's left of the cable back in the housing and secure it to the mounting bracket's holders. Install the tire and wheel unit, using a torque wrench of 135 Nm (100 ft lbs.) on the wheel mounting nuts, connect and balance the parking brake cable and reset the tension of the cable. Following this, reduce the ride height, link the negative Battery Cable and test the brakes while driving on the road.


Related Dodge Journey Parts
 Dodge Journey Brake Pads
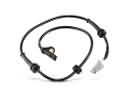 Dodge Journey ABS Sensor
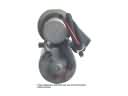 Dodge Journey ABS Pump And Motor Assembly
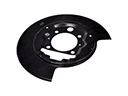 Dodge Journey Backing Plate
 Dodge Journey Brake Caliper Bolt
 Dodge Journey Brake Caliper Bracket
 Dodge Journey Brake Caliper Piston
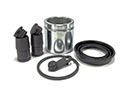 Dodge Journey Brake Caliper Repair Kit
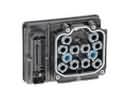 Dodge Journey Brake Controller
 Dodge Journey Brake Dust Shields
 Dodge Journey Hydraulic Hose
 Dodge Journey Wheel Stud