JeepParts
My Garage
My Account
Cart
OEM Dodge Ram 1500 Battery Cable
Car Battery Cable- Select Vehicle by Model
- Select Vehicle by VIN
Select Vehicle by Model
orMake
Model
Year
Select Vehicle by VIN
For the most accurate results, select vehicle by your VIN (Vehicle Identification Number).
44 Battery Cables found


Dodge Ram 1500 Positive Cable Part Number: 4801488AF
$11.84 MSRP: $58.55You Save: $46.71 (80%)Ships in 1-2 Business DaysDodge Ram 1500 Positive Cable Part Number: 4801819AC
$6.08 MSRP: $7.70You Save: $1.62 (22%)Ships in 1-2 Business Days


Dodge Ram 1500 Positive Cable Part Number: 56051989AA


Dodge Ram 1500 Negative Cable Part Number: 56020663AB

Dodge Ram 1500 Negative Cable Part Number: 4801640AA


Dodge Ram 1500 Positive Cable Part Number: 56000969AD


Dodge Ram 1500 Positive Cable Part Number: 56051996AE


Dodge Ram 1500 Negative Cable Part Number: 4801341AD


Dodge Ram 1500 Negative Cable Part Number: 56051878AD


Dodge Ram 1500 Positive Cable Part Number: 56051995AE

Dodge Ram 1500 Negative Cable Part Number: 56000975AC

Dodge Ram 1500 Positive Cable Part Number: 56000966AD
Dodge Ram 1500 Positive Cable Part Number: 56051714AD
$44.72 MSRP: $64.25You Save: $19.53 (31%)Dodge Ram 1500 Positive Cable Part Number: 56051996AD
$48.95 MSRP: $70.35You Save: $21.40 (31%)
Dodge Ram 1500 Positive Cable Part Number: 56051132AC
Dodge Ram 1500 Positive Cable Part Number: 56051132AB

Dodge Ram 1500 Positive Cable Part Number: 56020662AB
Dodge Ram 1500 Positive Cable Part Number: 56020228AB

Dodge Ram 1500 Negative Cable Part Number: 56018787
Dodge Ram 1500 Positive Cable Part Number: 56006543
| Page 1 of 3 |Next >
1-20 of 44 Results
Dodge Ram 1500 Battery Cable
Choose OEM Battery Cable that meet Dodge factory standards. Dodge designs and tests every component for precision and durability. Each Battery Cable follows strict manufacturing steps to lock in quality and fit. If your Dodge Ram 1500 matters to you, OEM parts make the smart choice. You'll get the exact look, feel, and performance you expect. Shop genuine Ram 1500 parts at the highly competitive prices online. Enjoy a manufacturer's warranty, a hassle-free return policy, and rapid delivery. No more guesswork with off brands. Get genuine parts with exact fit and true factory performance. Shop with confidence today at JeepPartsDeal.com.
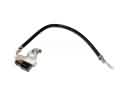
In Dodge Ram 1500 vehicles, Battery Cables plays the role of transmitting electrical current from the battery to various parts of the car, the starter motor included. These cables are vital in operation of engine, any harm in the cables results to problems in starting of the engine. For Dodge Ram 1500 Battery Cables it is advised to have it inspected and replaced as soon as possible to prevent any failure on the road. These Dodge Ram 1500 Battery Cables are made of high quality material to ensure that the cable will not easily degrade and its conductivity is at its optimal. It consists of a power supply cable referred to as the positive cable and the Earth cable as the negative cable thus making a closed loop power supply system. It is therefore very important for the integrity of these Battery Cables to be preserved so that it may give reliable service for the vehicle.
Dodge Ram 1500 Battery Cable Parts and Q&A
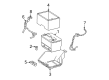
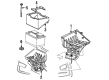
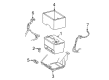
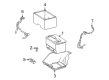
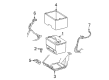
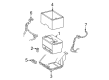
- Q: How to Maintain and Fix Battery Cables on Dodge Ram 1500?A:Before working on the battery cables, switch the ignition to Off and make certain no electrical accessories are powered. To work on the negative side of a gasoline engine, begin by isolating the negative terminal (3) of the battery with its cable, then bolt off the connecter (4) in the left front Fender, unfold and remove all the battery cable routing fasteners and clips and pull out the cable. Following this, disconnect the negative cable at the engine (4) and the left frame rail (6) by removing the bolts, before working on the battery. For a positive-cable engine, release the negative clamp (3) and the positive clamp (1) from their terminals, remove the securing nut (9) and disconnect the connectors (6 and 7) at the TIPM. Once your vehicle is raised, take out the left holder (1) that connects the battery cable, unscrew the nut (5) holding the cable to the starter solenoid (6), drop the vehicle, remove the terminal cap and take out the nut (3) securing the battery cable to the Alternator (2). For diesel engines, you'll do the same thing: separate the left negative cable, then disconnect and separate (1 and 9) the terminal clamps, take out the bolts (4, 6 and 7) and remove the cable all the way. For the other negative cable, detach the bolt (2) from the front right fender and bolt (4) from the engine to proceed as before. For the positive left cable, disconnect the clamps (1 and 9), take off the nut (8) holding the positive right cable (6) to the left clamp (5), lift the car and remove the stud at the engine and at the starter solenoid before you trace and remove the cable. Once you have the correct positive cable, disconnect the clamps from terminals 1 and 9, remove nut 8 from the right positive battery cable terminal 6, take off the fastener clips 11, release the terminal clamp 13 from alternator 3 and then unscrew nut 7 once you have followed and taken out the cable.
- Q: How to Install Battery Cables for Gasoline and Diesel Engines on Dodge Ram 1500?A:Set the cable in the vehicle and attach it with the battery retaining pushpins, fasteners and routing clips. Connect the negative cable's securing bolt to the left frame rail, the engine bracket and the left front fender. Secure the negative cable terminal on the battery and check the car works as it should. For the positive cable, set the cable in the car, attach the nut to the alterator using the existing thread, put on the terminal cap and secure the pushpin onto a bracket close to the alternator. Elevate the vehicle, add the securing nut to the cable at the starter solenoid, connect the battery cable pushpins to the left frame rail, drive the vehicle back to the ground and latch the cable into place on the battery. Push the pin into the TIPM housing, secure the wire harness connector with the pushpin at the TIPM, screw in the nut to connect the cable to the TIPM and make sure the positive and negative battery terminal clamps are correctly connected before carrying out a normal vehicle inspection. When working on diesel engines, place the negative cable, secure it with pushpins, fasteners and routing clips and fix bolts to the left frame rail, engine and left front fender. Then, attach the terminal clamps and examine the vehicle. Securing the negative cable is the same; you should use the right bolts and clamps. To do a proper cable installation for diesel engines, locate the cable, pushpin it in place, lift the vehicle, put the nut onto the starter solenoid, tighten the stud bolt to the engine, drop the vehicle and clamp the terminals in position. For positive cable installation, first position it, secure with fastener clips, link it to the left battery terminal clamp, screw in the nut onto the alternator and ensure that both negative terminal clamps are in place.