JeepParts
My Garage
My Account
Cart
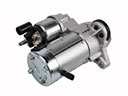
OEM Dodge Ram 2500 Alternator
Generator- Select Vehicle by Model
- Select Vehicle by VIN
Select Vehicle by Model
orMake
Model
Year
Select Vehicle by VIN
For the most accurate results, select vehicle by your VIN (Vehicle Identification Number).
22 Alternators found


Dodge Ram 2500 Alternator Part Number: R6028697AA
$331.97 MSRP: $400.00You Save: $68.03 (18%)Ships in 1-2 Business Days
Dodge Ram 2500 Alternator Part Number: RL028925AA
$253.24 MSRP: $442.00You Save: $188.76 (43%)Ships in 1-2 Business Days
Dodge Ram 2500 Alternator Part Number: 56028697AQ
$478.94 MSRP: $725.00You Save: $246.06 (34%)Ships in 1-2 Business Days
Dodge Ram 2500 Alternator Part Number: 56028732AC
$514.30 MSRP: $775.00You Save: $260.70 (34%)Ships in 1-2 Business Days
Dodge Ram 2500 Alternator Part Number: 5104762AA
$302.78 MSRP: $405.00You Save: $102.22 (26%)Ships in 1-2 Business Days

Dodge Ram 2500 Alternator Part Number: 4801769AD
$514.89 MSRP: $729.00You Save: $214.11 (30%)Ships in 1-2 Business Days
Dodge Ram 2500 Alternator Part Number: 4801768AE
$590.54 MSRP: $894.00You Save: $303.46 (34%)Ships in 1-2 Business Days


Dodge Ram 2500 Alternator Part Number: 56027912

Dodge Ram 2500 Alternator Part Number: 53008651


Dodge Ram 2500 Alternator Part Number: 56029913AA


Dodge Ram 2500 Alternator Part Number: 56028699AA


Dodge Ram 2500 Alternator Part Number: 56027221


Dodge Ram 2500 Alternator Part Number: 53008647


Dodge Ram 2500 Alternator Part Number: 4801475AA

Dodge Ram 2500 Alternator Part Number: 56028699AB
Dodge Ram 2500 Alternator Part Number: R6027912AB
Dodge Ram 2500 Alternator Part Number: RL027913
Dodge Ram 2500 Alternator Part Number: 5104772AA
Dodge Ram 2500 Alternator Part Number: 5104763AA

Dodge Ram 2500 Alternator Part Number: 4801632AA
| Page 1 of 2 |Next >
1-20 of 22 Results
Dodge Ram 2500 Alternator
Choose OEM Alternator that meet Dodge factory standards. Dodge designs and tests every component for precision and durability. Each Alternator follows strict manufacturing steps to lock in quality and fit. If your Dodge Ram 2500 matters to you, OEM parts make the smart choice. You'll get the exact look, feel, and performance you expect. Shop genuine Ram 2500 parts at the highly competitive prices online. Enjoy a manufacturer's warranty, a hassle-free return policy, and rapid delivery. No more guesswork with off brands. Get genuine parts with exact fit and true factory performance. Shop with confidence today at JeepPartsDeal.com.
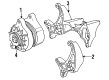
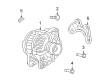
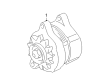
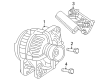
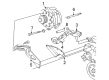
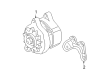
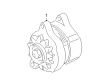
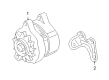
Dodge Ram 2500 Alternator is an unavoidable part that has a charging action for the vehicle's battery and supply electrical power to the vehicle's electrical machinery during operation. Usually situated intakes of an engine, the Alternator is an electromagnetic device that transforms mechanical energy into electrical energy that is utilized by parts such as the battery. Hence, this process involves a rotating magnetic field which creates an AC voltage in the stator windings, the AC voltage is then rectified to DC current to charge the battery and power the electrical system of the car. The voltage output of the Alternator is regulated so that the battery is not over charged or under charged, in newer vehicles the regulator of the alternator is in the Power Train Control Module (PCM). Custom alternators for Dodge Ram 2500 are out in the market for those owners who prefer to upgrade their vehicle to have a higher output alternator that can accommodate for additional loads in the electrical system caused by additional parts without risking the charging system's health.
Dodge Ram 2500 Alternator Parts and Q&A
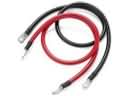
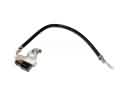
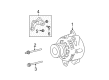
- Q: How to Effectively Service and Repair an Alternator on Dodge Ram 2500?A:You should start the service or repair of the alternator by disconnecting the negative Battery Cable to avoid accidents or harm to the electrical circuits. In accordance with the Cooling System procedure, take out the generator Drive Belt. Unscrew the cap that is covering the B+ terminal, take out the rear nut and disconnect the terminal. Outside the generator, push the tab on the field wire connector and slide the connector end out. Take out the three bracket nuts and the single bolt and then take off the bracket. After that, take out the two bolts holding the generator in place. Afterward, fit the generator close to the engine and apply the two mounting bolts, following the Torque Specifications. At the front of the generator, put the bracket in place, install the bolts and nuts and tighten them to the guidelines. Install the rear end of the field wire connector and put the B+ terminal eyelet on the generator's output stud, then secure it with the mounting nut to the required torque. Do not attempt to put the belt onto the pulley rim with a screwdriver, since it could break the synthetic fibers. Be certain the serpentine belt is installed properly so that the Water Pump rotates correctly and does not allow the engine to overheat; the label in the engine area can guide you. After that, install the generator drive belt and move on to reconnecting the negative battery cable.
- Q: How to Replace an Alternator on Dodge Ram 2500?A:Always remove the negative battery cable and both negative battery cables for diesels before you start replacing your alternator to guard against injuries or damage. Then, take out the generator Drive Belt, then work on the generator pivot and all the mounting bolts/nuts. Unscrew the B+ terminal nut at the generator's back and take off the wire, then push the tab on the field wire and remove the generator from the car. To attach the generator, link it to the engine and snap the field wire connector into the generator's rear. Attach the B+ terminal to the mounting stud on the generator, then tighten its mounting nut to 8.5 Nm (75 in. lbs.) torque. Screw the fasteners that mount the generator firmly in place and tighten the generator mounting bolt and pivot bolt/nut to 41 Nm (30 ft. lbs.) torque. Avoid pushing the belt on the pulley with a screwdriver to protect the belt from tearing and be sure to install the serpentine accessory drive belt the correct way so that the Water Pump doesn't cause the engine to overheat. After that, slide the generator drive belt into place and securely connect the negative battery cable(s) to the battery(s).