JeepParts
My Garage
My Account
Cart
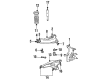
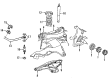
OEM Dodge Ram 2500 Control Arm
Suspension Arm- Select Vehicle by Model
- Select Vehicle by VIN
Select Vehicle by Model
orMake
Model
Year
Select Vehicle by VIN
For the most accurate results, select vehicle by your VIN (Vehicle Identification Number).
22 Control Arms found


Dodge Ram 2500 Lower Control Arm, Front Part Number: 68078374AA
$183.60 MSRP: $403.00You Save: $219.40 (55%)Ships in 1-2 Business Days


Dodge Ram 2500 Lower Control Arm, Front Part Number: 4670383AB
$237.58 MSRP: $361.00You Save: $123.42 (35%)Ships in 1-2 Business Days


Dodge Ram 2500 Upper Control Arm, Front Part Number: 52121586AF
$181.28 MSRP: $267.00You Save: $85.72 (33%)Ships in 1-3 Business Days


Dodge Ram 2500 Lower Control Arm, Front Driver Side Part Number: 52121517AE
$260.78 MSRP: $394.00You Save: $133.22 (34%)Ships in 1-2 Business Days


Dodge Ram 2500 Upper Control Arm, Front Part Number: 52013797AC
$261.72 MSRP: $389.00You Save: $127.28 (33%)

Dodge Ram 2500 Lower Control Arm Part Number: 52038752AC
$132.80 MSRP: $153.00You Save: $20.20 (14%)Ships in 1-2 Business Days
Dodge Ram 2500 Upper Control Arm Part Number: 52038850AC
$123.27 MSRP: $156.26You Save: $32.99 (22%)Ships in 1-2 Business Days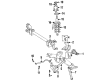
Dodge Ram 2500 Upper Control Arm Part Number: 52106799AA
$213.03 MSRP: $270.05You Save: $57.02 (22%)Ships in 1-2 Business Days

Dodge Ram 2500 Lower Control Arm Part Number: 52038753AC


Dodge Ram 2500 Upper Control Arm, Front Part Number: 52106776AE


Dodge Ram 2500 Upper Control Arm, Front Part Number: 52038730

Dodge Ram 2500 Lower Control Arm Part Number: 52113678AA

Dodge Ram 2500 Lower Control Arm Part Number: 52106778AA


Dodge Ram 2500 Upper Control Arm Part Number: 52106678AA

Dodge Ram 2500 Lower Control Arm Part Number: 52037649
Dodge Ram 2500 Lower Control Arm Part Number: 52037648

Dodge Ram 2500 Lower Control Arm, Front Part Number: 52013798AB
| Page 1 of 2 |Next >
1-20 of 22 Results
Dodge Ram 2500 Control Arm
Choose OEM Control Arm that meet Dodge factory standards. Dodge designs and tests every component for precision and durability. Each Control Arm follows strict manufacturing steps to lock in quality and fit. If your Dodge Ram 2500 matters to you, OEM parts make the smart choice. You'll get the exact look, feel, and performance you expect. Shop genuine Ram 2500 parts at the highly competitive prices online. Enjoy a manufacturer's warranty, a hassle-free return policy, and rapid delivery. No more guesswork with off brands. Get genuine parts with exact fit and true factory performance. Shop with confidence today at JeepPartsDeal.com.
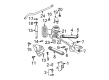
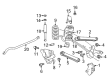
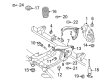
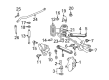
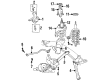
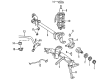
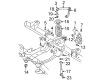
There are structural elements - the Control Arm of Dodge Ram 2500 vehicles perform the function of linking a car's frame with its wheels and is responsible for the functioning of the suspension system depending on the state of the roads. This component enables the wheel to move up and down or in other words to rotate on its own axis whilst still ensuring proper steering. Dodge Ram 2500 models have applied both Stamped Steel and Cast Iron or Aluminum Control Arms throughout the years, with the latter being stronger and lighter. Thus, the primary degree of variation for these Control Arms is in their sturdiness of materials used in construction. The earliest stamped steel arms tend to rust and become weakened with age and the newer designs are designed to succeed in high performance applications and hard corners. Semi Lena Power Control Arms are said to perform better to cope with the higher Horsepower for the enhanced stability and required space for broader Ram 2500 Tires.
Dodge Ram 2500 Control Arm Parts and Q&A
- Q: How to service and repair a left control arm on Dodge Ram 2500?A:The first step in servicing or repairing the left control arm is to raise and support the vehicle. First, remove the nut and bolt near the axle bracket, then the nut and bolt at the frame rail to take away the upper suspension arm. Put the upper suspension arm between the frame rail and the axle, bolt it on and finger tighten the nuts. As soon as you remove the support, lower the vehicle and fasten both nuts on the axle and frame to 163 Nm (120 ft. lbs.).
- Q: How to Remove and Install the Lower Control Arm on Dodge Ram 2500?A:First, make the vehicle sit up on jack stands and take off the tire, wheel and Brake Caliper with the rotor. Then, take out the cotter pin and nut from the tie rod and use the Puller C-3894-A to remove the Tie Rod End from the Steering Knuckle. Remove the stabilizer bar link from the lower suspension arm and then jack up the outboard end of the arm, placing the jack under it in front of the shock mount. With Remover C-4150A, take out the cotter pin and nut underneath the Ball Joint. Get rid of the lower shock bolt from the suspension arm, drop down the jack and suspension arm to take the tension from the springs and then remove the spring and rubber isolator. After that, remove the bolts that secure the suspension arm to the crossmember and get rid of the arm. Place the suspension arm over the crossmember during installation and bolt it down tightly. Slide the rubber isolator over the spring and place the spring into its upper seat. With the jack, raise the lower suspension arm and place the spring into the attachment point inside. Place the lower shock bolt in the car and tighten it using 142 Nm (105 ft. lbs.). Attach the steering knuckle to the lower ball joint, fix the lower ball joint nut to 129 Nm (95 ft. lbs.) for LD or 136 Nm (110 ft. lbs.) for HD and set the lower ball joint cotter pin. Connect the stabilizer bar link to the lower suspension arm, slide the grommet and retainer into place and secure the link with the nut, tightening to 37 Nm (27 ft. lbs.). Secure the new tie rod end to the steering knuckle, apply 108 Nm (80 ft. lbs.) of torque to the nut and put in the cotter pin. Place the caliper and rotor back on, press the tire against the rim and then install the wheel. Take away the support platform and put the car back on the ground, then tighten the suspension arm crossmember nuts to 169 Nm (125 ft. lbs.).


Related Dodge Ram 2500 Parts
 Dodge Ram 2500 Coil Springs
 Dodge Ram 2500 Wheel Bearing
 Dodge Ram 2500 Ball Joint
 Dodge Ram 2500 Bump Stop
 Dodge Ram 2500 Coil Spring Insulator
 Dodge Ram 2500 Control Arm Bolt
 Dodge Ram 2500 Control Arm Bumper
 Dodge Ram 2500 Shock Absorber
 Dodge Ram 2500 Strut Housing
 Dodge Ram 2500 Sway Bar Bushing
 Dodge Ram 2500 Sway Bar Link
 Dodge Ram 2500 Wheel Hub
Browse Dodge Ram 2500 Control Arm by Years
2010
2009
2008
2007
2006
2005
2004
2003
2002
2001
2000
1999
1998
1997
1996
1995
1994