JeepParts
My Garage
My Account
Cart
OEM Dodge Ram 2500 Van Ball Joint
Control Arm Joint- Select Vehicle by Model
- Select Vehicle by VIN
Select Vehicle by Model
orMake
Model
Year
Select Vehicle by VIN
For the most accurate results, select vehicle by your VIN (Vehicle Identification Number).
4 Ball Joints found


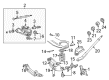
Dodge Ram 2500 Van Lower Ball Joint, Front Part Number: 3837088AC
$83.79 MSRP: $133.00You Save: $49.21 (37%)Ships in 1-2 Business Days


Dodge Ram 2500 Van Upper Ball Joint, Front Part Number: 3744929
Dodge Ram 2500 Van Upper Ball Joint, Front Part Number: 2808394
Dodge Ram 2500 Van Lower Ball Joint, Front Part Number: 3683983AB
Dodge Ram 2500 Van Ball Joint
Choose OEM Ball Joint that meet Dodge factory standards. Dodge designs and tests every component for precision and durability. Each Ball Joint follows strict manufacturing steps to lock in quality and fit. If your Dodge Ram 2500 Van matters to you, OEM parts make the smart choice. You'll get the exact look, feel, and performance you expect. Shop genuine Ram 2500 Van parts at the highly competitive prices online. Enjoy a manufacturer's warranty, a hassle-free return policy, and rapid delivery. No more guesswork with off brands. Get genuine parts with exact fit and true factory performance. Shop with confidence today at JeepPartsDeal.com.
Dodge Ram 2500 Van Ball Joint Parts and Q&A
- Q: How to service and repair the lower ball joint on Dodge Ram 2500 Van?A:For handling the lower ball joint, first raise and support the vehicle and next, take the front wheel and tire off. Unplug the outer tie rod end from the knuckle and take out the caliper along with its rotor. Hold the lower control arm in place, remove all the cotter pins and nuts on the ball joints and then proceed. Twist the threaded portion of C-3564-A on the ball joint to create pressure and you may need to also knock the knuckle with a hammer if the joint is difficult to loosen. Take out the ball joint seal and use the special remover/installer to press the ball joint towards the lower suspension arm bore. Place the ball joint remover/installer onto the lower suspension arm, where you will move the new ball joint in place. Next, fit a seal onto the ball joint and hold it firmly in place with a socket. Fit the steering knuckle onto the lower ball joint, mount the retaining nut and tighten to 183 Nm (135 ft. lbs.) for LD 11/16 or 237 Nm (175 ft. lbs.) for HD 3/4 torque specifications. After that, reattach the outer tie rod end to the steering knuckle and put new cotter pins in place. Install the rotor and disc brake caliper, then put on the tire and wheel combination and lower the vehicle. In addition, ensure that the car's wheels are correctly aligned.

Related Dodge Ram 2500 Van Parts
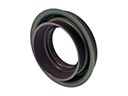 Dodge Ram 2500 Van Axle Shaft Seal
 Dodge Ram 2500 Van Bump Stop
 Dodge Ram 2500 Van Coil Springs
 Dodge Ram 2500 Van Control Arm
 Dodge Ram 2500 Van Control Arm Bolt
 Dodge Ram 2500 Van Control Arm Bushing
 Dodge Ram 2500 Van Shock Absorber
 Dodge Ram 2500 Van Sway Bar Bracket
 Dodge Ram 2500 Van Sway Bar Bushing
 Dodge Ram 2500 Van Sway Bar Link
 Dodge Ram 2500 Van Sway Bar Link Bushing
 Dodge Ram 2500 Van Wheel Bearing
Browse Dodge Ram 2500 Van Ball Joint by Years
2003
2002
2001
2000
1999