JeepParts
My Garage
My Account
Cart
OEM Dodge Ram 2500 Van Intake Manifold
Engine Intake Manifold- Select Vehicle by Model
- Select Vehicle by VIN
Select Vehicle by Model
orMake
Model
Year
Select Vehicle by VIN
For the most accurate results, select vehicle by your VIN (Vehicle Identification Number).
3 Intake Manifolds found

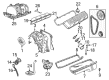
Dodge Ram 2500 Van Intake Manifold Part Number: 4897490AC

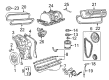
Dodge Ram 2500 Van Intake Manifold Part Number: 4897489AB
Dodge Ram 2500 Van Intake Manifold Part Number: 4897490AB
Dodge Ram 2500 Van Intake Manifold
Choose OEM Intake Manifold that meet Dodge factory standards. Dodge designs and tests every component for precision and durability. Each Intake Manifold follows strict manufacturing steps to lock in quality and fit. If your Dodge Ram 2500 Van matters to you, OEM parts make the smart choice. You'll get the exact look, feel, and performance you expect. Shop genuine Ram 2500 Van parts at the highly competitive prices online. Enjoy a manufacturer's warranty, a hassle-free return policy, and rapid delivery. No more guesswork with off brands. Get genuine parts with exact fit and true factory performance. Shop with confidence today at JeepPartsDeal.com.
Dodge Ram 2500 Van Intake Manifold Parts and Q&A
- Q: How to remove and install the intake manifold on Dodge Ram 2500 Van?A:The first step in removing the intake manifold is to cut off the negative battery cable and empty the cooling system. After that, remove the A/C compressor, generator, air cleaner bracket and accessory drive. Do the Fuel System Pressure release by unlocking the vehicle hydraulics and then cut off the fuel lines. pull the accelerator linkage, speed control and transmission kickdown cables if they exist, before you remove the return spring. Go ahead and take off the distributor cap and wires, separate the coil wires, heat indicator sending unit wire and heater hoses too. Drop out both the closed crankcase ventilation and evaporation control systems and then take out the intake manifold bolts. Working together, pick out the intake manifold and throttle body unit as a single assembly and throw away the four seals: the two flanges and both ends. With the bolts removed, pull the throttle body from the intake manifold and throw away the gasket. If you need to, unbolt the plenum pan and the gasket, then throw out the gasket. Clean the manifold with solvent and blow it dry with compressed air, so both ends of the gasket within the cylinder block are clean and dry. Examine the manifold for any defects, including cracks and measure its mating surfaces for overall flatness using a straightedge. Put a new plenum gasket in place, mount the plenum pan with the bolts tightened first to 5.4 Nm, then to 9.5 Nm and finally ensure all bolts are at 9.5 Nm. Place each flange gasket in position, so that the vertical port alignment tab sits on the deck face of the block, the horizontal alignment tabs are aligned with those on the cylinder head gasket and the words Manifold Side show on both flange gaskets. For the four corner joints, insert Mopar Gen Ii Silicone Rubber Adhesive Sealant or a similar sealant, spreading it over an area about 5 mm by 15 mm, with your fingers. Mount the front and rear end seals while making sure the molded dowel pins slip in fully to the holes in the cylinder block. Place the intake manifold gingerly on the barrel of the engine block and cylinder heads, checking to make sure seals are each in place. After putting on a new gasket, attach the throttle body to the intake manifold and tighten the bolts to 23 Nm (200 in. lbs.). Apply bolts 1 through 4, tightening them to 8 Nm (72 in. lbs.) alternately within each set of 1.4 Nm (12 in. lbs.), then do the same for bolts 5 through 12, again checking all bolts are tightened to the correct torque. After that, tighten all bolts one after another to 16 Nm (12 ft. lbs.) and repeat the check. Replace the closed crankcase ventilation and evaporation control apparatus, hook up the coil wires, heat indicator sending unit wire, heater hoses and bypass hose. Attach the distributor cap and its wires, install the return spring and add the accelerator linkage, if the vehicle has it. After that, fit the fuel lines as well as the accessory drive bracket and A/C compressor, install the generator and drive belt and secure the generator's mounting bolt at 41 Nm (30 ft. lbs.) of torque. After that, fix the air cleaner, fill the cooling system and reattach the negative terminal to the battery.
- Q: How to service and repair the intake manifold on Dodge Ram 2500 Van?A:Before any handling of the intake manifold, remove the negative cable from the battery and drain the cooling system. Take the A/C compressor out, as well as the generator, accessory drive bracket and air cleaner. Release the pressure in the fuel system and take off the fuel lines. If your engine has an accelerator linkage, speed control and transmission kickdown cables, remove them along with the return spring. Take off the distributor cap and all five wires, unplug the coil wires, sending unit wire and bypass and heater hoses. Disconnect the crankcase ventilation and evaporation control and next, remove the intake manifold bolts. Ease the assembly of the intake manifold and throttle body from the engine and throw out the old front and rear end seals and the flange side gaskets. Loosen the bolts under the throttle body and lift it off the manifold, while throwing away the gasket. If it's required, you can take out the plenum pan and gasket, throwing the old gasket away afterward. Put the manifold in solvent and blow it clean and dry with compressed air, so there is no dirt on the gasket surfaces in front and behind the cylinder block. Check the manifold for any cracks and make sure the mating surfaces are smooth and flat when measured using a straightedge. If you take out the plenum, apply a new gasket and mount the pan, secure all the fittings at 5.4 Nm (48 in. lbs.) and then tighten again to 9.5 Nm (84 in. lbs.), ensuring all are snug at that point. Set the flange gaskets in place, so that the edge with the words Manifold Side is facing the vertical port hole in the block and the other edges align with the gasket over the cylinder head. Coat the Mopar Gen Ii Silicone Rubber Adhesive Sealant or an equal product, onto all four corner joints, using about 5 mm (0.2 inch) of sealant that is 15 mm (0.6 inch) long. Place the front and rear seals on the engine so that the dowel pins all enter through the holes in the cylinder block. Place the intake manifold over the cylinder heads and cylinder block, watching to ensure all seals are on. Put the throttle body in place on the intake manifold after you have put the new gasket on, tightening the bolts to 23 Nm (200 in. lbs.). After finishing the intake manifold bolts, torque each of bolts 1 through 4 to 8 Nm (72 in. lbs.), then tighten bolts 5 through 12 to 8 Nm and ends by tightening all bolts together to 16 Nm (12 ft. lbs.) Replace the closed crankcase ventilation and evaporation control systems, attach the coil wires, heat indicator sending unit wire, heater hoses and bypass hose. Attach the distributor cap and wires, mount the return spring and link the accelerator linkage and speed control cables, if these parts exist on your transmission. After your fuel lines, the accessory drive bracket and A/C compressor, install the generator and drive belt, tightening the generator bolt to 41 Nm (30 ft. lbs.) torque. After that, attach the air cleaner, add the coolant and reattach the negative cable to the battery.


Related Dodge Ram 2500 Van Parts
 Dodge Ram 2500 Van Air Filter
 Dodge Ram 2500 Van Air Filter Box
 Dodge Ram 2500 Van Fuel Filter
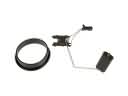 Dodge Ram 2500 Van Fuel Level Sensor
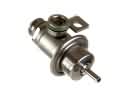 Dodge Ram 2500 Van Fuel Pressure Regulator
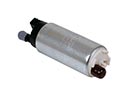 Dodge Ram 2500 Van Fuel Pump
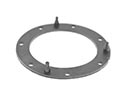 Dodge Ram 2500 Van Fuel Pump Gasket
 Dodge Ram 2500 Van Fuel Pump Tank Seal
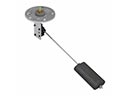 Dodge Ram 2500 Van Fuel Sending Unit
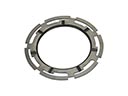 Dodge Ram 2500 Van Fuel Tank Lock Ring
 Dodge Ram 2500 Van Intake Manifold Gasket
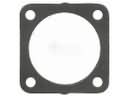 Dodge Ram 2500 Van Throttle Body Gasket