JeepParts
My Garage
My Account
Cart
OEM Dodge Ram 3500 Battery Cable
Car Battery Cable- Select Vehicle by Model
- Select Vehicle by VIN
Select Vehicle by Model
orMake
Model
Year
Select Vehicle by VIN
For the most accurate results, select vehicle by your VIN (Vehicle Identification Number).
49 Battery Cables found


Dodge Ram 3500 Positive Cable Part Number: 56017788AB
$316.03 MSRP: $481.00You Save: $164.97 (35%)


Dodge Ram 3500 Negative Cable Part Number: 56020688AC
$129.15 MSRP: $193.00You Save: $63.85 (34%)Ships in 1-2 Business Days


Dodge Ram 3500 Positive Cable, Driver Side Part Number: 56000976AB
$257.47 MSRP: $390.00You Save: $132.53 (34%)


Dodge Ram 3500 Negative Cable, Driver Side Part Number: 56000978AB
$90.64 MSRP: $134.00You Save: $43.36 (33%)

Dodge Ram 3500 Negative Cable Part Number: 56020665AE
$190.91 MSRP: $284.00You Save: $93.09 (33%)Ships in 1-2 Business Days


Dodge Ram 3500 Positive Cable Part Number: 56020664AB
$326.30 MSRP: $485.00You Save: $158.70 (33%)Ships in 1-3 Business Days
Dodge Ram 3500 Negative Cable, Driver Side Part Number: 56045770AC
$210.40 MSRP: $278.00You Save: $67.60 (25%)Ships in 1-2 Business Days


Dodge Ram 3500 Starter Wiring Part Number: 68026777AA


Dodge Ram 3500 Positive Cable Part Number: 56051989AA

Dodge Ram 3500 Negative Cable Part Number: 56020663AB


Dodge Ram 3500 Positive Cable, Driver Side Part Number: 4801279AC

Dodge Ram 3500 Positive Cable Part Number: 56045775AD


Dodge Ram 3500 Negative Cable, Passenger Side Part Number: 56000979AA


Dodge Ram 3500 Negative Cable, Passenger Side Part Number: 4801822AA


Dodge Ram 3500 Positive Cable Part Number: 56051995AE


Dodge Ram 3500 Positive Cable Part Number: 68004760AE


Dodge Ram 3500 Cable Assembly Part Number: 68086508AA

Dodge Ram 3500 Positive Cable Part Number: 68004564AE

Dodge Ram 3500 Positive Cable, Driver Side Part Number: 4801451AB


Dodge Ram 3500 Positive Cable, Passenger Side Part Number: 56000977AD
| Page 1 of 3 |Next >
1-20 of 49 Results
Dodge Ram 3500 Battery Cable
Choose OEM Battery Cable that meet Dodge factory standards. Dodge designs and tests every component for precision and durability. Each Battery Cable follows strict manufacturing steps to lock in quality and fit. If your Dodge Ram 3500 matters to you, OEM parts make the smart choice. You'll get the exact look, feel, and performance you expect. Shop genuine Ram 3500 parts at the highly competitive prices online. Enjoy a manufacturer's warranty, a hassle-free return policy, and rapid delivery. No more guesswork with off brands. Get genuine parts with exact fit and true factory performance. Shop with confidence today at JeepPartsDeal.com.
Dodge Ram 3500 entails Battery Cables that act as the medium through which electrical current is supplied to various parts in the vehicle so that the starter works and the engine kicks its way to life. These cables, however, may deteriorate over time, through factors such as oxidation, warping or physical damage that may affect the efficiency and the occurrence of starting problems. Different models of Dodge Ram 3500 may require different types of Battery Cables being installed, but that would be the only difference as to the type of cable and the condition of the materials being used in its construction. Superior quality replacement Battery Cables are available to guarantee that there will be no loose and poor connection between the battery and the starter due to abused connections and normal wear and tear. This is to ensure that the Battery Cables receives the periodic check up that would guarantee it the efficient performance for appropriate durations of time without developing faults along the line.
Dodge Ram 3500 Battery Cable Parts and Q&A
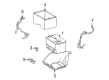
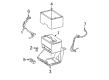
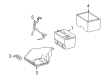
- Q: How to Install Battery Cables for Gasoline and Diesel Engines on Dodge Ram 3500?A:After the negative cable is in the correct place inside the vehicle, put the battery cable retaining pushpins, fasteners and routing clips onto the cable until it's properly secured. Put in the bolt for the negative cable on the left frame rail next, then fit the bolt for the cable to the engine and complete with the bolt to the left front fender. Mount the negative cable terminal clamp on the battery and make sure the vehicle performs correctly. For the positive cable, set the cable in the vehicle, fasten the nut to its end and to the Alternator, fit the terminal cap onto the alternator stud and secure the cable pushpin into the bracket beside the alternator. Raise the vehicle, fasten the nut securing the cable to the starter solenoid, link the battery cable pushpins to the left frame rail, lower the vehicle and set the other pushpin in place on the Battery Tray. With the engine turned off, place the wire harness connector pushpin into the TIPM housing, join the wire harness connector to the TIPM, secure the connecting cable with another nut and attach both cables to their clamps. For diesel engines, attach the negative cable to the left frame rail, secure it with pushpins, fasteners and routing clips, put in the bolts, join the terminal clamps and make sure the engine runs normally. Left and right sides are both wired up through the negative cable in the same way. Put the positive cable in place, hold it with pushpins, raise the vehicle, install the nut on the starter solenoid, secure the cover over the stud, thread in the stud bolt to the engine, let the vehicle down and attach the terminal clamps. For a proper positive cable installation, place the cable, attach fastener clips, connect the terminal to the adjacent left clamp, tighten the nut, connect the next clamp, lift the cover to thread a nut into the alternator and connect the negative clamps before testing the unit.
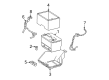
- Q: How to Service and Repair the Right-Side Diesel Engine Battery Cable on Dodge Ram 3500?A:Warning! Before servicing or fixing the negative battery cable for a diesel engine on the right side, first turn the ignition switch to the Off position and disable all electrical accessories. Take off the cable clamps connected to terminals 1 and 9 of the negative side of the battery. Unbolt bolt 2, securing the negative cable 3 to the right front Fender and then unbolt bolt 4 which holds the negative cable 5 to the engine 6. Remove the battery cable retaining pushpins, fasteners and routing clips from beneath the vehicle until you can take out the negative cable of the battery. With the battery negative cable, put it 3 in place under the hood and then hold the cable there by installing the retaining pushpins, fasteners and routing clips. The negative cable should be fastened to the right front fender with bolt 2 and bolt 4 should hold the negative cable 5 to the engine 6. In the end, join clamps 1 and 9 to the battery negative cables and then test the vehicle to ensure it's operating normally.