JeepParts
My Garage
My Account
Cart
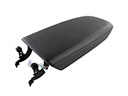
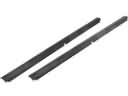
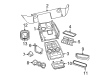
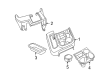
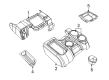
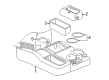
OEM Dodge Ram 3500 Center Console Base
- Select Vehicle by Model
- Select Vehicle by VIN
Select Vehicle by Model
orMake
Model
Year
Select Vehicle by VIN
For the most accurate results, select vehicle by your VIN (Vehicle Identification Number).
12 Center Console Bases found


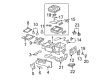
Dodge Ram 3500 Console Base, Gray, Center Part Number: 1NN14XDVAB
$344.65 MSRP: $503.00You Save: $158.35 (32%)Ships in 1-3 Business Days
Dodge Ram 3500 Console Base, Front Center Lower Part Number: 1BP561J8AB
$31.98 MSRP: $147.00You Save: $115.02 (79%)Ships in 1-2 Business DaysDodge Ram 3500 Console Base, Slate Gray/Taupe, Front Center Part Number: 1BP561DHAB
$135.69 MSRP: $156.00You Save: $20.31 (14%)Ships in 1-2 Business Days


Dodge Ram 3500 Console Base, Front Center Part Number: 5KK91ZJ8AA


Dodge Ram 3500 Console Base, Beige, Center Part Number: 1NN14DK2AB

Dodge Ram 3500 Console Base, Gray, Rear Part Number: 1EB18XDVAB
Dodge Ram 3500 Console Base, Beige, Rear Part Number: 1EB18DK2AB

Dodge Ram 3500 Console, Taupe, Front Center Part Number: 5GT26XDVAC
Dodge Ram 3500 Console, Gray, Front Center Part Number: 5GT26WL5AC

Dodge Ram 3500 Console Base, Front Center Part Number: 1GE831J3AA
Dodge Ram 3500 Center Console Base
Choose OEM Center Console Base that meet Dodge factory standards. Dodge designs and tests every component for precision and durability. Each Center Console Base follows strict manufacturing steps to lock in quality and fit. If your Dodge Ram 3500 matters to you, OEM parts make the smart choice. You'll get the exact look, feel, and performance you expect. Shop genuine Ram 3500 parts at the highly competitive prices online. Enjoy a manufacturer's warranty, a hassle-free return policy, and rapid delivery. No more guesswork with off brands. Get genuine parts with exact fit and true factory performance. Shop with confidence today at JeepPartsDeal.com.
Dodge Ram 3500 Center Console Base Parts and Q&A
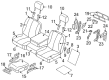
- Q: How to Remove and Install the Center Console Base on Dodge Ram 3500?A:Before you remove the mini floor console, first undo the 4WD gear shift boot and if it's a manual car, remove the transmission gear shift lever extension. If you have console inserts, remove them at this step, then unbolt the two screws connecting the rear console to the floor panel. Lift back the rear of the floor console to free the gear shift lever, remove the two bolts and pull the front console apart from the floor. Last, open the front clips and get rid of the mini console. The first step for the full floor console is to examine the warnings and cautions found in the service precautions. Use the trim stick C-4755 or its equivalent to remove seven clips holding the front console bezel and lift the back to bring the bezel out. Removing the bolt from the bottom, lift the rear of the printer and pull the front guide pins to remove the front base. Replace all seat fasteners with new ones and take the front bolts out and get rid of them. Push the seats to the front, detach the included bolts at the back, disconnect 12 v power supply if equipped, fold the seat backs forwards and roll the whole seatframe back into the vehicle. Take the screws out of the center seat console on either side of the driver and then take the screws out of the center console in the back and throw them away. If you can, remove the electrical connector, push the seat assembly forward and lift out the center seat console. With the mini floor console, align it first, push down the front clips completely and add the bolts to secure the rear console to the floor panel. Fit the inserts, the extension for the gear shifter and the 4WD light cover. For the complete console installation, settle the center seat console on the front seat and then roll it into the car. Connect the center console to both seats by putting in new nuts, add the electrical connection if available and tighten all the nuts to 25 N.m (18 ft.lbs.). Secure new nuts to join the center console to the driver and passenger seats using 25 N.m. If your motorcycle comes with connectors, use them and then move the seat assembly forward toward the engine. Add new bolts in the rear, but make sure to tighten them to 40 N.m (30 ft.lbs.). First, fold back the seatbacks, move the seats as far back as possible and use a torque spanner to install the new front bolts, tightening them to 28 N.m (21 ft.lbs.).