JeepParts
My Garage
My Account
Cart
OEM Dodge Ram 3500 Van Oil Pan
Oil Drain Pan- Select Vehicle by Model
- Select Vehicle by VIN
Select Vehicle by Model
orMake
Model
Year
Select Vehicle by VIN
For the most accurate results, select vehicle by your VIN (Vehicle Identification Number).
2 Oil Pans found


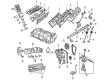
Dodge Ram 3500 Van Oil Pan Part Number: 53020916


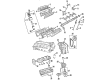
Dodge Ram 3500 Van Oil Pan Part Number: 53020914AB
Dodge Ram 3500 Van Oil Pan
Choose OEM Oil Pan that meet Dodge factory standards. Dodge designs and tests every component for precision and durability. Each Oil Pan follows strict manufacturing steps to lock in quality and fit. If your Dodge Ram 3500 Van matters to you, OEM parts make the smart choice. You'll get the exact look, feel, and performance you expect. Shop genuine Ram 3500 Van parts at the highly competitive prices online. Enjoy a manufacturer's warranty, a hassle-free return policy, and rapid delivery. No more guesswork with off brands. Get genuine parts with exact fit and true factory performance. Shop with confidence today at JeepPartsDeal.com.
Dodge Ram 3500 Van Oil Pan Parts and Q&A
- Q: How to service and repair the oil pan on Dodge Ram 3500 Van?A:Before working on the oil pan, first disconnect the battery negatively and take out the oil dipstick. Lift the vehicle and drain the oil, after which you should remove the exhaust pipe and the left engine to transmission strut. Turn the cushion thru-bolt nut on the support bracket for the right engine counter-clockwise. Next, move the engine up to free the oil pan and remove it. Eliminate the end gasket, clean both the block and pan gasket surfaces and discard or shave away any residual sealant at the rear main caps of the oil pan gasket. Should there be extra sealant, cut it off inside the engine, clean the oil pan in solvent and wipe it dry with a clean cloth afterward. Remove all solid material from the oil screen and the pipe with clean solvent and look at the condition of the screen. Thoroughly observe the oil drain plug and plug hole for signs of stripped threads and check the oil pan mounting flange for any bends by looking for symptoms of distortion. To install the engine, wash the surfaces of the block and pan where the gasket will go, clean up any over-technical sealant like before, make four alignment dowels from 5/16 x 1 1/2 inch bolts by removing the heads and cutting a notch into their tops and wipe new gasket and surfaces. Push the dowels into the cylinder block, dab some Mopar Silicone Rubber Adhesive Sealant or equivalent in the corner of the cap and in the hole on the block and slide the large gasket over the dowels and onto the block. Place the oil pan over the dowels and onto the gasket, attach the bolts and tighten them to an angle of 24 Nm (215 in. lbs.). After the dowels are out, add the rest of the oil pan bolts and tighten them to the same value. Remember to place the engine on the brackets over the supports and tighten the thru bolt nut properly. After putting in the drain plug and turning it to 34 Nm (25 ft. lbs.) torque, install the engine to transmission strut and exhaust pipe. Set the wheels of the vehicle down, add the dipstick again, attach the minus cable to the battery and pour oil into the crankcase until it reaches the proper mark.

Related Dodge Ram 3500 Van Parts
 Dodge Ram 3500 Van Crankshaft
 Dodge Ram 3500 Van Crankshaft Pulley
 Dodge Ram 3500 Van Dipstick
 Dodge Ram 3500 Van Dipstick Tube
 Dodge Ram 3500 Van Engine Mount
 Dodge Ram 3500 Van Harmonic Balancer
 Dodge Ram 3500 Van Oil Filler Cap
 Dodge Ram 3500 Van Oil Filter
 Dodge Ram 3500 Van Oil Pan Gasket
 Dodge Ram 3500 Van Timing Chain
 Dodge Ram 3500 Van Timing Cover Gasket
 Dodge Ram 3500 Van Valve Cover Gasket