JeepParts
My Garage
My Account
Cart
OEM Dodge Sprinter 2500 Air Duct
Air Hose- Select Vehicle by Model
- Select Vehicle by VIN
Select Vehicle by Model
orMake
Model
Year
Select Vehicle by VIN
For the most accurate results, select vehicle by your VIN (Vehicle Identification Number).
Filter by Part Type
Filter by Part Type
31 Air Ducts found


Dodge Sprinter 2500 Air Hose, Front Part Number: 68034120AA
$75.75 MSRP: $172.00You Save: $96.25 (56%)Ships in 1-2 Business Days


Dodge Sprinter 2500 Intercooler Hose, Outer Part Number: 68013655AA
$84.56 MSRP: $131.00You Save: $46.44 (36%)Ships in 1-2 Business Days

Dodge Sprinter 2500 Lower Hose Part Number: 5103616AA
$33.45 MSRP: $72.15You Save: $38.70 (54%)Ships in 1-2 Business Days
Dodge Sprinter 2500 Side Duct, Passenger Side Part Number: 5124740AA
$8.06 MSRP: $10.22You Save: $2.16 (22%)Ships in 1-2 Business Days
Dodge Sprinter 2500 Upper Hose Part Number: 5104140AA
$44.38 MSRP: $56.26You Save: $11.88 (22%)Ships in 1-2 Business Days


Dodge Sprinter 2500 Front Hose Part Number: 68013681AA


Dodge Sprinter 2500 Upper Hose Part Number: 5120144AA


Dodge Sprinter 2500 Rear Hose Part Number: 68012331AA

Dodge Sprinter 2500 Front Duct, Driver Side Part Number: 5124748AA

Dodge Sprinter 2500 Front Duct, Passenger Side Part Number: 5124747AA

Dodge Sprinter 2500 Rear Duct, Passenger Side Part Number: 5124746AA

Dodge Sprinter 2500 Rear Duct, Driver Side Part Number: 5124745AA

Dodge Sprinter 2500 Inner Duct, Passenger Side Part Number: 5124742AA

Dodge Sprinter 2500 Side Duct, Driver Side Part Number: 5124739AA

Dodge Sprinter 2500 Center Duct Part Number: 5124737AA

Dodge Sprinter 2500 Heat Duct, Passenger Side Part Number: 68010416AA


Dodge Sprinter 2500 Side Duct, Front Part Number: 68010413AA

| Page 1 of 2 |Next >
1-20 of 31 Results
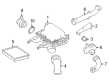
Dodge Sprinter 2500 Air Duct
Choose OEM Air Duct that meet Dodge factory standards. Dodge designs and tests every component for precision and durability. Each Air Duct follows strict manufacturing steps to lock in quality and fit. If your Dodge Sprinter 2500 matters to you, OEM parts make the smart choice. You'll get the exact look, feel, and performance you expect. Shop genuine Sprinter 2500 parts at the highly competitive prices online. Enjoy a manufacturer's warranty, a hassle-free return policy, and rapid delivery. No more guesswork with off brands. Get genuine parts with exact fit and true factory performance. Shop with confidence today at JeepPartsDeal.com.
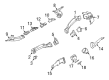
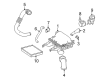
The Dodge Sprinter 2500 Air Duct demonstrates crucial value by boosting the reliability together with performance variables of Dodge Sprinter 2500 vehicles. As a durable component the Air Duct brings clean air into the engine while cooperating with the air filter to catch and defend the engine from damaging contaminants. The maintenance quality of engine health depends heavily on the Air Duct because unfiltered engine air intake creates performance problems and wear issues. The Dodge Sprinter 2500 Air Duct offers compatibility with all Sprinter 2500 vehicle models such as 4-door van, 2-door pickup truck and 4-door crew van and minibus to suit diverse applications. The Air Duct system has a Mass Air Flow (MAF) sensor that serves to monitor air intake so that fuel mixtures stay optimal for improved efficiency and safety benefits. The Dodge Sprinter 2500 distinguishes itself from other vehicles primarily through its exceptional craftsmanship together with superior fuel economy and its exceptional performance from the Air Duct component. The Dodge model Air Duct maintains engine performance along with integrity enabling this vehicle to establish a status as a reliable choice for driver and dealer markets.
Dodge Sprinter 2500 Air Duct Parts and Q&A
- Q: How to Properly Install and Seal Air Ducts in a Refrigerant System on Dodge Sprinter 2500?A:Therefore, before installing the air duct, be sure to replace the O-rings on the refrigerant line when breaking it free and make sure the front face of the instrument panel is safe from damage. Mount the defroster and instrument panel ducts in the instrument panel and fit and secure them with the HVAC housing. Put screws through the ducts into the instrument panel, tighten to 2 Nm (17 in. lbs.), then fit the two covers over the instrument panel and install it. After opening the refrigerant line fittings and expansion valve and Heater Core ports, remove any tape or plugs from them. Just like the old seals, make sure that you grease the new rubber O-ring seals with clean refrigerant oil and mount them on the A/C system's fittings using only compatible R-134a system O-rings and refrigerant oil. Put the tube ends in the right position with the A/C Expansion Valve and then tighten the line nut so you don't injure the sealing rings in the ends. Push the A/C liquid line and the A/C suction line onto the A/C expansion valve and tighten the nut with a torque of 6 Nm (53 in. lbs.). Screw the heater hoses into the heater core and secure them with the clamps. Set the air cleaner housing into place, connect the Battery Cable, top up the engine coolant, drain off the old refrigerant and replace it with the right amount.

Related Dodge Sprinter 2500 Parts
 Dodge Sprinter 2500 Fuel Filter
 Dodge Sprinter 2500 Air Filter
 Dodge Sprinter 2500 Air Filter Box
 Dodge Sprinter 2500 Air Intake Coupling
 Dodge Sprinter 2500 Air Intake Hose
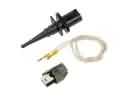 Dodge Sprinter 2500 Air Temperature Sensor
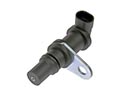 Dodge Sprinter 2500 Crankshaft Position Sensor
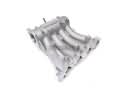 Dodge Sprinter 2500 Intake Manifold
 Dodge Sprinter 2500 Intake Manifold Gasket
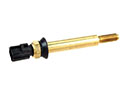 Dodge Sprinter 2500 Temperature Sender
 Dodge Sprinter 2500 Transmission Sensor
 Dodge Sprinter 2500 Turbocharger
Browse Dodge Sprinter 2500 Air Duct by Years
2009 2008 2007 2006 2005 2004 2003