JeepParts
My Garage
My Account
Cart
OEM Dodge Sprinter 3500 A/C Accumulator
Accumulator- Select Vehicle by Model
- Select Vehicle by VIN
Select Vehicle by Model
orMake
Model
Year
Select Vehicle by VIN
For the most accurate results, select vehicle by your VIN (Vehicle Identification Number).
3 A/C Accumulators found

Dodge Sprinter 3500 Dehydrator, Rear Part Number: 68012647AA
$60.16 MSRP: $98.60You Save: $38.44 (39%)Ships in 1-2 Business Days

Dodge Sprinter 3500 Dehydrator Part Number: 5103570AA


Dodge Sprinter 3500 Dehydrator, Front Part Number: 68013634AA
Dodge Sprinter 3500 A/C Accumulator
Choose OEM A/C Accumulator that meet Dodge factory standards. Dodge designs and tests every component for precision and durability. Each A/C Accumulator follows strict manufacturing steps to lock in quality and fit. If your Dodge Sprinter 3500 matters to you, OEM parts make the smart choice. You'll get the exact look, feel, and performance you expect. Shop genuine Sprinter 3500 parts at the highly competitive prices online. Enjoy a manufacturer's warranty, a hassle-free return policy, and rapid delivery. No more guesswork with off brands. Get genuine parts with exact fit and true factory performance. Shop with confidence today at JeepPartsDeal.com.
Dodge Sprinter 3500 A/C Accumulator is an essential part known to have immense reliability along with its overwhelming performance level in the vehicle's air conditioning system. This A/C Accumulator is used to provided a clean environment and free of any debris or moisture that might hamper the efficiency of the A/C system. Applicable on new and used Dodge Sprinter 3500 models which were manufactured between 2003 and 2009, this part contributes a lot to the conditioning and durability of the A/C system of the vehicle. The Dodge Sprinter 3500 A/C Accumulator is intertwined with the condenser and the expansion valve to protect the A/C subcomponents and offer a comfortable drive. This is functional to a certain extent and at the same time, gives an aesthetic view of the workmanship associated with Dodge cars. Firstly, the A/C Accumulator's qualities to perform in various conditions point to how the apparatus provides a way to increase efficiency and improve safety for the drivers and car occupants. Also, what separates the Dodge Sprinter 3500 A/C Accumulator in the automotive market is their construction and durability, which are critical in maintaining the functionality of the A/C system in harsh conditions. Thus, the Dodge Sprinter 3500 A/C Accumulator is considered to be reliable since it demonstrates its effectiveness in providing comfortable conditions for a car.
Dodge Sprinter 3500 A/C Accumulator Parts and Q&A
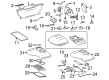
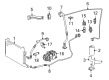
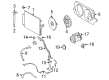
- Q: How Does the A/C Accumulator Prevent Malfunction and Compressor Damage on Dodge Sprinter 3500?A:Be sure to adjust the refrigerant oil level in the A/C system, as doing so can prevent the A/C system from failing and your compressor from being damaged. An A/C accumulator needs to be put in if the A/C compressor has an internal issue to prevent more damage. When only the rear A/C accumulator is replaced, you should add 30 milliliters (1 fluid ounce) of recommended refrigerant oil. Be sure to put in new O-ring seals if you remove the A/C accumulator to stop leaks from happening. To begin, uncover any ports on the line fittings and accumulator with your pliers and remove the tape or plugs you see. Clear off any oil from new O-ring seals and then use the appropriate seals for the R-134a system when installing them on the line fittings. Attach the rear A/C accumulator (3) to the end of the rear condenser outlet (1) and to the rear liquid tube (7) and temporarily put on the retaining bolts. Lay the rear A/C accumulator on the rear A/C Condenser (4) and fasten both screws (5). Apply a torque force of 6 Nm (53 in. lbs.) to the bolts joining the rear A/C liquid line and rear condenser outlet line. After the rear A/C pressure transducer (2) is taken out, install it in place and tighten to 10 Nm (88 in. lbs.) and then connect the wire harness connector (6) to the transducer. Place the rear condenser cover on the unit and fit it using retaining screws tightened to 2 Nm (17 in. lbs.). Reattach the negative Battery Cable, remove all the rear refrigerant and if you're putting in a new rear A/C accumulator, add 30 milliliters (1 fluid ounce) of the proper refrigerant oil. The last step is to charge the back refrigerant system.
- Q: How to Service and Repair an A/C Accumulator in the Rear Receiver/Drier System on Dodge Sprinter 3500?A:To work on the rear A/C accumulator, start with removing the negative Battery Cable, next unscrew the Air Filter on the rear A/C evaporator and finally vacuum the refrigerant from the rear evaporator. After that, take out the cover from the rear A/C condenser housing, unhook the rear refrigerant reservoir from the rear A/C accumulator and toss away the O-ring seal. Take off the liquid line from the rear A/C accumulator and throw away its O-ring. Take out the bolt and retaining bracket joining the rear A/C accumulator to the rear A/C condenser housing and remove the A/C accumulator, then cover both the liquid line fitting and the reservoir and A/C accumulator open ports with plugs or tape. Before fitting the new rear A/C accumulator, drain the refrigerant oil from the old one, record the oil's amount and add an equal quantity of the recommended oil to the new replacement, placing it with the flow arrow pointed in the right direction. Fasten the new rear A/C accumulator against the rear A/C condenser housing, install the holding bracket and torque it to 25 N.m (18 ft. lbs.). Take off the tape or plugs from the liquid line, reservoir and A/C accumulator ports, smear clean oil on a new O-ring seal and fit it over the rear liquid line fitting with the O-ring seal for the system. Screw the rear liquid line into the rear A/C accumulator and tighten it to 35 N.m (26 ft. lbs.). Add refrigerant oil to a second O-ring seal, put it onto the A/C accumulator outlet fitting, then connect the refrigerant reservoir to the rear A/C accumulator, tightening the nut down to 35 N.m (26 ft. lbs.). After replacing the negative battery cable, release the rear refrigerant into the atmosphere, fill the empty rear system with refrigerant, place the air filter at the rear and finish up by attaching the cover to the rear A/C condenser housing.


Related Dodge Sprinter 3500 Parts
 Dodge Sprinter 3500 A/C Compressor
 Dodge Sprinter 3500 A/C Compressor Clutch
 Dodge Sprinter 3500 A/C Condenser
 Dodge Sprinter 3500 A/C Expansion Valve
 Dodge Sprinter 3500 A/C Hose
 Dodge Sprinter 3500 Blend Door Actuator
 Dodge Sprinter 3500 Blower Control Switches
 Dodge Sprinter 3500 Blower Motor
 Dodge Sprinter 3500 Cabin Air Filter
 Dodge Sprinter 3500 Evaporator
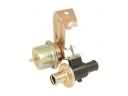 Dodge Sprinter 3500 Heater Control Valve
 Dodge Sprinter 3500 HVAC Pressure Switch