JeepParts
My Garage
My Account
Cart
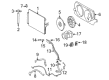
OEM Dodge Sprinter 3500 A/C Hose
Air Conditioning Hose- Select Vehicle by Model
- Select Vehicle by VIN
Select Vehicle by Model
orMake
Model
Year
Select Vehicle by VIN
For the most accurate results, select vehicle by your VIN (Vehicle Identification Number).
23 A/C Hoses found

Dodge Sprinter 3500 Rear A/C Line Part Number: 68012784AA
$32.23 MSRP: $185.00You Save: $152.77 (83%)Ships in 1-2 Business Days
Dodge Sprinter 3500 Rear A/C Line Part Number: 68012778AA
$41.82 MSRP: $240.00You Save: $198.18 (83%)Ships in 1-2 Business Days
Dodge Sprinter 3500 Rear A/C Line Part Number: 68009179AA
$27.27 MSRP: $78.20You Save: $50.93 (66%)Ships in 1-2 Business Days
Dodge Sprinter 3500 A/C Hoses Part Number: 5124647AA
$424.71 MSRP: $538.39You Save: $113.68 (22%)Ships in 1-2 Business Days
Dodge Sprinter 3500 A/C Hoses Part Number: 68012745AA
$115.08 MSRP: $126.00You Save: $10.92 (9%)Ships in 1-2 Business DaysDodge Sprinter 3500 Connector Tube, Rear Part Number: 68012764AA
$65.42Ships in 1-2 Business Days

Dodge Sprinter 3500 Rear A/C Line Part Number: 68012773AA


Dodge Sprinter 3500 A/C Hoses, Front Part Number: 68012744AA


Dodge Sprinter 3500 A/C Hoses Part Number: 68012761AA


Dodge Sprinter 3500 A/C Hoses Part Number: 5104484AA

Dodge Sprinter 3500 A/C Hoses Part Number: 5124817AA

Dodge Sprinter 3500 A/C Hoses Part Number: 5104479AA

Dodge Sprinter 3500 A/C Hoses Part Number: 5124646AA

Dodge Sprinter 3500 Suction Line Part Number: 68064746AA

Dodge Sprinter 3500 Rear A/C Line Part Number: 68012779AA

Dodge Sprinter 3500 Front A/C Line Part Number: 68012751AA

Dodge Sprinter 3500 Suction Line Part Number: 68012755AA

Dodge Sprinter 3500 Rear A/C Line Part Number: 68012772AA

Dodge Sprinter 3500 A/C Hoses, Front Part Number: 68012765AA

Dodge Sprinter 3500 Rear A/C Line Part Number: 68012777AA
| Page 1 of 2 |Next >
1-20 of 23 Results
Dodge Sprinter 3500 A/C Hose
Choose OEM A/C Hose that meet Dodge factory standards. Dodge designs and tests every component for precision and durability. Each A/C Hose follows strict manufacturing steps to lock in quality and fit. If your Dodge Sprinter 3500 matters to you, OEM parts make the smart choice. You'll get the exact look, feel, and performance you expect. Shop genuine Sprinter 3500 parts at the highly competitive prices online. Enjoy a manufacturer's warranty, a hassle-free return policy, and rapid delivery. No more guesswork with off brands. Get genuine parts with exact fit and true factory performance. Shop with confidence today at JeepPartsDeal.com.
This Dodge Sprinter 3500 A/C Hose is a critical part of the automobile that deals with the air conditioning system of the automobile; this part is famous for its reliability and the performance delivered by this part. This A/C Hose primary role is to transport the refrigerant from the compressor to the different constituents of the system; this results to efficient cooling internally thus improving the comfort of the cabin as well as safety to the passengers. Designed with aluminum fittings folded at one end and curled at the other, the A/C Hose used in the Dodge Sprinter 3500 is designed to combat the pressure that comes with gaseous refrigeration, hence no leakage and great endurance. As for flexibility, the compatibility with the various models of the Dodge Sprinter 3500 produced between the years 2003 and 2009, makes it diverse capable of works as per the different engine options and the body type of 2.7 L I5 and 3.0 L V6. In fact, the Dodge Sprinter 3500 A/C Hose goes beyond being merely a part, it offers efficiency to the car in use affecting fuel consumption, among others. This commercial application appeared due to the fact that Dodge Sprinter 3500 A/C Hose has special features that include a high level of build quality and accurate engineering The key consumer audience is people who value reliability and consistently choose genuine parts when choosing automotive equipment. It plays a major role in the efficient flow of the refrigerant hence improving on the feel of the vehicle as well as the safety of the vehicle making it one of the most important components of the Dodge Sprinter 3500 A/C.
Dodge Sprinter 3500 A/C Hose Parts and Q&A
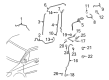
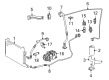
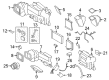
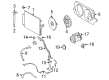
- Q: How to Install an A/C Hose for the Liquid Line on Dodge Sprinter 3500?A:Before we begin, set the refrigerant oil so there isn't too much pressure on the compressor and remember to install new O-ring seals as soon as the A/C line is removed to stop leaks. Untape or unplug the fittings and condenser ports, first and then grease new rubber O-rings with clean oil before pressing them into the fittings, always selecting the right O-rings and recommended type of oil. Bring the front A/C liquid line (5) into the engine compartment, support the vehicle in a raised position and join it to the middle section (4) by fastening the bolt to 8 Nm (70 in. lbs.). Secure the line on the left frame rail with two nuts, hand-tighten them to 4 Nm (35 in. lbs.) and when needed, install the underbody A/C lines and heat shield. Next, remove the air chamber by lowering the car on its secure digging points, then press down the A/C liquid and discharge lines onto the condenser and ensure they remain fixed by tightening each 6 Nm (53 in. lbs.) Once more, link the negative Battery Cable, expel the refrigerant, fine-tune the oil in the system, charge it and put the air cleaner housing in place. For step two, take off more tape or plugs, put in O-ring seals, lube the area, install section 3, attach it to section 2 and complete everything with a bolt tightened to 8 Nm (70 in. lbs.). Fix the middle section to the front section; add two nuts to the left frame rail, but only tighten them to 4 Nm (35 in. lbs.). If you have rear A/C, put in your underbody lines and heat shield, lower the car, put back your negative battery cable, evacuate the refrigerant system, lower the refrigerant oil to the correct level, charge the system and place in the air cleaner housing. First, remove any tape or plugs; then, lubricate, insert the O-ring seals, put on the rear valves of the liquid (3) and suction (2) lines, hoist the vehicle, align and connect the rear lines to the middle sections (11 & 4), finish by tightening the bolt to 8 Nm (70 in. lbs.). When needed, fit the underbody A/C lines and shield, lower the car, tighten the rear section of the suction line to the center with a bolt at 8 Nm (70 in. lbs.), join the rear section of the liquid line to the A/C Expansion Valve (1) with a bolt tightened to 6 Nm (53 in. lbs.) and secure both lines to dash panel with nuts at 4 Nm (35 in. lbs.). For diesel engines, put the wires in their harness and bracket onto the cleaner housing bracket and firmly install two retaining nuts. Now, join the negative battery cable, clear out the refrigerant, check the refrigerant oil, charge the system and put in the air cleaner housing.
- Q: How to Safely Remove and Service an A/C Hose Suction Line on Dodge Sprinter 3500?A:The first thing to do when servicing the A/C suction line is to disconnect and separate the negative Battery Cable. Take out the air cleaner housing and draw out the refrigerant from the refrigerant system. In the front, unhook the windshield washer reservoir so it doesn't get in the way and for diesel models, pull out the turbo resonator and charge air outlet tube. After that, remove the bolt connecting the front section of the A/C suction line to the compressor, pull off the line and discard the O-ring. Unscrew the bolt that secures the front and middle sections (11), remove them from each other, throw away the O-ring seal and take out the front section from the engine compartment. Insert plugs into the opened refrigerant lines d a nd the compressor or tape over these areas. For the thick middle part, first take out the battery and get back the refrigerant. Remove the bolts fastening the middle section to the front and to the rear sides, then disconnect the middle part and throw away its O-ring seals. Should the car include rear A/C, you should relocate the underbody A/C lines to make access easier. Release the nut that keeps the middle section hanging on the stud (12) on the left frame rail and take the section out of the car, always putting blocking plugs or tape in place over the opened ports of the refrigerant lines. At the back, remove the battery, release the refrigerant and on diesel vehicles, loosen the two nuts holding the wire harness to the air cleaner housing, positioning the harness outside of the housing bracket. Take out the two fasteners joining the rear A/C lines to the dash panel (2 and 3) and the one holding both lines to the A/C Expansion Valve. Remove the connections to the expansion valve and throw out the O-rings. Remove the screw that holds the center section (11) to the rear section, raise and support the vehicle and if you need to, take away the heat shield from the left frame rail for easier access. Where an A/C unit is installed at the rear, you'll need to pull the underbody A/C lines out of the way so you can reach them. Take out the bolts connecting the middle to the rear part, disconnect them and put the O-ring seals away. Lower the vehicle, takeout the rear section of the A/C hoses and lines from in front of the engine and bolt or tape the covers over the fitted openings and expansion valve ports.


Related Dodge Sprinter 3500 Parts
 Dodge Sprinter 3500 A/C Accumulator
 Dodge Sprinter 3500 A/C Compressor
 Dodge Sprinter 3500 A/C Compressor Clutch
 Dodge Sprinter 3500 A/C Compressor Cut-Out Switches
 Dodge Sprinter 3500 A/C Condenser
 Dodge Sprinter 3500 A/C Expansion Valve
 Dodge Sprinter 3500 A/C Service Cap
 Dodge Sprinter 3500 Blend Door Actuator
 Dodge Sprinter 3500 Blower Motor
 Dodge Sprinter 3500 Blower Motor Resistor
 Dodge Sprinter 3500 Evaporator
 Dodge Sprinter 3500 HVAC Pressure Switch