JeepParts
My Garage
My Account
Cart
OEM Dodge Stratus Windshield
Glass Windshield- Select Vehicle by Model
- Select Vehicle by VIN
Select Vehicle by Model
orMake
Model
Year
Select Vehicle by VIN
For the most accurate results, select vehicle by your VIN (Vehicle Identification Number).
6 Windshields found

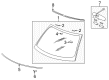
Dodge Stratus Windshield, Front Part Number: 5170497AA
$324.81Ships in 1-2 Business Days
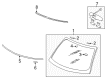
Dodge Stratus Windshield, Front Part Number: MR987821
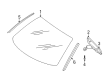
Dodge Stratus Windshield, Front Part Number: 5170496AA


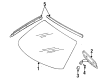
Dodge Stratus Windshield, Front Part Number: 5083393AB
Dodge Stratus Windshield, Front Part Number: 5019071AA

Dodge Stratus Windshield Part Number: 4882429
Dodge Stratus Windshield
Choose OEM Windshield that meet Dodge factory standards. Dodge designs and tests every component for precision and durability. Each Windshield follows strict manufacturing steps to lock in quality and fit. If your Dodge Stratus matters to you, OEM parts make the smart choice. You'll get the exact look, feel, and performance you expect. Shop genuine Stratus parts at the highly competitive prices online. Enjoy a manufacturer's warranty, a hassle-free return policy, and rapid delivery. No more guesswork with off brands. Get genuine parts with exact fit and true factory performance. Shop with confidence today at JeepPartsDeal.com.
Dodge Stratus Windshield Parts and Q&A
- Q: How Is a Windshield Installed and Removed with Urethane Adhesive on Dodge Stratus?A:There is a type of sealing called urethane adhesive that secures the windshield to the window frame. Before the adhesive is applied cold, primer is needed to help the seal stick properly. Removing a windshield is tough, since it supports the roof structure and the urethane sealing is hard to split or wash away. Check ahead to be sure a replacement windshield and moldings are available before you begin. Open the convertible top, take out the Weather Strips and moldings, mark the windshield area and use a cold knife or push cutter to slice the urethane adhesive before removing the windshield. The interior method is similar; first, you take out the cowl cover and weather strips and then you use a reciprocating or oscillating knife to trim the urethane adhesive. If your windshield is cracked and you want to cut it out, spherical tools work for the exterior, but save the glass best by starting from inside. After you have the inside rear view mirror and cowl cover removed, undo the two screws at each side molding, cut the urethane seal before breaking away the windshield. Open the left front door glass when installing to keep the passenger area unpressurized and let the urethane cure for a full day. Make certain the urethane material is consistent with the windshield's shape and remember to clean all support spacers in advance. Place the new windshield in the hole, making certain it lines up against the pinch weld fence and mark it for easy reference. Spray ammonia cleaner on the windshield, use Glass Prep afterwards and then apply Glass Primer. Never allow urethane removal to harm the paint. First, install compression spacers, run the urethane adhesive bead and match the installation marks before setting the windshield. Clean off extra urethane, stick the molding in place with masking tape and attach the cover, wipers and inside rear view mirror as before. Once the repair is cured, remove the tape and check the windshield with water.

Related Dodge Stratus Parts
 Dodge Stratus Ashtray
 Dodge Stratus Car Mirror
 Dodge Stratus Car Speakers
 Dodge Stratus Center Console
 Dodge Stratus Door Lock Switch
 Dodge Stratus Exterior Door Handle
 Dodge Stratus Floor Pan
 Dodge Stratus Grille
 Dodge Stratus Hood Latch
 Dodge Stratus Torsion Bar
 Dodge Stratus Wheelhouse
 Dodge Stratus Wiper Pivot