JeepParts
My Garage
My Account
Cart
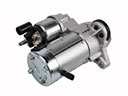
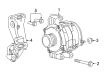
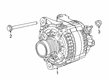
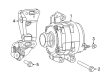
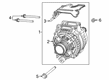
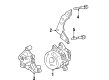
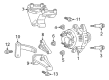
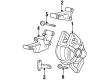
OEM Jeep Cherokee Alternator
Generator- Select Vehicle by Model
- Select Vehicle by VIN
Select Vehicle by Model
orMake
Model
Year
Select Vehicle by VIN
For the most accurate results, select vehicle by your VIN (Vehicle Identification Number).
16 Alternators found

Jeep Cherokee Alternator Part Number: 56029624AC
$575.07 MSRP: $871.00You Save: $295.93 (34%)Ships in 1-2 Business Days
Jeep Cherokee Alternator Part Number: 56029745AB
$421.48 MSRP: $639.00You Save: $217.52 (35%)Ships in 1-2 Business Days
Jeep Cherokee Alternator Part Number: 68324893AC
$492.20 MSRP: $746.00You Save: $253.80 (35%)Ships in 1-2 Business Days
Jeep Cherokee Alternator Part Number: 56029740AA
$716.62 MSRP: $1095.00You Save: $378.38 (35%)
Jeep Cherokee Alternator Part Number: 68271763AB
$575.07 MSRP: $871.00You Save: $295.93 (34%)Ships in 1-2 Business Days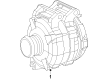
Jeep Cherokee Alternator Part Number: 56029622AC
$356.10 MSRP: $521.00You Save: $164.90 (32%)Ships in 1-3 Business DaysJeep Cherokee Alternator Part Number: R8271763AB
$341.92Ships in 1-2 Business Days

Jeep Cherokee Alternator Part Number: JR775127

Jeep Cherokee Alternator Part Number: JR775126

Jeep Cherokee Alternator Part Number: 56041822AB

Jeep Cherokee Front Speed Sensor Part Number: 56028686AA
Jeep Cherokee Alternator Part Number: JR775005
Jeep Cherokee Alternator Part Number: RL005685AB
Jeep Cherokee Alternator Part Number: 53006070
Jeep Cherokee Alternator Part Number: RL041822AA
Jeep Cherokee Alternator Part Number: 68271768AA
Jeep Cherokee Alternator
Choose OEM Alternator that meet Jeep factory standards. Jeep designs and tests every component for precision and durability. Each Alternator follows strict manufacturing steps to lock in quality and fit. If your Jeep Cherokee matters to you, OEM parts make the smart choice. You'll get the exact look, feel, and performance you expect. Shop genuine Cherokee parts at the highly competitive prices online. Enjoy a manufacturer's warranty, a hassle-free return policy, and rapid delivery. No more guesswork with off brands. Get genuine parts with exact fit and true factory performance. Shop with confidence today at JeepPartsDeal.com.
Jeep Cherokee automobiles' alternator is an important model that works as a charging system for the battery and as an onboard generator to power numerous parts while the vehicle is in operation. It works through the mechanism of turning the mechanical energy produced by the engine into electrical energy in the form of AC with the help of belt drive and is then changed into DC for use in recharging the battery or for powering electrical loads. For many years, Jeep Cherokee models have incorporated various types of alternators - rotating with different approaches to excitation, including permanents magnets and field coils. The only difference between these alternators is with the way the voltage is regulated, beginning with outside regulators with the initial models to inside regulators and then to the PCM. Getting a high output alternator is usually advised to modified Jeep Cherokee, as the vehicle's electrical load may increase during customization.
Jeep Cherokee Alternator Parts and Q&A
- Q: How to Effectively Service and Repair an Alternator on Jeep Cherokee?A:Start by removing the negative Battery Cable to prevent harm or damage to the electrical parts when servicing or repairing the alternator. Unwind the generator Drive Belt to get it out. After removing the generator pivot screw and mounting bolt/nut on a Left Hand Drive vehicle, ensure the generator can be accessed to make connections over the valves. In RHD vehicles, first remove both generator adjustment nuts and both belt adjustment bolts, then pull out the lower generator nut and position the assembly for the wire connectors. If you have an uncovered terminal, remove the plastic tab, loosen the nut behind the generator and pull off the B+ terminal. Push the tab on the field wire connector at the back of the generator and unplug it, then lift the generator from your car. Position the generator behind the engine and snap the end of the field wire connector into the generator's rear side. Secure the terminal from the B+ connection to the generator mounting stud by tightening the screw to 8.5 Nm (75 in. lbs.) Should the extension have a plastic cover, snap it securely to the B+ terminal. If your vehicle is LHD, fit the generators with the fasteners and tighten the upper mounting bolt to 55 Nm (41 ft. lbs.) torque and the lower pivot bolt/nut to the same. Never try to put a belt over a pulley rim by hand with a screwdriver or the belt could wear out quickly; you should also ensure the serpentine accessory drive belt does not run amiss as this might cause engine overheating. On LHD cars, connect the generator drive belt. Place the upper adjusting nut from the generator on RHD models, then add the two belt adjusting screws and the lower generator nut/bolt. After that, place the negative cable from the charger to the negative terminal on the battery.
- Q: How to Maintain and Fix an Alternator on Jeep Cherokee?A:Be sure to disconnect the negative cable of the battery before servicing or repairing the alternator. Take out the generator Drive Belt following the instructions in the Cooling System section. For Left Hand Drive vehicles, take out the generator pivot and mounting bolt/nut to get to the wire connectors. On Right Hand Drive (RHD) autos, take off the upper generator nut, both belt adjustment bolt heads and lastly the lower bolt or nut to reach the wires. Should the cover be present, remove it from the B+ terminal and unscrew the mounting nut hidden behind the generator for the B+ terminal. Loosen the field wire connector by pressing on the tab and unplug the connector and then take out the generator. To set up the generator, link it to the engine and snap the field wire connector into the back part of the generator. Simply connect the B+ terminal to the generator's mounting stud and tighten the nut with a torque of 10 Nm (90 in.lbs.). If you have the plastic cover, slide it onto the B+ terminal. On LHD vehicles, place in the generator and then tighten the upper fastening bolt to 55 Nm (41 ft.lbs.) and the lower bolt or nut to the same torque. Don't lift the belt over the pulley with a screwdriver, since this may harm the synthetic belt material and make sure the serpentine belt is correctly aligned to stop your engine from overheating. Follow the Cooling System procedures for LHD vehicles when installing the generator drive belt. For these vehicles, install the upper nut and the two belt adjustment bolts, followed by the generator lower nut/bolt. RHD cars depend on the generator to help align the serpentine belt, so always use the Cooling System procedures to get the belt routing, adjustment and bolt tightening correct. When finished, clamp or screw the negative cable once again to the battery.