JeepParts
My Garage
My Account
Cart
OEM Jeep Cherokee Drive Belt
Serpentine Belt- Select Vehicle by Model
- Select Vehicle by VIN
Select Vehicle by Model
orMake
Model
Year
Select Vehicle by VIN
For the most accurate results, select vehicle by your VIN (Vehicle Identification Number).
20 Drive Belts found


Jeep Cherokee Serpentine Belt Part Number: 4627166AC
$32.63 MSRP: $48.35You Save: $15.72 (33%)Ships in 1-2 Business Days


Jeep Cherokee Serpentine Belt Part Number: 53010269
$59.71 MSRP: $89.45You Save: $29.74 (34%)Ships in 1-2 Business Days


Jeep Cherokee Serpentine Belt Part Number: 4627534AA
$38.70 MSRP: $57.30You Save: $18.60 (33%)Ships in 1-2 Business Days


Jeep Cherokee Serpentine Belt Part Number: 53010314
$27.84 MSRP: $40.00You Save: $12.16 (31%)
Jeep Cherokee Serpentine Belt Part Number: 53010234AB
$39.29 MSRP: $86.90You Save: $47.61 (55%)Ships in 1-2 Business Days
Jeep Cherokee Serpentine Belt Part Number: 53011035AB
$26.83 MSRP: $58.10You Save: $31.27 (54%)Ships in 1-2 Business Days
Jeep Cherokee Serpentine Belt Part Number: 55111074AC
$24.19 MSRP: $48.85You Save: $24.66 (51%)Ships in 1-2 Business Days
Jeep Cherokee Serpentine Belt Part Number: 53010276
$46.62 MSRP: $92.90You Save: $46.28 (50%)Ships in 1-3 Business Days
Jeep Cherokee Serpentine Belt Part Number: 53031118AB
$43.71 MSRP: $56.40You Save: $12.69 (23%)Ships in 1-2 Business Days
Jeep Cherokee Serpentine Belt Part Number: 4893758AA
$51.53 MSRP: $76.55You Save: $25.02 (33%)Ships in 1-2 Business Days
Jeep Cherokee Serpentine Belt Part Number: B0013481
Jeep Cherokee Serpentine Belt Part Number: 53030913

Jeep Cherokee Serpentine Belt Part Number: 53012002

Jeep Cherokee Serpentine Belt Part Number: 53010311
Jeep Cherokee Drive Belt Part Number: B0013431AB

Jeep Cherokee Power Steering Belt Part Number: B0017465
Jeep Cherokee Serpentine Belt Part Number: Q4060817AB
Jeep Cherokee Serpentine Belt Part Number: 53010254AB
Jeep Cherokee Serpentine Belt Part Number: 53010257AC

Jeep Cherokee Water Pump Part Number: Q4061025
Jeep Cherokee Drive Belt
Choose OEM Drive Belt that meet Jeep factory standards. Jeep designs and tests every component for precision and durability. Each Drive Belt follows strict manufacturing steps to lock in quality and fit. If your Jeep Cherokee matters to you, OEM parts make the smart choice. You'll get the exact look, feel, and performance you expect. Shop genuine Cherokee parts at the highly competitive prices online. Enjoy a manufacturer's warranty, a hassle-free return policy, and rapid delivery. No more guesswork with off brands. Get genuine parts with exact fit and true factory performance. Shop with confidence today at JeepPartsDeal.com.
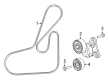
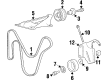
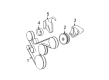
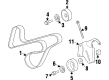
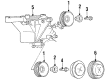
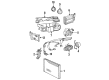
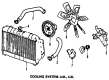
Drive Belt also referred to as serpentine belt in Jeep Cherokee cars is involved in linking a number of parts to the engine including the alternator and the A/C compressor. Usually, a serpentine belt is used, it goes round these components and connects them to the crankshaft pulley. We were able to put together this design as it facilitate power transmission that ensures the Jeep Cherokee runs other operations pertaining to its functionality. It is worth underlining that through the years Jeep Cherokee used different types of Drive Belts, that include V-belts, as well as multi-groove belts. V-belts offer high coefficient of friction and long-lasting service while multi-groove belts offer flexibility as well as adaptability to wide transmission paths. The effective lifespan of these Drive Belts extends approximately to 100,000 miles however early replacement may be needed if the belts exhibit signs of wear such as fraying or fractures. It is therefore very important that the proper care and maintenance of the Drive Belt is well achieved to avoid worst happening to both the parts as well as the performance of Jeep Cherokee's engine.
Jeep Cherokee Drive Belt Parts and Q&A
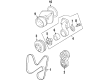
- Q: Is Proper Drive Belt Tension Crucial for Optimal Performance of Belt-Driven Engine Accessories on Jeep Cherokee?A:Having the drive belts set at the correct tension is important for the best operation of belt-driven accessories and several adjustment gauges are sold, with instructions included with them. For measuring tension, fit the gauge into the center of the section you are testing, making certain it touches only the belt. While the routing diagrams shown for different engines follow the latest guide, using the Belt Routing Label in the engine box will help if you see anything that looks wrong. In left-hand drive vehicles, both belt tension and belt position are changed at the power steering pump bracket and idler pulley assembly. Firs disconnect the negative Battery Cable, then loosen both the idler pulley bolt and the adjusting bolt. After assessing the pulleys, add a new belt and verify that its tension shows as correct according to the serpentine belt tension gauge after tightening the serial bolts and the idler pulley bolt, now at 47 Nm (35 ft. lbs.). Just like other engines, the first step for right-drive 4.0L models is to disconnect the negative battery cable. Then, you untighten the mounting bolts on both the lower and upper side of the alternator along with the adjusting bolt above. With pulley inspection done, fit and tighten a replacement belt, fasten all the bolts and test for proper tension on the belt.
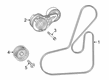
- Q: How to Replace or Adjust a Drive Belt on Jeep Cherokee?A:To change or adjust the drive belt, you should begin by disconnecting the battery's negative cable first. Release the idler pulley bolt at the power steering bracket and keep loosening the adjusting bolt until the belt can come off the pulleys. Look at all the pulleys closely after taking away the belt. Position the new serpentine belt correctly to keep the engine from getting hot because the Water Pump is rotating the wrong way as a result. Attach the new belt and use the tension gauge to tighten the adjusting bolt until the belt gets its proper tension. After the belt is at the proper tension, turn the idler pulley bolt clockwise to reach 47 Nm (35 ft. lbs.). Once the idler pulley is in place, review the belt tension and adjust it if it's not right. Having the drive belt tension set properly is crucial for the best performance of your engine accessories and different gauges exist to help with checking either type of belt. Place the gauge you are given in the middle of the section being tested, confirming not to allow the gauge to press against anything but the belt.


Related Jeep Cherokee Parts
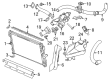
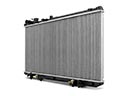 Jeep Cherokee Radiator
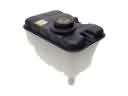 Jeep Cherokee Coolant Reservoir
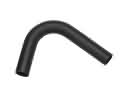 Jeep Cherokee Radiator Hose
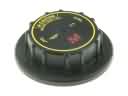 Jeep Cherokee Radiator Cap
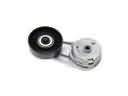 Jeep Cherokee Belt Tensioner
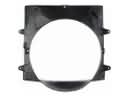 Jeep Cherokee Fan Shroud
 Jeep Cherokee Radiator Support
 Jeep Cherokee Thermostat Gasket
 Jeep Cherokee Thermostat Housing
 Jeep Cherokee A/C Idler Pulley
 Jeep Cherokee Belt Tensioner Bolt
 Jeep Cherokee Coolant Reservoir Hose