JeepParts
My Garage
My Account
Cart
OEM Jeep Cherokee Radiator
Cooling Radiator- Select Vehicle by Model
- Select Vehicle by VIN
Select Vehicle by Model
orMake
Model
Year
Select Vehicle by VIN
For the most accurate results, select vehicle by your VIN (Vehicle Identification Number).
17 Radiators found


Jeep Cherokee Radiator Part Number: 68525071AA
$250.84 MSRP: $379.00You Save: $128.16 (34%)Ships in 1-2 Business Days


Jeep Cherokee Radiator Part Number: 68197299AC
$235.37 MSRP: $355.00You Save: $119.63 (34%)

Jeep Cherokee Radiator Part Number: 68291180AA
$244.21 MSRP: $369.00You Save: $124.79 (34%)Ships in 1-2 Business Days


Jeep Cherokee Radiator Part Number: 68229284AB
$267.41 MSRP: $404.00You Save: $136.59 (34%)Ships in 1-2 Business Days


Jeep Cherokee Radiator Part Number: 68284108AA
$270.73 MSRP: $409.00You Save: $138.27 (34%)Ships in 1-2 Business Days
Jeep Cherokee Radiator Part Number: 68291177AA
$278.46 MSRP: $421.00You Save: $142.54 (34%)
Jeep Cherokee Radiator Part Number: 68291178AA
$267.39 MSRP: $394.00You Save: $126.61 (33%)


Jeep Cherokee Radiator Part Number: 52080115AC


Jeep Cherokee Radiator Part Number: 52080104AC


Jeep Cherokee Radiator Part Number: 55037652AA


Jeep Cherokee Radiator Part Number: 5191929AA

Jeep Cherokee Radiator Part Number: 52003695
Jeep Cherokee Radiator Part Number: 52029118AC
Jeep Cherokee Radiator Part Number: 52029046AC
Jeep Cherokee Radiator Part Number: 52079693AE
Jeep Cherokee Radiator Part Number: 52029047AC
Jeep Cherokee Radiator Part Number: 52079682AF
Jeep Cherokee Radiator
Choose OEM Radiator that meet Jeep factory standards. Jeep designs and tests every component for precision and durability. Each Radiator follows strict manufacturing steps to lock in quality and fit. If your Jeep Cherokee matters to you, OEM parts make the smart choice. You'll get the exact look, feel, and performance you expect. Shop genuine Cherokee parts at the highly competitive prices online. Enjoy a manufacturer's warranty, a hassle-free return policy, and rapid delivery. No more guesswork with off brands. Get genuine parts with exact fit and true factory performance. Shop with confidence today at JeepPartsDeal.com.
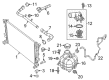
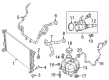
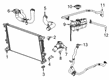
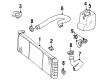
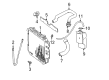
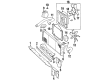
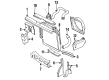
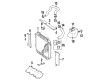
The Radiaor in Jeep Cherokee vehicles is one of the key parts of the entire cooling system, its primary function is to avoid engine overheating. Located at the front of the vehicle above the engine, it consists of tubes and fins through which the coolant is passed so as to be cooled by air. It is installed in a way that it can easily draw fresh air while the front grille serves to safeguard the Radiator and any obstructions. Typical problems that are characteristic of Jeep Cherokee radiators include leakages and crackling that stem from negligence, mechanical pressures, and accidents. Cleaning and inspection of the radiator should be done continually in an effort to elongate the life of the equipment as well ensure that it is working efficiently. Altogether, the radiator plays an important role of a heat exchanger in order to ensure proper running of the engine as well as its durability.
Jeep Cherokee Radiator Parts and Q&A
- Q: How to Effectively Service and Repair a Radiator on Jeep Cherokee?A:To service and repair radiator, first, radiator fins have to be cleaned, with engine cold, sprayed with cold water and compressed air in the back of the radiator to clean out the debris from the radiator and the A/C Condenser. Then, inspect radiator cooling fins for damage wear or deterioration not bended or crushed since bended or crushed fins will affect heat exchange and cause higher operating temperature of cooling system. Also, check plastic end tanks for cracks or damage / leaks and radiator neck for damage or distortion.
- Q: How to Properly Remove and Install a Radiator on Jeep Cherokee?A:The first thing you should do is disconnect the negative Battery Cable and check that the system isn't hot or pressurized to protect yourself from injuries. After removing the pressure cap from the radiator, unscrew the mounting screws for the grill so you can access the radiator draincock. Set up a 24-inch x 1/4 inch ID drain hose on the radiator petcock and place the opposite end into a clean container to let the water out. If your car has one, unplug the electric cooling fan electrical connector and remove its two mounting bolts. Once the bolts are gone, raise the fan straight away. Unbolt the shroud supports and lift the shroud a small distance to clear the fan, placing it over the fan when you lift it. Disconnect and plug the automatic transmission fluid cooler lines and release them with Quick Connect Fitting Release Tool 6935 if it is used in your vehicle. Also, disconnect the radiator upper and lower hose clamps before unplugging the hoses. Place a mark showing the hood latch striker's position on the radiator crossmember. Then remove the hood latch striker, unbolt both upper crossmember to isolator nuts and remove the four upper crossmember bolts. Should the vehicle have air conditioning, take the mounting brackets off to remove the radiator from the condenser. While holding it up straight, remove the radiator from its place inside the engine compartment to avoid breaking its fins. To clean the radiator fins, run cold water and compressed air through the radiator's back side. Look over the cooling fins to see they are not damaged and also examine the plastic end tanks and radiator neck for wear or tears. First, set the radiator into the engine compartment and slide the dowels of the radiator onto the rubber grommets found in the lower crossmember. When you have air conditioning, put the condenser in place beside the radiator using the included brackets. Attach the upper crossmember with the four bolts and secure it using the two upper crossmember-to-isolator nuts to 10 Nm (86 in-lbs.) torque and if you removed the isolator-to-radiator nuts, tighten them to 5 Nm (47 in-lbs.) torque. Refit the hood latch striker to its marked place, join the upper and lower radiator hoses and join any applicable automatic transmission fluid cooler lines. Seat the fan and its mounting tabs at the bottom of the fan shroud into the slots on the bottom of the radiator bracket; tighten all four bolts to 3 Nm/31 inch lbs. Install the power cord from the electric cooling fan, slide the mechanical cooling fan shroud into place and secure it. Once you have located the draincock, shut it off, set the grill back to place, reattach the negative battery cable, flood the cooling system with the correct coolant and seal everything with the pressure cap. In the end, check and adjust the level of ATF in your truck if it features an automatic gearbox.


Related Jeep Cherokee Parts
 Jeep Cherokee Thermostat
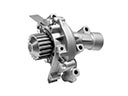 Jeep Cherokee Water Pump
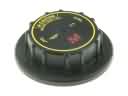 Jeep Cherokee Radiator Cap
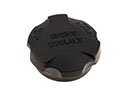 Jeep Cherokee Coolant Reservoir Cap
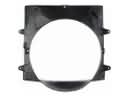 Jeep Cherokee Fan Shroud
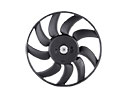 Jeep Cherokee Radiator fan
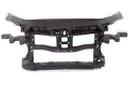 Jeep Cherokee Radiator Support
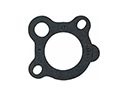 Jeep Cherokee Thermostat Gasket
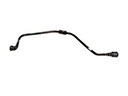 Jeep Cherokee Coolant Reservoir Hose
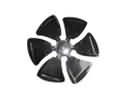 Jeep Cherokee Fan Blade
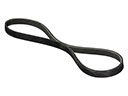 Jeep Cherokee V-Belt
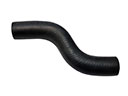 Jeep Cherokee Water Hose