JeepParts
My Garage
My Account
Cart
OEM Jeep Cherokee Timing Cover
Engine Timing Cover- Select Vehicle by Model
- Select Vehicle by VIN
Select Vehicle by Model
orMake
Model
Year
Select Vehicle by VIN
For the most accurate results, select vehicle by your VIN (Vehicle Identification Number).
5 Timing Covers found


Jeep Cherokee Timing Cover Part Number: 53020222
$185.73 MSRP: $254.00You Save: $68.27 (27%)Ships in 1-2 Business Days

Jeep Cherokee Timing Cover Part Number: 5048201AA
$140.38 MSRP: $211.00You Save: $70.62 (34%)Ships in 1-2 Business Days
Jeep Cherokee Timing Cover Part Number: 68104731AG
$566.78 MSRP: $833.00You Save: $266.22 (32%)
Jeep Cherokee Timing Cover Part Number: 5048523AB

Jeep Cherokee Timing Cover Part Number: 4796590
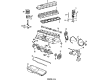
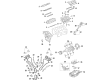
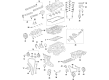
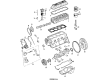
Jeep Cherokee Timing Cover
Choose OEM Timing Cover that meet Jeep factory standards. Jeep designs and tests every component for precision and durability. Each Timing Cover follows strict manufacturing steps to lock in quality and fit. If your Jeep Cherokee matters to you, OEM parts make the smart choice. You'll get the exact look, feel, and performance you expect. Shop genuine Cherokee parts at the highly competitive prices online. Enjoy a manufacturer's warranty, a hassle-free return policy, and rapid delivery. No more guesswork with off brands. Get genuine parts with exact fit and true factory performance. Shop with confidence today at JeepPartsDeal.com.
The Timing Cover of Jeep Cherokee automobile is an important part that plays a vital role in protecting the timing of the vehicles engine which can employ a timing belt, timing chain, or the cam belt. Made of metals like aluminum, plastic or steel, the Timing Cover shields the delicate teeth of these parts from harm occasioned by debris. A good number of Jeep Cherokee Timing Covers has the added advantage of including gaskets which boost the security of timing belt. The use of different Timing Covers in Jeep Cherokee models has occasioned the application of new styles to suit different engines over the years. Though they are very robust, it can break at any one time hence the need for timely replacement to ensure safe use of vehicle. In fact, maintenance of the Timing Cover forms a very important aspect in the durability and efficiency of the Jeep Cherokee.
Jeep Cherokee Timing Cover Parts and Q&A
- Q: How to Service and Repair a Timing Cover on Jeep Cherokee?A:Before working on the timing cover, unplug the battery's negative terminal and loosen the accessory Drive Belt. Then, take the fan brackets away from the timing cover and remove the fan and hub plus the shroud. Should the vehicle have it, remove the A/C compressor and generator bracket assembly from the engine cylinder head and lay it aside. After that, undo all of the vibration damper bolts together with the bolts holding the Oil Pan-to-timing case cover and the timing case cover-to-cylinder block cover. Open the timing case cover and remove the gasket together, then remove the Crankshaft oil seal from the cover's front. Before installation, wipe the gasket surfaces found on the timing case cover, oil pan and cylinder block. Hold a new crankshaft oil seal in the timing case cover, open edge facing inward and fix it with the 6139 Seal Installation Tool. Apply the gasket to the cylinder block and sit the timing case cover over the oil pan gasket and the cylinder block. Put Timing Case Cover Alignment and Seal Installation Tool 6139 into the crankshaft opening in the cover, then mount the bolts for attaching the timing cover to both the cylinder block and oil pan. The 1/4 inch bolts between the cover and the block go in at 7 Nm (60 in. lbs.), the 5/16 inch bolts on the front need 22 Nm (192 in. lbs.) and tighten the bolts holding the oil pan to the cover at 9.5 Nm (84 in. lbs.). Once the cover alignment tool is removed, next place a thin layer of engine oil on the hub of the vibration damper seal, using Silicone Rubber Adhesive Sealant on the crankshaft keyway as you insert it into the key. Apply a thin layer of grease on the vibration damper, washer and bolt and attach them with the bolt tightened to 108 Nm (80 ft. lbs.). You should install the A/C compressor and generator bracket assembly before installing the engine fan and hub assembly with shroud. After that, put on the accessory drive belt and secure it to the required tightness and reconnect the negative cable to the battery.

Related Jeep Cherokee Parts
 Jeep Cherokee Oil Filter
 Jeep Cherokee Camshaft
 Jeep Cherokee Crankshaft
 Jeep Cherokee Transmission Mount
 Jeep Cherokee Coolant Filter
 Jeep Cherokee Crankshaft Gear
 Jeep Cherokee Crankshaft Pulley
 Jeep Cherokee Crankshaft Thrust Washer
 Jeep Cherokee Cylinder Head Gasket
 Jeep Cherokee Motor And Transmission Mount
 Jeep Cherokee Timing Belt Tensioner
 Jeep Cherokee Valve Cover Grommet