JeepParts
My Garage
My Account
Cart
OEM 2000 Dodge Neon Camshaft
Cam- Select Vehicle by Model
- Select Vehicle by VIN
Select Vehicle by Model
orMake
Model
Year
Select Vehicle by VIN
For the most accurate results, select vehicle by your VIN (Vehicle Identification Number).
1 Camshaft found

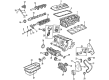
2000 Dodge Neon Camshaft Part Number: 4777128
$314.32 MSRP: $398.46You Save: $84.14 (22%)Ships in 1-2 Business DaysProduct Specifications- Other Name: Camshaft, Machined
- Item Weight: 6.70 Pounds
- Condition: New
- Fitment Type: Direct Replacement
- SKU: 4777128
- Warranty: This genuine part is guaranteed by Mopar's factory warranty.
2000 Dodge Neon Camshaft Parts and Q&A
- Q: How to Successfully Remove and Install a Camshaft on 2000 Dodge Neon?A: Unclamp the fuel tank, detach the cylinder head cover and then place marks on the rocker arm shafts to see that they are restored correctly. Remove the bolts from the rocker arm shaft as well as the timing belt, timing belt tensioner and camshaft sprocket. After that, remove the rear timing belt cover and the cylinder head. Unhook the camshaft sensor and the camshaft target magnet and afterward, remove the camshaft from the back of the cylinder head. Be on the lookout for blocked oil holes in the cylinder head, signs of camshaft bearing wear and any scratches on the journals; you can smooth over light scratches with 400 grit sandpaper, but deep ones mean you'll likely need a new camshaft with potential cylinder head damage. See if there is pitting or damage on the lobes and if you notice these issues, replace the rocker arm or hydraulic lash adjuster. If your lobes show signs of pitting, put in a new camshaft. First, tighten the camshaft onto the journal bearings with plenty of oil and continue with oiling other shafts without installing the rocker arm assemblies. Share the insert the camshaft target magnet and tighten the mounting screw to 3.4 Nm (30 in. lbs.), then add the camshaft position sensor and tighten its screws to 9 Nm (80 in. lbs.). To check the camshaft end play, attach a dial indicator to the stationary part of the cylinder head and move the camshaft backward; zero the dial and then move the camshaft forward to take the reading. End play should be between 0.13 - 0.33 mm (0.005 - 0.013 inch). After the video is installed, install the front camshaft seal, then put the rear timing belt cover in place, tighten the camshaft sprocket to 116 Nm (85 ft. lbs.), attach the timing belt tensioner and then put the timing belt in. Install the rocker arm assemblies as they were removed, tightening them as you go to 28 Nm (250 in. lbs.,) then install and tighten the cylinder head cover with 12 Nm (105 in. lbs.). After that, mount the ignition coil and spark plug cables, tighten the fasteners to 12 Nm (105 in. lbs.) and allow the camshaft and crankshaft to be synchronized again by going to the "miscellaneous" setting, picking "re-learn cam/crank," and following the instructions that appear on the scan tool screen.
Related 2000 Dodge Neon Parts
 2000 Dodge Neon Oil Pan Gasket
 2000 Dodge Neon Crankshaft Pulley
 2000 Dodge Neon Crankshaft Timing Gear
 2000 Dodge Neon Cylinder Head Gasket
 2000 Dodge Neon Dipstick
 2000 Dodge Neon Dipstick Tube
 2000 Dodge Neon Exhaust Valve
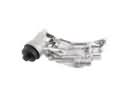 2000 Dodge Neon Oil Filter Housing
 2000 Dodge Neon Piston
 2000 Dodge Neon Rocker Arm
 2000 Dodge Neon Rocker Arm Pivot
 2000 Dodge Neon Valve Stem Seal