JeepParts
My Garage
My Account
Cart
OEM 2001 Dodge Neon Camshaft
Cam- Select Vehicle by Model
- Select Vehicle by VIN
Select Vehicle by Model
orMake
Model
Year
Select Vehicle by VIN
For the most accurate results, select vehicle by your VIN (Vehicle Identification Number).
2 Camshafts found

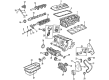
2001 Dodge Neon Camshaft Part Number: 4777128
$314.32 MSRP: $398.46You Save: $84.14 (22%)Ships in 1-2 Business DaysProduct Specifications- Other Name: Camshaft, Machined
- Item Weight: 6.70 Pounds
- Condition: New
- Fitment Type: Direct Replacement
- SKU: 4777128
- Warranty: This genuine part is guaranteed by Mopar's factory warranty.

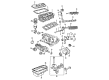
2001 Dodge Neon Camshaft Part Number: 4884325AA
Product Specifications- Item Weight: 8.10 Pounds
- Condition: New
- Fitment Type: Direct Replacement
- SKU: 4884325AA
- Warranty: This genuine part is guaranteed by Mopar's factory warranty.
2001 Dodge Neon Camshaft Parts and Q&A
- Q: How to Remove and Replace a Camshaft on 2001 Dodge Neon?A: Disconnect the battery's negative cable and remove the battery before you try to replace the camshaft. After that, disconnect the IAT sensor's electrical connector and pull off the air intake duct at the intake manifold and the throttle cables, TPS and IAC from the throttle body and then disconnect the air make-up hose from the air cleaner housing. After that, remove the air cleaner housing, the battery tray, the timing belt and the camshaft sprocket. Under the cylinder head cover, mark each of the rocker arm shaft assemblies and then detach the rocker arm and shafts using those as your reference points. Empty the cooling system until the fluid is below the heater hose, take off the ECT sensor connector and remove the tubing from the heater supply and return ports. Take out the bolts on the bracket that holds the heater tube, then remove both PDC attaching screws and reposition the PDC to allow easy camshaft removal. Drop the camshaft sensor and camshaft target magnet on the fuel system. Afterward, remove the camshaft located at the rear of the cylinder head and realign the heater tubes and PDC. Lift off the camshaft seal and give the camshaft a clean with an appropriate solvent. Watch for any harm and tightness in the camshaft journals and meanwhile, see if the cylinder head shows any damage or oil-hole blockage if binding occurs. Look at the cam lobe and bearing areas for any unusual wear or breaks and if the camshaft is bad, change it. Determine how much the lobe has worn by using a standard of 0.0254 mm (0.001inch) and a wear limit of 0.254 mm(0.010 inch), exchanging the camshaft if it is worn too much. Make sure the camshaft journals are oiled before putting the camshaft in place in the cylinder head, repositioning the PDC and heater tubes so they don't interfere. Attach the target magnet to the camshaft tip, using a 3.4 Nm (30 in. lbs.) torque wrench, then fix the camshaft position sensor in place. The camshaft end-play should be checked after mounting the camshaft, but before installing the camshaft seal. Set the front camshaft seal and the timing belt rear cover in place, without tightening the camshaft sprocket bolt with an impact wrench to prevent damaging the camshaft timing pin; tighten the camshaft sprocket by hand up to 115 Nm (85 ft. lbs.). Place the timing belt and tensioner before installing the rocker arm assemblies in the correct order, tightening them by 28 Nm (250 in. lbs.). Set in place the cylinder head cover, keep the ignition coil and spark plug cables close and firmly fasten ignition coil mounts at 12 Nm (105 in. lbs.). Attach the heater tube bracket bolt, join the heater hoses to the tubes and attach the ECT electrical cable again. Next, screw the PDC plates, insert the battery cover and set in the air cleaner assembly and then join all the necessary connections between the throttle body, IAT, vibration damper and engine. Also, put in the battery, attach the cables and perform the camshaft and crankshaft timing relearn procedure in the "miscellaneous" menu by using the DRB scan tool connected to the data link in the passenger compartment, turning the ignition switch on, selecting "re-learn cam/crank," and following the instructions on the DRB screen.
Related 2001 Dodge Neon Parts
 2001 Dodge Neon Oil Pan Gasket
 2001 Dodge Neon Crankshaft Pulley
 2001 Dodge Neon Crankshaft Timing Gear
 2001 Dodge Neon Dipstick
 2001 Dodge Neon Dipstick Tube
 2001 Dodge Neon Exhaust Valve
 2001 Dodge Neon Intake Valve
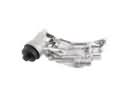 2001 Dodge Neon Oil Filter Housing
 2001 Dodge Neon Piston
 2001 Dodge Neon Rocker Arm
 2001 Dodge Neon Rocker Arm Pivot
 2001 Dodge Neon Valve Stem Seal