JeepParts
My Garage
My Account
Cart
OEM Dodge Neon Camshaft
Cam- Select Vehicle by Model
- Select Vehicle by VIN
Select Vehicle by Model
orMake
Model
Year
Select Vehicle by VIN
For the most accurate results, select vehicle by your VIN (Vehicle Identification Number).
7 Camshafts found


Dodge Neon Camshaft Part Number: 4781681AB
$299.46 MSRP: $457.00You Save: $157.54 (35%)
Dodge Neon Camshaft Part Number: 4781679AB
$220.27 MSRP: $457.00You Save: $236.73 (52%)Ships in 1-2 Business Days
Dodge Neon Camshaft Part Number: 4777128
$338.72 MSRP: $429.39You Save: $90.67 (22%)Ships in 1-2 Business Days
Dodge Neon Camshaft Part Number: 4884325AB

Dodge Neon Camshaft Part Number: 4884325AA

Dodge Neon Exhaust Camshaft Part Number: 4777632AA

Dodge Neon Camshaft Part Number: 4667667
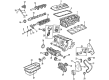
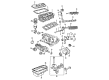
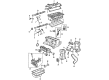
Dodge Neon Camshaft
Choose OEM Camshaft that meet Dodge factory standards. Dodge designs and tests every component for precision and durability. Each Camshaft follows strict manufacturing steps to lock in quality and fit. If your Dodge Neon matters to you, OEM parts make the smart choice. You'll get the exact look, feel, and performance you expect. Shop genuine Neon parts at the highly competitive prices online. Enjoy a manufacturer's warranty, a hassle-free return policy, and rapid delivery. No more guesswork with off brands. Get genuine parts with exact fit and true factory performance. Shop with confidence today at JeepPartsDeal.com.
Camshaft in Dodge Neon automobiles is known to help in controlling the operations of the intake and exhaust valves which allow the admission of the air fuel blend into the engine chamber and the discharge of the exhaust gases as well. Dodge Neon camshaft is usually made from iron or steel and works through the eccentric lobes for the valves opening. Camshaft is synchronized with the crankshaft to ensure the right time of valve operating to gain the maximum efficiency. Camshaft configuration that has been used in Dodge Neon models include Over Head Valve (OHV), Single Over Head Cam (SOHC) and Double Over Head Cam (DOHC). All the types have an impact on the engines in unique ways, for example, DOHC provide individual camshafts for intake and exhaust, which yield better result at high engine speeds. The manufacture camshafts in the can also progress these characteristics with variants of lift, duration, and lobe separation according to the driving purpose.
Dodge Neon Camshaft Parts and Q&A
- Q: How to Remove and Install a Camshaft on Dodge Neon?A:Before removing the camshaft, first remove and separate the negative battery cable, next disconnect the positive battery cable and remove the battery. Following that, remove the IAT sensor electrical connector, the Air Duct at the Throttle Body, the Throttle Cables, TPS and JAC connectors and the make-up air hose at the air cleaner housing. Take out the air cleaner housing, the Battery Tray, the Timing Belt covers in front and rear, the timing belt and finally the tensioner, followed by the camshaft sprocket. Lift the cylinder head cover, remembering to mark the rocker arm shaft assembly for correct reinstallation and next remove the rocker arm and shafts assembly. Rain the coolant under the heater hose line, remove the electrical link from the ECT sensor and take hoses from the heater supply and return tubes. Remove the bolts at the rear of the cylinder head that secure the heater tube bracket, reposition the PDC for removing the camshaft and remove both the camshaft sensor and its associated target magnet. After removing the camshaft from the back of the cylinder head, relocate both the heater tubes and air pump and pull out the Camshaft Seal. Wash the camshaft using a proper solvent and inspect the journals on the camshaft for problems and binding, ensuring the cylinder head is not damaged and the oil holes are clean. Check cam lobe and bearing areas for damage, change the camshaft if it is worn out and measure the camshaft for actual wear, replacing it if the reading is over 0.0254 mm (0.001 inch) or beyond the 0.254 mm (0.010 inch) limit. Before fastening the camshaft, lubricate its journals with oil and set the PDC and heater tubes aside carefully to make room for the camshaft in the cylinder head. Insert the camshaft target magnet into the camshaft, apply 3.4 Nm (30 in. lbs.) of torque to the mounting screw and then insert the Camshaft Position Sensor. Calculate the end-play of the camshaft before putting in the seal and after, fit and secure the rear timing belt cover and the camshaft sprocket on the camshaft, keeping in mind not to use an impact wrench for tightening the bolt that holds the sprocket in place. When tightening the bolt to 115 Nm (85 ft. lbs.), make sure the sprocket is being held by Special Tools C-4687 and modified Adaptor C-4687-1. Put the timing belt and tensioner into place, next install the front timing belt cover. Assemble the rocker arms safely and make sure to tighten them in order to 28 Nm (250 in. lbs.) and once the rocker arms are in, you should place the cylinder head cover, Ignition Coil and spark plug cables before tightening the ignition coil fasteners to 12 Nm (105 in. lbs.). Install the bracket for the heater tube, connect the heater hoses to the heater tubes and place back the ECT electrical connector. Attach the screws for the PDC, set in the battery tray and add the air cleaner housing assembly. After, put back the air intake duct at the throttle body, the throttle cables, TPS and JAC connectors and make-up air hose at the air cleaner housing. Plug back in the IAT sensor, put in the battery, secure both battery cables to their corresponding terminals, add the appropriate amount of coolant and use the DRB 1116 tool linked to the data link connector to initiate the camshaft and Crankshaft timing relearn procedure as described below.

Related Dodge Neon Parts
 Dodge Neon Cylinder Head
 Dodge Neon Engine Mount
 Dodge Neon Crankshaft Pulley
 Dodge Neon Crankshaft Thrust Washer
 Dodge Neon Cylinder Head Gasket
 Dodge Neon Engine Mount Bracket
 Dodge Neon Exhaust Valve
 Dodge Neon Lash Adjuster
 Dodge Neon Rocker Arm Pivot
 Dodge Neon Timing Chain Guide
 Dodge Neon Timing Chain Tensioner
 Dodge Neon Timing Cover Gasket