JeepParts
My Garage
My Account
Cart
OEM 2000 Dodge Neon Rack And Pinion
Steering Rack And Pinion- Select Vehicle by Model
- Select Vehicle by VIN
Select Vehicle by Model
orMake
Model
Year
Select Vehicle by VIN
For the most accurate results, select vehicle by your VIN (Vehicle Identification Number).
2 Rack And Pinions found

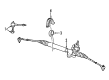
2000 Dodge Neon Steering Gear Part Number: 4656184AG
Product Specifications- Other Name: Gear - Rack And Pinion; Rack and Pinion Assembly; Gear Assembly
- Replaces: 4656184AF
- Item Weight: 18.50 Pounds
- Condition: New
- Fitment Type: Direct Replacement
- SKU: 4656184AG
- Warranty: This genuine part is guaranteed by Mopar's factory warranty.
2000 Dodge Neon Steering Gear Part Number: R0400244
Product Specifications- Other Name: Gear - Pinion; Rack and Pinion Assembly; Steering Gearbox; Gear Assembly
- Replaces: 5272421AF, 5272421AG
- Item Weight: 21.90 Pounds
- Item Dimensions: 54.6 x 11.3 x 6.3 inches
- Condition: New
- Fitment Type: Direct Replacement
- SKU: R0400244
- Warranty: This genuine part is guaranteed by Mopar's factory warranty.
2000 Dodge Neon Rack And Pinion Parts and Q&A
- Q: What Preparations Are Essential for Rack and Pinion Removal and Installation on 2000 Dodge Neon?A: Make sure the steering wheel is set straight and that a steering wheel holder is in place to stop the steering wheel from moving which will maintain the Clock Spring's direction. Inside the car, pick out the steering column coupling retainer pin, unscrew the pinch bolt nut and extract the pinch bolt and finally, pull apart the upper and lower steering column connections. Lift the vehicle, remove it from the ground and take out the front tire and wheel assemblies. Grab the outer tie rod stud in place and remove the nuts behind the knuckle using a wrench. Unhook the wire clip from the outer tie rod with Remover and remove the heat shield on the tie rod using Special Tool MB991113. Take out the securing tab on the power steering fluid pressure switch wiring harness connector and disconnect them. Remove the tube nut holding the power steering fluid pressure hose to the rack and pinion and if you don't have a power steering fluid cooler, break loose the return hose from the rack and pinion; else, break loose the cooler hose. Take the power steering return hose out of the C-clamps and open the routing clips to pull the power steering fluid pressure hose free. Should you attach a winch cooler, unfasten the screws anchoring it to the front suspension crossmember and leave the cooler hanging by the side. Remove the bolt that secures the engine to the torque strut and then use paint or pencil to draw a line on the right forward corner of the body showing the crossmember's location. Raise the front crossmember up with a transmission jack, knock out the two bottom bolts inside it and loosen the two rear bolts until they can be pulled out from inside the body threads. Lower the crossmember below the row of bolts, disconnect the power steering rack and pinion, drive out the roll pin securing the rack and pinion to the steering column lower coupling and pull off the dash cover seal around the pinion shaft. Take out the power steering rack and pinion's bolts from the front suspension crossmember, install the new one and secure it with the original bolts to 61 Nm (45 ft. lbs.). Place the dash cover seal over the pinion shaft, sliding the steering column coupling onto the shaft's pinion end and insert the roll pin. Center the rack and pinion and raise it and the crossmember and power steering rack and pinion, until they reach their mounting places. The rear crossmember mounting bolts should be started into the tapping plates and the front bolts should be installed as well, giving them about 2 Nm (20 inch lbs.) of tightness. Put the frame rails into their original place using the scribe marks and tighten the rear bolts to 203 Nm (150 ft. lbs.) and the front to 142 Nm (105 ft. lbs.). Put the engine torque strut back, clean the ends of the power steering hoses and rack and pinion ports, change the pressure hose O-ring and put some power steering fluid on it. Place the pressure hose onto the rack and pinion, reconnect the cooler line (if it is there) and snap the hose into the routing clips. If your vehicle has a cooler, connecting it to the front suspension crossmember is recommended and remember to position the hose clamps correctly. Assemble the alignment of the return hose and pull the harness over it, plus reconnect the connector for the pressurized steering fluid pressure switch. Put the tie rod heat shield on the tie rod for every outer tie rod, join the tie rod end to the steering knuckle, insert the nut onto the stud and turn the nut to 55 Nm (40 ft. lbs.). Insert the main tire and wheel assembly into the vehicle and tighten the wheel mounting nuts up to 135 Nm (100 ft. lbs.). After that, lower the car. Attach the dash-to-lower coupling seal, link the steering column lower coupling to the upper coupling, tighten the pinch bolt nut to 28 Nm (250 inch lbs.) and pin the retainer into place. After taking out the steering wheel holder, check that the lower coupling does not touch or squeak against the sealing rubber around the dash, then perform the Power Steering Pump Initial Operation service, watch out for fluid leaks and check and adjust the toe setting in front.
Related 2000 Dodge Neon Parts
 2000 Dodge Neon Power Steering Pump
 2000 Dodge Neon Steering Wheel
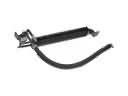 2000 Dodge Neon Power Steering Cooler
 2000 Dodge Neon Power Steering Hose
 2000 Dodge Neon Steering Column
 2000 Dodge Neon Steering Column Cover
 2000 Dodge Neon Steering Gear Box
 2000 Dodge Neon Tie Rod End