JeepParts
My Garage
My Account
Cart
OEM 2001 Dodge Neon Rack And Pinion
Steering Rack And Pinion- Select Vehicle by Model
- Select Vehicle by VIN
Select Vehicle by Model
orMake
Model
Year
Select Vehicle by VIN
For the most accurate results, select vehicle by your VIN (Vehicle Identification Number).
4 Rack And Pinions found

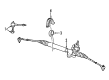
2001 Dodge Neon Steering Gear Part Number: 5272574AD
Product Specifications- Other Name: Gear - Power Steering; Rack and Pinion Assembly; Steering Gearbox; Gear Assembly
- Replaces: 5272643AD, 5272574AB, 5272574AC, 5272643AE
- Item Weight: 20.30 Pounds
- Condition: New
- Fitment Type: Direct Replacement
- SKU: 5272574AD
- Warranty: This genuine part is guaranteed by Mopar's factory warranty.
2001 Dodge Neon Steering Gear Part Number: 4656750AG
Product Specifications- Other Name: Gear - Rack And Pinion; Rack and Pinion Assembly; Gear Assembly
- Replaces: 4656750AD, 4656750AF, 5272866AA, 5272866AB
- Item Weight: 19.40 Pounds
- Condition: New
- Fitment Type: Direct Replacement
- SKU: 4656750AG
- Warranty: This genuine part is guaranteed by Mopar's factory warranty.

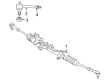
2001 Dodge Neon Gear Assembly Part Number: 5272490AG
Product Specifications- Other Name: Gear - Rack And Pinion; Rack and Pinion Assembly
- Replaces: 5272490AE, 5272490AF
- Item Weight: 21.80 Pounds
- Item Dimensions: 63.9 x 10.8 x 6.7 inches
- Condition: New
- Fitment Type: Direct Replacement
- SKU: 5272490AG
- Warranty: This genuine part is guaranteed by Mopar's factory warranty.
2001 Dodge Neon Steering Gear Part Number: 5272500AG
Product Specifications- Other Name: Gear - Rack And Pinion; Rack and Pinion Assembly; Gear Assembly
- Replaces: 5272500AF, 5272500AE, 5272500AD
- Item Weight: 20.20 Pounds
- Condition: New
- Fitment Type: Direct Replacement
- SKU: 5272500AG
- Warranty: This genuine part is guaranteed by Mopar's factory warranty.
2001 Dodge Neon Rack And Pinion Parts and Q&A
- Q: How to Remove and Install a Rack and Pinion Steering Gear on 2001 Dodge Neon?A: Before you remove the rack and pinion, turn the steering wheel straight and secure it with a steering wheel holder. Starting in the passenger area, get rid of the steering column coupling retainer pin, ease off the pinch bolt nut and remove the pinch bolt under it. Once you've removed them, separate the upper and lower steering column coupling pieces. Lift the vehicle and take out both front tire and wheel assemblies. Take out the nuts holding the outer tie rods to the steering knuckles, while keeping the tie rod stud fixed. Place Remover, Special Tool Mb991113, on the outer tie rod at the steering knuckles and turn it counterclockwise to take off the tie rod heat shield. Press the tab that holds the wiring harness together for the power steering fluid pressure switch and remove it from its socket. Withdraw the tube nut joining the power steering fluid pressure hose to the rack and pinion, release the clamp and cut off the fluid cooler hose from the rack and pinion. Remove the front routing clips from the power steering rack and pinion and take out the hydraulic hose at the same time as you remove the cooler tube from the right clip. Let the cooler dangle by removing the two screws from the front suspension crossmember. Take out the fasteners for the drive-belt splash shield and remove the shield, next remove the pencil strut from the right front corner of the crossmember and body and finally take out the washer from the washer on the torque strut bolt. After taking out the bolts that mount the engine torque strut, draw a line on the vehicle body along the front suspension crossmember. Install a transmission jack at the center of the front suspension crossmember and raise it to hold the crossmember up. Take out two front bolts on the front suspension crossmember, while loosening the rear bolts until they no longer grip the frame rails, maintaining safe lock within the body isolator. Lower the front suspension crossmember to the point where you can take out the power steering rack and pinion from the rear. Strike the roll pin holding the steering column lower coupling to the power steering rack and pinion pinion shaft with a roll pin punch and pull the coupling off the shaft. Slide the pinion shaft cover seal from its position on the tabs and lift it off of the housing. Unbolt the four fasteners that hold the power steering rack and pinion to the front suspension crossmember and pull out the rack and pinion. The rack and pinion goes on the front suspension crossmember and is fixed in place using all four bolts tightened to 61 Nm (45 ft. lbs.). Attach the dash cover seal to the power steering pinion shaft after checking that the holes fit with the tabs on the housing. Connect the flat on the lower coupling in the steering column to the flat on the pinion shaft and slide the coupling over the shaft. Since the roll pin hole matches the groove, just insert and install the roll pin now. Drive the car forward until the power steering rack and pinion is level and then bring the front suspension crossmember and power steering rack and pinion up until it hits its support. Put the rear crossmember mounting bolts into the tapping plates and install the front mounting bolts, tightly them enough that the bolts slip about 2 Nm (20 inch lbs.). line up the front suspension crossmember using a soft hammer to the spots where you made the marks and tighten the rear bolts to 203 Nm (150 ft. lbs.) and the front to 142 Nm (105 ft. lbs.). Put in the mounting bolts for the engine torque strut and then put a washer up against the bolt on the strut. Fix the pencil strut to the inside of the steering column where it meets the right front corner, then tighten the nuts so the torque is 58 Nm (43 ft. lbs.). Attach the drive-belt splash shield onto the engine, together with its fasteners. Use a lint-free towel to clean both the hose ends and the power steering rack and pinion ports and put a fresh, greased O-ring on the pressure hose. Fit the power steering fluid pressure hose onto the rack and pinion and start threading the tube nut without tightening it. Bring the cooler line back together if you have it, remove the routing clips and put the power steering fluid pressure hose in the clips. Put the cooler into place and attach the tube into the correct routing clip, then close the routing clips and screw the tube nut at the rack and pinion until it reaches 34 Nm (25 ft. lbs.). Join the cooler to the front crossmember securely with the two screws. Put the hose clamp on the hose, so the clamp is past the steel part and slide the hose onto the fitting, securing at the bead. Send the hose that receives the fluid back down the front of the rack and pinion, clipping it as you go. After check wiring, securely connect the power steering fluid pressure switch by turning the locking tab. For every outer tie rod, position the tie rod heat shield at the outer end of the knuckle, connect the outer tie rod end, start screwing on the nut, prevent the stud from rotating as you tighten the nut and then tighten to 55 Nm (40 ft. lbs.). After you put back the tire and wheel, secure the wheel with the mounting nuts by turning them to 135 Nm (100 ft. lbs.) and finally lower the vehicle. Cover the plastic part of the lower coupling with the dash-to-lower coupling seal, making sure the seal's lip has grease. Securely fasten the steering column lower coupling to the upper coupling, put in the pinch bolt and tighten the nut to 28 Nm (250 inch lbs.), before installing the pinch bolt retainer pin. Take the steering wheel holder out and test that the lower coupling doesn't squeak on the dash-to-coupling seal as you rotate the steering wheel. Before driving, perform the Power Steering Pump Initial Operation to fill the power steering system, look for leaks and adjust the car's front toe setting.
Related 2001 Dodge Neon Parts
 2001 Dodge Neon Power Steering Pump
 2001 Dodge Neon Steering Wheel
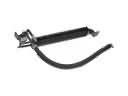 2001 Dodge Neon Power Steering Cooler
 2001 Dodge Neon Power Steering Hose
 2001 Dodge Neon Steering Column
 2001 Dodge Neon Steering Column Cover
 2001 Dodge Neon Steering Gear Box
 2001 Dodge Neon Tie Rod End