JeepParts
My Garage
My Account
Cart
OEM 2000 Jeep Grand Cherokee Timing Cover
Engine Timing Cover- Select Vehicle by Model
- Select Vehicle by VIN
Select Vehicle by Model
orMake
Model
Year
Select Vehicle by VIN
For the most accurate results, select vehicle by your VIN (Vehicle Identification Number).
1 Timing Cover found

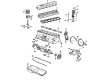
2000 Jeep Grand Cherokee Timing Cover Part Number: 53010421
Product Specifications- Other Name: Cover - Timing Belt; Engine Timing Cover; Front Cover; Cover Timing Belt
- Condition: New
- Fitment Type: Direct Replacement
- SKU: 53010421
- Warranty: This genuine part is guaranteed by Mopar's factory warranty.
2000 Jeep Grand Cherokee Timing Cover Parts and Q&A
- Q: How to Maintain and Fix a Timing Cover on 2000 Jeep Grand Cherokee?A: Stop by unlinking the negative battery cable from the timing cover first. Get rid of the vibration damper, fan and hub assembly and fan shroud. Take out the accessory drive brackets from the timing case cover, then remove the A/C compressor (if it is there) along with the generator bracket assembly from the engine cylinder head and set everything aside. After the mains and rods are off, unbolt and remove the cover for the oil pan-to-timing case and its bolts for the case to the block separately. Gently pry the crankshaft oil seal out of the front side of the timing case cover. Before mounting, wash both surfaces of the timing case cover, oil pan and cylinder block with the gasket. Insert the crankshaft oil seal into the timing case cover, making sure the open end is directed inward and use Seal Installation Tool 6139 inside the engine to guide the installation. Postion the gasket on the cylinder block and lay the timing case cover over it and the oil pan gasket. Position Timing Case Cover Alignment and Seal Installation Tool 6139 in the opening for the crankshaft in the top cover. Tighten the 1/4 inch bolts from the timing case cover to the cylinder block to 7 Nm (60 in. lbs.), the 5/16 inch front cover-to-block bolts to 22 Nm (192 in. lbs.) and the oil pan-to-cover 1/4 inch bolts to 9.5 Nm (84 in. lbs.). Take out the cover alignment tool, apply a small amount of engine oil to the vibration damper hub of the seal and put Mopar Silicone Rubber Adhesive Sealant on the keyway in the crankshaft before you put in the key. After you have the key, put in the vibration damper, washer and bolt, lubricate and tighten them to 108 Nm (80 ft. lbs.). After that, put back the A/C compressor if included, next the generator bracket assembly, then the fan and hub assembly and shroud. After that, fit the serpentine drive belt and reattach the negative cable to the battery.
Related 2000 Jeep Grand Cherokee Parts
 2000 Jeep Grand Cherokee Oil Pan Gasket
 2000 Jeep Grand Cherokee Crankshaft
 2000 Jeep Grand Cherokee Cylinder Head
 2000 Jeep Grand Cherokee Dipstick
 2000 Jeep Grand Cherokee Harmonic Balancer
 2000 Jeep Grand Cherokee Cam Gear
 2000 Jeep Grand Cherokee Camshaft Bearing
 2000 Jeep Grand Cherokee Engine Mount Bracket
 2000 Jeep Grand Cherokee Exhaust Valve
 2000 Jeep Grand Cherokee Intake Valve
 2000 Jeep Grand Cherokee Oil Filler Cap
 2000 Jeep Grand Cherokee Rod Bearing