JeepParts
My Garage
My Account
Cart
OEM 2001 Chrysler Sebring ABS Control Module
Anti Lock Brake Control Module- Select Vehicle by Model
- Select Vehicle by VIN
Select Vehicle by Model
orMake
Model
Year
Select Vehicle by VIN
For the most accurate results, select vehicle by your VIN (Vehicle Identification Number).
4 ABS Control Modules found

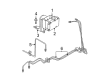
2001 Chrysler Sebring Control Module Part Number: 5093774AA
$601.57 MSRP: $744.00You Save: $142.43 (20%)Ships in 1-2 Business DaysProduct Specifications- Other Name: Control - Anti-Lock Brake; ABS Control Module; ABS Control Unit; Control Unit Anti-Lock Brake
- Replaces: 5080634AA, 5093740AA
- Item Weight: 1.90 Pounds
- Condition: New
- Fitment Type: Direct Replacement
- SKU: 5093774AA
- Warranty: This genuine part is guaranteed by Mopar's factory warranty.

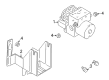
2001 Chrysler Sebring Modulator Valve Part Number: MR370625
Product Specifications- Other Name: Master Cylinder - Anti-Lock Brake System; ABS Hydraulic Assembly; ABS Control Module; Modulator; Hydraulic Control Unit Anti-Lock Brake System
- Item Weight: 7.90 Pounds
- Condition: New
- Fitment Type: Direct Replacement
- SKU: MR370625
- Warranty: This genuine part is guaranteed by Mopar's factory warranty.
2001 Chrysler Sebring Control Module Part Number: MR370624
Product Specifications- Other Name: Master Cylinder - Anti-Lock Brake System; ABS Hydraulic Assembly; Modulator Valve; Modulator; Hydraulic Control Unit Anti-Lock Brake System
- Item Weight: 6.70 Pounds
- Condition: New
- Fitment Type: Direct Replacement
- SKU: MR370624
- Warranty: This genuine part is guaranteed by Mopar's factory warranty.

2001 Chrysler Sebring Modulator Valve Part Number: 5018254AA
Product Specifications- Other Name: Accumulator - Anti-Lock Brake System; ABS Hydraulic Assembly; ABS Control Module; ABS Control Unit; Modulator; Hydraulic Control Unit Anti-Lock Brake System
- Condition: New
- Fitment Type: Direct Replacement
- SKU: 5018254AA
- Warranty: This genuine part is guaranteed by Mopar's factory warranty.
2001 Chrysler Sebring ABS Control Module Parts and Q&A
- Q: How to Service and Repair the ABS Control Module on 2001 Chrysler Sebring?A: Before handling the Electronic Brake Control Module, first remove the battery negative cable. Pull the vehicle up and press the CAB connector lock to release both electrical connectors from the CAB. Untighten the bolts holding the ICU's bracket onto the lower radiator support and slowly move the component to the right of the vehicle, making sure you do not bend the brake tubes. Eliminate the screws that holds the CAB and HCU together and then remove the CAB. To install the CAB, screw it to the HCU and tighten each screw to 2 Nm (17 in. lbs.) torque. Set the ICU mounting bracket into the lower radiator support and fix it in place by tightening the bolts to 28 Nm (21 ft. lbs.) torque. Plug the 24-way electrical into the pump and reconnect the pump/motor connector on the engine, then set the car back on the ground and join the negative battery cable. In the end, plug a DRB III into the vehicle and turn on the feature.
Related 2001 Chrysler Sebring Parts
 2001 Chrysler Sebring Brake Booster
 2001 Chrysler Sebring Brake Caliper
 2001 Chrysler Sebring Brake Caliper Bracket
 2001 Chrysler Sebring Brake Disc
 2001 Chrysler Sebring Brake Drum
 2001 Chrysler Sebring Brake Dust Shield
 2001 Chrysler Sebring Brake Line
 2001 Chrysler Sebring Brake Master Cylinder
 2001 Chrysler Sebring Brake Proportioning Valve
 2001 Chrysler Sebring Speed Sensor
 2001 Chrysler Sebring Wheel Bearing Dust Cap
 2001 Chrysler Sebring Wheel Stud